background image

EN

2

TILE CUTTER

Thank you for buying this Ferm product.

By doing so you now have an excellent product, 

delivered by one of Europeís leading suppliers. 

All products delivered to you by Ferm are 

manufactured according to the highest standards 

of performance and safety. As part of our 

philosophy we also provide an excellent customer 

service, backed by our comprehensive Warranty.

We hope you will enjoy using this product for 

many years to come.

 Read the operating instructions 

carefully before using this device. 

Familiarize yourself with its functions 

and basic operation. Service the device 

as per the instructions to ensure that it 

always functions properly. The 

operating instructions and the 

accompanying documentation must be 

kept in the vicinity of the device.

Contents

1.   Technical specifications

2.   Safety instructions

3.   Assembly

4.   Use

5.   Maintenance

1. Technical specifications

max. 10 mm

max. 400 mm

30-80 mm

0-45°

2.  Special safety instructions

1.  The tile cutting machine is fitted with a 

replaceable circular blade. Therefore, keep 

children away.

2.  After use the machine must be stored in a 

safe and dry place, away from children.

3.  This machine has been designed for cutting  

and breaking glazed tiles, and must not be 

used for any other purpose.

4.  When using the tile cutting machine make 

sure to keep extension leads and such away 

from the machine.

5.  Always place the tile cutting machine on a 

level and firm surface.

6.  CAUTION! The edges of cut tiles are sharp.

3. Assembly

Assemble the tile cutting machine as shown in the 

drawing.

Assembly of the tile cutting machine

Remove all the parts from the box and assemble 

the tile cutting machine as follows:

1.  Slide the black rubber feet (T) over the 

corners of the tile cutter. Slide a washer onto 

the bolt and push this into the rubber foot. 

Now slide a washer and a nut over the bolt on 

the back and fasten this properly. Repeat this 

for the other three corners.

2.  Mount the fastening blocks (N) with the 2 

tubes (M) onto the bottom plate (V) using the 

4 bolts (O) and washers (P).

3.  Screw the lever (H) onto the tube fastening (I).

4.  Finally, mount the sash angle (U) onto the 

bottom plate (V) using the knob (S) and 

washer.

Assembly of the hollow square chisel

1.  Place the hollow square chisel above the hole 

in the bottom plate (V).

2.  Make sure that the clamping plate (E) comes 

under the 2 tubes and fasten this using the 

socket head wrench supplied. The socket 

head wrench is situated in the black fastening 

plate (C).

3.  It is important that the drill (G) and the knife 

(F) are adjusted in such a way that they just 

touch the bottom plate (V). This adjustment 

can be done using the two nuts at the top of 

the hollow square chisel. Then fasten these 

nuts against each other.

3. How to cut and break tiles

1.  Use a soft-tipped (carpenter’s) pencil to mark 

off the cutting line. 

2.  Place the tile against the stop, the glazed 

side facing upward. The pencil mark must be 

Summary of Contents for TCM1012

Page 1: ...29 EN Original instructions 02 DE bersetzung der Originalbetriebsanleitung 04 NL Vertaling van de oorspronkelijke gebruiksaanwijzing 06 FR Traduction de la notice originale 08 ES Traducci n del manual...

Page 2: ...m the machine 5 Always place the tile cutting machine on a level and firm surface 6 CAUTION The edges of cut tiles are sharp 3 Assembly Assemble the tile cutting machine as shown in the drawing Assemb...

Page 3: ...important that the drill and the blade are adjusted in such a way that they just touch the base This adjustment can be made by means of the upper two nuts Make sure to tighten the nuts after adjustme...

Page 4: ...en Also nicht f r andere Arbeiten geeignet 4 Schneiden Sie keine Fliesen an Stellen an denen elektrische Verl ngerungsschn ren und dergleichen am Boden liegen 5 Benutzen Sie den Fliesenschneider auf e...

Page 5: ...Dies macht man indem man die Unterseite der Fliese ber die ganze L nge der Kerbe beklopft Die Bruchlinie wird sich dann durch die Fliese fortsetzen Dadurch wird die Fliese an der Bruchlinie brechen M...

Page 6: ...kende klantenservice die wordt ondersteund door onze uitgebreide garantie Wij hopen dat u vele jaren naar tevredenheid gebruik zult maken van dit product Voor uw eigen veiligheid en die van anderen ra...

Page 7: ...egels Indien u geen ervaring hebt met het gebruik van een tegelsnijder raden wij u aan eerst te oefenen met oude tegels 1 Teken met een zacht potlood de plaats af waar de tegel moet worden doorgesnede...

Page 8: ...euw exemplaar Doe dit als volgt Draai de schroef waarmee het mesje bevestigd is los en haal het mesje uit het apparaat Vervang dit mesje door een nieuw en draai de schroef weer vast Garantie Lees voor...

Page 9: ...le socle V Ce r glage peut s effectuer avec les deux crous sur le dessus de la perceuse trous Apr s cela placer et fixer ces crous l un contre l autre 4 Le d coupage de carreaux Si vous n avez pas d...

Page 10: ...u couteau Lorsque le couteau est us il pourra tre remplac par un nouvel exemplaire Faire cela comme suit Desserrer la vis qui fixe le couteau et retirer le couteau de l appareil Remplacer le couteau p...

Page 11: ...anera que justamente toquen la placa de fondo V Ese ajuste se puede hacer con las dos tuercas en la parte superior de la taladradora Despu s del ajuste estas tuercas hay que apretarlas en contra 4 Man...

Page 12: ...l di metro ser dos veces m s grande 3 Girando la manivela hacia la derecha primero se taladra un agujero y a continuaci n se obtiene un agujero mayor de la medida exacta 4 La manivela no debe ser empu...

Page 13: ...13...

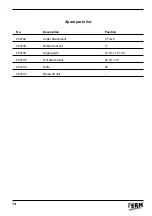
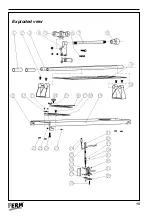
Page 14: ...parts list No Description Position 204102 Cutter attachment 5 TILL 8 204103 Rubber feet set 11 204104 Angle guide 12 TILL 18 20 204105 Drill attachment 24 TILL 38 204106 Knife 29 204107 Break off uni...

Page 15: ...Exploded view 15...

Page 16: ...www ferm com...

Reviews: