background image

Page 6

DUO

DUO

DUO

DUO

DUOX CITYLINE KIT 3-24L

X CITYLINE KIT 3-24L

X CITYLINE KIT 3-24L

X CITYLINE KIT 3-24L

X CITYLINE KIT 3-24L

DUO

DUO

DUO

DUO

DUOX CITYLINE KIT 3-24L

X CITYLINE KIT 3-24L

X CITYLINE KIT 3-24L

X CITYLINE KIT 3-24L

X CITYLINE KIT 3-24L

DIN rail Installation - DIN rail Installation

Fastened with screws

+ 18V

      1

. 5 A

50-60

 Hz. 5

0VA M

AX.

1 2 V

       1

A

FUEN

TE ALIM

ENTAC

ION

KIT DIGIT

AL

MA

DE

 IN 

SPA

IN

Disassembly

Assembly

 INSTALLING THE POWER SUPPLY

ENTRY PANEL INSTALLATION

1.70m

5.57 feet

1

2

4

M A R I A

L O R C A

3

INSTALLING THE MONITOR

Assembly

1

1.60m

5.25 feet

3

2

in B

in B

Bou

t

Bou

t

F1

1.60m

5.25 feet

2

1

in B

in B

Bou

t

Bout

F1

Disassembly

Summary of Contents for VIDEO CITYLINE DUOX 24L

Page 1: ...E S PA Ñ O L E N G L I S H MANUAL DE INSTALADOR Y USUARIO USER INSTALLER S MANUAL KIT VIDEO CITYLINE DUOX 3 24L VIDEO CITYLINE DUOX KIT 3 24L ...

Page 2: ...stándares de diseño y tecnología Su monitor de videoportero FERMAX le permitirá comunicarse con la placa de calle ver la persona que le está llamando y abrirle la puerta de entrada si así lo desea Esperamos disfrute de sus funcionalidades www fermax com Publicación técnica de caracter informativo editada por FERMAX ELECTRONICA S A U FERMAX ELECTRONICA en su política de mejora constante se reserva ...

Page 3: ... 10 Reset Mapeado código de llamada pulsador 10 Programación Tiempos de apertura de puerta 10 RESET parámetros a valores por defecto de fábrica mediante un teclado 11 Precableado 12 Características Técnicas 15 Esquemas de cableado 17 SECCION II MANUAL DE USUARIO 27 Monitor Veo 28 Botones 28 Programación Pantalla Menú Usuario 29 1 Ajuste volumen melodías 29 2 Modo no molestar cancelar tono de llama...

Page 4: ... CITYLINE KIT 3 24L X CITYLINE KIT 3 24L X CITYLINE KIT 3 24L X CITYLINE KIT 3 24L X CITYLINE KIT 3 24L DUO DUO DUO DUO DUOX CITYLINE KIT 3 24L X CITYLINE KIT 3 24L X CITYLINE KIT 3 24L X CITYLINE KIT 3 24L X CITYLINE KIT 3 24L ...

Page 5: ...24L X CITYLINE KIT 3 24L X CITYLINE KIT 3 24L X CITYLINE KIT 3 24L X CITYLINE KIT 3 24L DUO DUO DUO DUO DUOX CITYLINE KIT 3 24L X CITYLINE KIT 3 24L X CITYLINE KIT 3 24L X CITYLINE KIT 3 24L X CITYLINE KIT 3 24L Sección I Manual del Instalador ...

Page 6: ...4L X CITYLINE KIT 3 24L Instalación en carril DIN DIN rail Installation Fijación con tornillos 1 8 V 1 5 A 50 60 Hz 50VA MAX 1 2 V 1 A FU EN TE ALIMEN TACION KIT DIGITAL MA DE IN SPA IN Desmontaje Montaje INSTALACIÓNDELALIMENTADOR INSTALACIÓN PLACA DE CALLE 1 70m 5 57 feet 1 2 4 M A R I A L O R C A 3 INSTALACIÓN DELMONITOR Montaje Desmontaje 1 1 60m 5 25 feet 3 2 inB inB B out B out F1 1 60m 5 25 ...

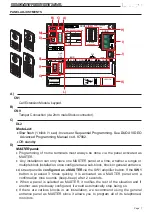
Page 7: ... DUOX VIDEO cod 97902 Apagado reposo CN9 Conexión Tamper mediante conector stocko macho paso 2mm DL2 B Placa MÁSTER La programación de los terminales de vivienda se realiza siempre desde la placa activada como MÁSTER En cualquier instalación sólo puede haber una placa MÁSTER a la vez ya sea una instalación de un sólo bloque o de varios ya esté configurada como placa de sub bloque de bloque o entra...

Page 8: ...o de sub bloque de 00 a 99 NN indica el número de vivienda del sub bloque de 00 a 99 No es necesario segregar la instalación según ésta jerarquía ya que el sistema se adapta a las necesidades de la instalación NOTAIMPORTANTE Configuración de parámetros por el instalador Para realizar la configuración en la placa de pulsadores Cityline ver ANEXO Configuración asistida por voz en placas de pulsadore...

Page 9: ... micrófono micrófono ubicado en el perfil inferior de la placa Versión del amplificador K L PL Nº SB BK EG Nº TYPE BK X 3 PL Nº SB BK EG Nº TYPE BK X 2 01 PL Nº SB BK EG Nº TYPE BK X 3 02 01 Etiqueta datos de programación Rellenar los campos de la etiqueta correspondientes a la programación realizada Ejemplo 1 Programación como Entrada General y Placa número 3 Ejemplo 2 Programación como Bloque 1 ...

Page 10: ...o dar alimentación y mantener pulsado el botón SW1 durante 5 segundos El led parpadeará rápidamente para indicar que se ha realizado la restauración del mapeado de pulsadores RESET Mapeado codigo de llamada pulsador El amplificador DUOX dispone de la función de Reset que permite restaurar los parámetros programados a valores de fábrica Los tiempos de activación de abrepuerta programables son dos T...

Page 11: ...ramación permanecer 10 segundos sin pulsar ninguna tecla Sonará un bip bip indicando la salida de programación de tiempos 5º A partir de este momento se puede quitar el cortocircuito entre las bornas Bs y negativo del amplificador y se puede utilizar el amplificador con normalidad RESET de parámetros a valores por defecto de fábrica mediante un teclado Se puede realizar un Reset de parámetros a va...

Page 12: ...n módulo de extensión de llamadas ref 2008 Conexión varios módulos de extensión de llamadas ref 2008 más de 8 pulsadores Pulsadores 9 16 Pulsadores 1 8 1 2 Al amplificador ARRIBA UP P1 ON B D A C E F PL Nº SB BK EG Nº TYPE BK DL2 CN9 TAMPER CN1 PACK EXTENSION SW1 PROG JP2 JP1 LEDS ON TERM OFF TERM ON LEDS OFF DUOX VIDEO AMPLIFICADOR AMPLIFIER ALIMENTACION POWER SUPPLY 18 Vdc JP1 JP2 BS S 12 C NC N...

Page 13: ...E F PL Nº SB BK EG Nº TYPE BK DL2 CN9 TAMPER CN1 PACK EXTENSION SW1 PROG JP2 JP1 LEDS ON TERM OFF TERM ON LEDS OFF DUOX VIDEO AMPLIFICADOR AMPLIFIER ALIMENTACION POWER SUPPLY 18 Vdc JP1 JP2 BS S 12 C NC NO B B GND EXIT MIC AUDIO LANGUAGE IDIOMA 18Vdc ONE C NC NO BUS CN3 CN2 TO ONE VERSION P2 SW1 CN9 CN1 JP3 JP2 2 1 3 4 8 5 6 7 11 9 10 13 12 16 14 15 REF 2441 MODULO EXTENSION 16 LLAMADAS 16 CALL EX...

Page 14: ...US LLAMADAS CALLS 16 EXTENSION CALL PACK 1 REF 2441 4 3 2 7 6 5 10 9 8 12 11 15 14 13 16 PACK EXTENSION 16 LLAMADAS SIGUIENTE NEXT ANTERIOR PREVIOUS LLAMADAS CALLS 17 31 15 19 18 32 16 20 2 4 1 3 MIC Si por cualquier motivo tiene que cambiar algún módulo de la placa recuerde que no debe colocar el cable del micrófono insertado a lo largo del perfil de la placa Aconsejamos ubicarlo en los clipajes ...

Page 15: ... en ambos sentidos 25º 55ºC 13º 131ºF Potencia audio sentido calle vivienda 1 W 0 15 W IP43 IK07 Valores Tiempo activación abrepuertas 01 99 seg por defecto 03 Tiempo activación botón salida 00 99 seg por defecto 06 Desactivado 00 Tiempo de conversación máximo 90 seg Tipo de Placa sub bloque bloque general por defecto bloque Número Bloque 00 99 por defecto 00 Número Sub Bloque 00 99 por defecto 00...

Page 16: ...encial de pulsadores tras cese actividad 60 seg Tiempo en programación inversa de pulsadores tras cese actividad 300 seg Capacidades Llamadas desde Placa Pulsadores 99 Llamadas desde Placa Teclado Sub Bloque 99 Bloque 9999 Entrada General 999999 Número de Placas Entradas Generales 10 Bloque 10 Sub Bloque 10 25 mA 230 mA Alimentación Consumo Temperatura de funcionamiento PantallaOSD Resolución 18 V...

Page 17: ...KIT 3 24L X CITYLINE KIT 3 24L X CITYLINE KIT 3 24L X CITYLINE KIT 3 24L X CITYLINE KIT 3 24L DUO DUO DUO DUO DUOX CITYLINE KIT 3 24L X CITYLINE KIT 3 24L X CITYLINE KIT 3 24L X CITYLINE KIT 3 24L X CITYLINE KIT 3 24L Esquemas de cableado ...

Page 18: ...2 JP1 LEDS ON TERM OFF TERM ON LEDS OFF DUOX VIDEO AMPLIFICADOR AMPLIFIER ALIMENTACION POWER SUPPLY 18 Vdc JP1 JP2 BS S 12 C NC NO B B GND EXIT MIC AUDIO LANGUAGE IDIOMA 18Vdc ONE C NC NO BUS CN3 CN2 TO ONE VERSION P2 SW1 CN9 CN1 Ref 3244 18Vdc 2A MADE IN SPAIN INPUT REF 3244 DUOX POWER SUPPLY ADAPTER MODULE OUTPUT 18Vdc 2A 18 Vdc IN PREV BUS PWR BUS PWR BUS B in B in A JP1 B DUOX LINE ADAPTOR REF...

Page 19: ...CN1 PACK EXTENSION SW1 PROG JP2 JP1 LEDS ON TERM OFF TERM ON LEDS OFF DUOX VIDEO AMPLIFICADOR AMPLIFIER ALIMENTACION POWER SUPPLY 18 Vdc JP1 JP2 BS S 12 C NC NO B B GND EXIT MIC AUDIO LANGUAGE IDIOMA 18Vdc ONE C NC NO BUS CN3 CN2 TO ONE VERSION P2 SW1 CN9 CN1 Ref 3244 18Vdc 2A MADE IN SPAIN INPUT REF 3244 DUOX POWER SUPPLY ADAPTER MODULE OUTPUT 18Vdc 2A 18 Vdc IN PREV BUS PWR BUS PWR BUS C B in B ...

Page 20: ... LEDS OFF DUOX VIDEO AMPLIFICADOR AMPLIFIER ALIMENTACION POWER SUPPLY 18 Vdc JP1 JP2 BS S 12 C NC NO B B GND EXIT MIC AUDIO LANGUAGE IDIOMA 18Vdc ONE C NC NO BUS CN3 CN2 TO ONE VERSION P2 SW1 CN9 CN1 Ref 3244 18Vdc 2A MADE IN SPAIN INPUT REF 3244 DUOX POWER SUPPLY ADAPTER MODULE OUTPUT 18Vdc 2A 18 Vdc IN PREV BUS PWR BUS PWR BUS B DUOX LINE ADAPTOR REF 3255 JP1 A B C JP1 B B in B in B DUOX LINE AD...

Page 21: ...ón de línea Duox 100 240V INPUT 100 240V 0 5 A 50 60 Hz OUTPUT 18 V 1 5 A ON OVERLOAD 18Vdc Ref 3244 18Vdc 2A MADE IN SPAIN INPUT REF 3244 DUOX POWER SUPPLY ADAPTER MODULE OUTPUT 18Vdc 2A 18 Vdc IN PREV BUS PWR BUS PWR BUS T Bin BinBout Bout A F1 F1 T Bin BinBout Bout A F1 F1 T Bin BinBout Bout A F1 F1 SW3 CN1 100 240V INPUT 100 240V 0 5 A 50 60 Hz OUTPUT 18 V 1 5 A ON OVERLOAD 18Vdc Ref 3244 18Vd...

Page 22: ... A Red F1 2A 2A Max 2A A A 110 240Vac 50 60Hz REF 2438 ADS LIGHT COMMANDER ACTIVADOR DE LUCES ADS 110 240Vac 110 240Vac Ref 2040 Ref 2438 12 Vdc CONEXIÓNABREPUERTAS 12Vdc P1 ON B D A C E F PL Nº SB BK EG Nº TYPE BK DL2 CN9 TAMPER CN1 PACK EXTENSION SW1 PROG JP2 JP1 LEDS ON TERM OFF TERM ON LEDS OFF DUOX VIDEO AMPLIFICADOR AMPLIFIER ALIMENTACION POWER SUPPLY 18 Vdc JP1 JP2 BS S 12 C NC NO B B GND E...

Page 23: ...n el uso de diferentes tipos de cable Para un funcionamiento ideal se recomienda utilizar cable paralelo de 2x1mm Ref 5925 Es preferible evitar 1 Doblar cables unir 2 pares para aumentar la sección 2 Utilizar diferentes tipos de cable o cambiar la sección a lo largo de la instalación 3 Cables sueltos hilos o cables para instalaciones eléctricas no dentro de manguera 4 Cables de diferentes longitud...

Page 24: ... ADAPTER MODULE OUTPUT 18Vdc 2A 18 Vdc IN PREV BUS PWR BUS PWR BUS F1 Ref 3244 Ref 3244 D max F1 40 24 40 24 40 24 40 24 40 24 40 24 18Vdc 3 5 A 18Vdc 1 5 A 40 24 40 24 40 24 Ref 3244 Ref 3244 Ref 3244 Ref 3244 Ref 3244 TABLAS SECCIONES DISTANCIAS INSTALACIÓN DE KITS DE VIDEO con FILTRO de 3 a 24 Líneas 1 TRONCAL Distancia máxima A Fuente Filtro hasta Placa Placa Abrepuertas i SECCIÓN CABLE Distan...

Page 25: ...X CITYLINE KIT 3 24L X CITYLINE KIT 3 24L X CITYLINE KIT 3 24L X CITYLINE KIT 3 24L DUO DUO DUO DUO DUOX CITYLINE KIT 3 24L X CITYLINE KIT 3 24L X CITYLINE KIT 3 24L X CITYLINE KIT 3 24L X CITYLINE KIT 3 24L CODIFICACIÓN IDIOMAS SINTETIZADOR DE VOZ ...

Page 26: ... 5 1 2 3 4 6 5 1 2 3 4 6 5 1 2 3 4 6 5 1 2 3 4 6 5 1 2 3 4 6 5 1 2 3 4 6 5 1 2 3 4 6 5 1 2 3 4 6 5 1 2 3 4 6 5 1 2 3 4 6 5 1 2 3 4 6 5 1 2 3 4 6 5 1 2 3 4 6 5 1 2 3 4 6 5 1 2 3 4 6 5 1 2 3 4 6 5 1 2 3 4 6 5 1 2 3 4 6 5 1 2 3 4 6 5 1 2 3 4 6 O N 1 2 3 4 5 6 SINTETIZADOR DE VOZ CODIFICACIÓN IDIOMAS Ver tabla CODE 16 17 18 19 20 21 22 23 24 25 26 27 28 29 30 62 63 castellano inglés francés holandés f...

Page 27: ...irir un producto de calidad El monitor de videoportero Veo con pantalla informativa a todo color para personalización de las funciones de usuario le permitirá comunicarse con la placa de calle ver la persona que le está llamando y abrirle la puerta de entrada si así lo desea Gracias a su menú en pantalla se incluyen nuevas prestaciones para la configuración de los parámetros del monitor Esperamos ...

Page 28: ...n los pulsadores correspondientes ubicados en el monitor Volvemos a la pantalla anterior o stand by Seleccionamos la opción previa del menú Marcamos la siguiente opción del menú Confirma la selección y activa la función Nota La línea blanca abajo del icono indica en la función en la que nos encontramos Al pulsar se selecciona F1 F1 F1 Botón Autoencendido Conexión con cámara del Bloque o de la Entr...

Page 29: ...ones 1 Volumen 2 Modo no molestar 3 F2 4 Configuración 1 2 3 4 1 Menú USUARIO Ajuste volumen melodías En primer lugar se muestra y se escucha el volumen actual que podrá ir aumentando o decrementando con los botones correspondientes a las flechas indicadas en pantalla 2 Menú USUARIO Modo No molestar cancelar el tono de llamada Función para desactivar el tono de llamada Cancelado el el tono de llam...

Page 30: ... Menú USUARIO CONFIGURACIÓN 4 1 1 Selección melodía placa Seleccionando esta opción se puede cambiar la melodía que se escuchará en el monitor cuando se realice una llamada desde la placa de la calle Una vez seleccionada muestra y se escucha la melodía actual pulsando el botón o se pueden ir seleccionando y escuchando las diferen tes melodías disponibles en el monitor La melodía escogida es la que...

Page 31: ...al monitor Una vez seleccionada esta opción muestra y se escucha la melodía actual pulsando el botón o se pueden ir seleccionando y escuchando las diferentes melodías disponibles en el monitor La melodía escogida es la que se escuchará en el monitor cuando la conserjería realice una llamada al monitor Para acceder a la información relativa al Sistema Duox manuales productos relacionados catálo gos...

Page 32: ...contraste y color mientras se halla recibido una llamada sin descolgar o realizando un autoencendido cámara ver capítulo Funcionamiento Autoencendido Teniendo la imagen de video en la pantalla realizar una pulsación corta en el botón MENU y aparecerá en pantalla un menú contextual para el ajuste del brillo contraste y color de la imagen 1 Seleccionar los ajustes de contraste brillo y color con los...

Page 33: ...un tono de llamada tanto en la placa de calle como en el monitor encendiéndose la pantalla Se puede descolgar el brazo y mantener una conversación con la placa de calle La comunicación finalizará automáticamente a los 90 se gundos o en cualquier momento al colgar el brazo del teléfono Si no se establece comunicación descolgando el brazo con la placa de calle el monitor se apaga automáticamente pas...

Page 34: ...meet the highest design and technology standards Your FERMAX video door entry system will allow you to communicate with the entry panel see who is calling you and open the front door if you wish We hope you enjoy its range of functions www fermax com Technical publication of an informative nature published by FERMAX ELECTRONICA S A U As part of its constant improvement policy FERMAX ELECTRONICA re...

Page 35: ...Restore default values Reset 10 RESET Mapping call button code 10 Programming Lock Release Times 10 RESET to default parameter values via keypad 11 Pre wiring 12 Technical Characteristics 15 Wiring Diagrams 17 SECTION II USER MANUAL 27 Veo Monitor 28 Buttons 28 Programming User Menu Screen 29 1 Ring tone volume settings 29 2 Do not disturb mode cancel call tone 29 3 F2 Function 30 4 Configuration ...

Page 36: ...X CITYLINE KIT 3 24L X CITYLINE KIT 3 24L X CITYLINE KIT 3 24L X CITYLINE KIT 3 24L X CITYLINE KIT 3 24L DUO DUO DUO DUO DUOX CITYLINE KIT 3 24L X CITYLINE KIT 3 24L X CITYLINE KIT 3 24L X CITYLINE KIT 3 24L X CITYLINE KIT 3 24L ...

Page 37: ...3 24L X CITYLINE KIT 3 24L X CITYLINE KIT 3 24L X CITYLINE KIT 3 24L X CITYLINE KIT 3 24L DUO DUO DUO DUO DUOX CITYLINE KIT 3 24L X CITYLINE KIT 3 24L X CITYLINE KIT 3 24L X CITYLINE KIT 3 24L X CITYLINE KIT 3 24L Section I Installation Manual ...

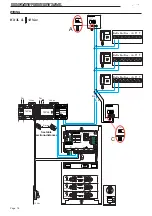
Page 38: ...T 3 24L X CITYLINE KIT 3 24L DIN rail Installation DIN rail Installation Fastened with screws 1 8 V 1 5 A 50 60 Hz 50VA MAX 1 2 V 1 A FU EN TE ALIMEN TACION KIT DIGITAL MA DE IN SPA IN Disassembly Assembly INSTALLINGTHEPOWERSUPPLY ENTRYPANELINSTALLATION 1 70m 5 57 feet 1 2 4 M A R I A L O R C A 3 INSTALLINGTHEMONITOR Assembly 1 1 60m 5 25 feet 3 2 inB inB B out B out F1 1 60m 5 25 feet 2 1 inB inB...
Page 39: ...gramming See DUOX VIDEO Advanced Programming Manual cod 97902 Off standby CN9 Tamper Connection via 2mm male Stocko connector DL2 B MASTER panel Programming of home terminals must always be done via the panel activated as MASTER Any installation can only have one MASTER panel at a time whether a single or multiple block installation once configured as a sub block block or general entrance A street...

Page 40: ... number from 00 to 99 NN indicates the sub Block house number from 00 to 99 You do not have to segregate the installation according to this hierarchy since the system adapts to the installation s needs IMPORTANTNOTE Configuration of the parameters by the installer To configure the Cityline push button panel see ANNEX Voice assisted configuration in button panels Instructions included with this equ...

Page 41: ...ts J MIC Microphone connection microphone located in the lower panel profile Amplifier Version K L PL Nº SB BK EG Nº TYPE BK X 3 PL Nº SB BK EG Nº TYPE BK X 2 01 PL Nº SB BK EG Nº TYPE BK X 3 02 01 Programming data tags Fill in the fields of the corresponding tags in the completed programming Example 1 Programming as General Entrance and Panel number 3 Example 2 Programming as Block 1 and Panel nu...

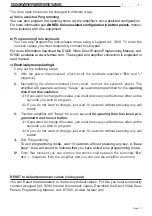
Page 42: ...ve power 2 With the SW1 button pressed power and maintain the SW1 button for 5 seconds The LED will blink quickly to indicate that button mapping has been restored RESET Mapping call button code The DUOX amplifier has a Reset function which can be used to restore programmed default parameters There are two programmable lock release activation times Lock release time set from the residence Lock rel...

Page 43: ...4 Exit Programming To exit programming mode wait 10 seconds without pressing any key A beep beep tone will sound to indicate that you have exited time programming mode 5º From that moment you can remove the short circuit between the terminals Bs and negative from the amplifier and you can use the amplifier as normal RESET to default parameter values via keypad You can Reset the parameters to the f...

Page 44: ...IRING Call extension module connection ref 2008 Various call extension modules connection ref 2008 more than 8 buttons Buttons 9 16 Buttons 1 8 1 2 To the ADS ARRIBA UP P1 ON B D A C E F PL Nº SB BK EG Nº TYPE BK DL2 CN9 TAMPER CN1 PACK EXTENSION SW1 PROG JP2 JP1 LEDS ON TERM OFF TERM ON LEDS OFF DUOX VIDEO AMPLIFICADOR AMPLIFIER ALIMENTACION POWER SUPPLY 18 Vdc JP1 JP2 BS S 12 C NC NO B B GND EXI...

Page 45: ...PL Nº SB BK EG Nº TYPE BK DL2 CN9 TAMPER CN1 PACK EXTENSION SW1 PROG JP2 JP1 LEDS ON TERM OFF TERM ON LEDS OFF DUOX VIDEO AMPLIFICADOR AMPLIFIER ALIMENTACION POWER SUPPLY 18 Vdc JP1 JP2 BS S 12 C NC NO B B GND EXIT MIC AUDIO LANGUAGE IDIOMA 18Vdc ONE C NC NO BUS CN3 CN2 TO ONE VERSION P2 SW1 CN9 CN1 JP3 JP2 2 1 3 4 8 5 6 7 11 9 10 13 12 16 14 15 REF 2441 MODULO EXTENSION 16 LLAMADAS 16 CALL EXTENS...

Page 46: ...SIGUIENTE NEXT ANTERIOR PREVIOUS LLAMADAS CALLS 16 EXTENSION CALL PACK 1 REF 2441 4 3 2 7 6 5 10 9 8 12 11 15 14 13 16 PACK EXTENSION 16 LLAMADAS SIGUIENTE NEXT ANTERIOR PREVIOUS LLAMADAS CALLS 17 31 15 19 18 32 16 20 2 4 1 3 MIC If for whatever reason you have to change a panel module remember to not place the microphone cable inside the panel s profile We suggest placing them on the modules clip...

Page 47: ...me can be regulated in both directions 25º 55º C 13º 131º F Audio power in entry panel Residence direction 1W 0 15 W IP43 IK07 Values Lock release activation time 01 99 sec Default 03 Exit button activation time 00 99 sec Default 06 Deactivated 00 Maximum conversation time 90 secs Panel type sub block block general default block Block number 00 99 by default 00 Sub Block number 00 99 by default 00...

Page 48: ...programming time after activity has stopped 60 secs Buttons inverse programming time after activity has stopped 300 secs Capacities Calls from the Button Panel 99 Calls from the Keypad panel Sub Block 99 Block 9999 General Entrance 999999 Number of Panels General entrances 10 Block 10 Sub Block 10 25 mA 230 mA Power supply Consumption Operating temperature OSD Screen Resolution 18 Vdc 5 40 C TFT4 ...

Page 49: ...NE KIT 3 24L X CITYLINE KIT 3 24L X CITYLINE KIT 3 24L X CITYLINE KIT 3 24L X CITYLINE KIT 3 24L DUO DUO DUO DUO DUOX CITYLINE KIT 3 24L X CITYLINE KIT 3 24L X CITYLINE KIT 3 24L X CITYLINE KIT 3 24L X CITYLINE KIT 3 24L Wiring Diagrams ...

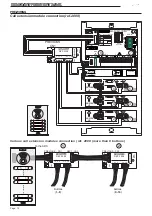
Page 50: ... JP2 JP1 LEDS ON TERM OFF TERM ON LEDS OFF DUOX VIDEO AMPLIFICADOR AMPLIFIER ALIMENTACION POWER SUPPLY 18 Vdc JP1 JP2 BS S 12 C NC NO B B GND EXIT MIC AUDIO LANGUAGE IDIOMA 18Vdc ONE C NC NO BUS CN3 CN2 TO ONE VERSION P2 SW1 CN9 CN1 Ref 3244 18Vdc 2A MADE IN SPAIN INPUT REF 3244 DUOX POWER SUPPLY ADAPTER MODULE OUTPUT 18Vdc 2A 18 Vdc IN PREV BUS PWR BUS PWR BUS B in B in A JP1 B DUOX LINE ADAPTOR ...

Page 51: ...R CN1 PACK EXTENSION SW1 PROG JP2 JP1 LEDS ON TERM OFF TERM ON LEDS OFF DUOX VIDEO AMPLIFICADOR AMPLIFIER ALIMENTACION POWER SUPPLY 18 Vdc JP1 JP2 BS S 12 C NC NO B B GND EXIT MIC AUDIO LANGUAGE IDIOMA 18Vdc ONE C NC NO BUS CN3 CN2 TO ONE VERSION P2 SW1 CN9 CN1 Ref 3244 18Vdc 2A MADE IN SPAIN INPUT REF 3244 DUOX POWER SUPPLY ADAPTER MODULE OUTPUT 18Vdc 2A 18 Vdc IN PREV BUS PWR BUS PWR BUS C B in ...

Page 52: ...ON LEDS OFF DUOX VIDEO AMPLIFICADOR AMPLIFIER ALIMENTACION POWER SUPPLY 18 Vdc JP1 JP2 BS S 12 C NC NO B B GND EXIT MIC AUDIO LANGUAGE IDIOMA 18Vdc ONE C NC NO BUS CN3 CN2 TO ONE VERSION P2 SW1 CN9 CN1 Ref 3244 18Vdc 2A MADE IN SPAIN INPUT REF 3244 DUOX POWER SUPPLY ADAPTER MODULE OUTPUT 18Vdc 2A 18 Vdc IN PREV BUS PWR BUS PWR BUS B DUOX LINE ADAPTOR REF 3255 JP1 A B C JP1 B B in B in B DUOX LINE ...

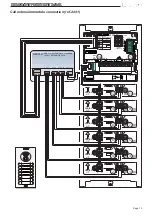
Page 53: ...PUT 100 240V 0 5 A 50 60 Hz OUTPUT 18 V 1 5 A ON OVERLOAD 18Vdc Ref 3244 18Vdc 2A MADE IN SPAIN INPUT REF 3244 DUOX POWER SUPPLY ADAPTER MODULE OUTPUT 18Vdc 2A 18 Vdc IN PREV BUS PWR BUS PWR BUS T Bin BinBout Bout A F1 F1 T Bin BinBout Bout A F1 F1 T Bin BinBout Bout A F1 F1 SW3 CN1 100 240V INPUT 100 240V 0 5 A 50 60 Hz OUTPUT 18 V 1 5 A ON OVERLOAD 18Vdc Ref 3244 18Vdc 2A MADE IN SPAIN INPUT REF...

Page 54: ...A Max 2A A A 110 240Vac 50 60Hz REF 2438 ADS LIGHT COMMANDER ACTIVADOR DE LUCES ADS 110 240Vac 110 240Vac Ref 2040 Ref 2438 12 Vdc DOOR LOCK RELEASE CONNECTION 12Vdc P1 ON B D A C E F PL Nº SB BK EG Nº TYPE BK DL2 CN9 TAMPER CN1 PACK EXTENSION SW1 PROG JP2 JP1 LEDS ON TERM OFF TERM ON LEDS OFF DUOX VIDEO AMPLIFICADOR AMPLIFIER ALIMENTACION POWER SUPPLY 18 Vdc JP1 JP2 BS S 12 C NC NO B B GND EXIT M...

Page 55: ...ion 2 Using different cable type or changing the section throughout the installation 3 Loose wires electrical installation wiring not within its hose 4 Different length cables As Duox is a system designed for replacement it works with the existing wiring in older installations Parallel black red 0 2mm minimum UTP CAT 5 Hose with several wires for example 5 wires 6 wires etc 4 N Installations Natur...

Page 56: ... IN SPAIN INPUT REF 3244 DUOX POWER SUPPLY ADAPTER MODULE OUTPUT 18Vdc 2A 18 Vdc IN PREV BUS PWR BUS PWR BUS F1 Ref 3244 Ref 3244 D max F1 40 24 40 24 40 24 40 24 40 24 40 24 18Vdc 3 5 A 18Vdc 1 5 A 40 24 40 24 40 24 Ref 3244 Ref 3244 Ref 3244 Ref 3244 Ref 3244 DISTANCE SECTION TABLE VIDEO KIT INSTALLATION with FILTER 3 and 24 Lines 1 RISER Maximum distance A Source Filter up to Panel Panel Lock r...

Page 57: ...24L X CITYLINE KIT 3 24L X CITYLINE KIT 3 24L X CITYLINE KIT 3 24L X CITYLINE KIT 3 24L DUO DUO DUO DUO DUOX CITYLINE KIT 3 24L X CITYLINE KIT 3 24L X CITYLINE KIT 3 24L X CITYLINE KIT 3 24L X CITYLINE KIT 3 24L LANGUAGE CODING VOICE SYNTHESIZER ...

Page 58: ...1 2 3 4 6 5 1 2 3 4 6 5 1 2 3 4 6 5 1 2 3 4 6 5 1 2 3 4 6 5 1 2 3 4 6 5 1 2 3 4 6 5 1 2 3 4 6 5 1 2 3 4 6 5 1 2 3 4 6 5 1 2 3 4 6 5 1 2 3 4 6 5 1 2 3 4 6 5 1 2 3 4 6 5 1 2 3 4 6 5 1 2 3 4 6 5 1 2 3 4 6 5 1 2 3 4 6 5 1 2 3 4 6 5 1 2 3 4 6 O N 1 2 3 4 5 6 VOICE SYNTHESISER LANGUAGE ENCODING See table CODE 16 17 18 19 20 21 22 23 24 25 26 27 28 29 30 62 63 Spanish English French Dutch Flemish German ...

Page 59: ...TYLINE KIT 3 24L X CITYLINE KIT 3 24L Congratulations on purchasing this quality product The Veo Monitor with an informative full colour screen allows you to communicate with the entry panel see the caller and open the entrance door if you wish Thanks to its on screen menu new features are included for configuring the monitor s parameters We hope you enjoy its range of functions www fermax com Sec...

Page 60: ...th the corresponding buttons located on the monitor Return to the previous screen or stand by Select the previous menu option Mark the following menu option Confirm the selection and activate the function Notice The white line below the icon indicates the function you are currently in Upon pressing it is selected F1 F1 Auto start button Connection with the Block s or General Entrance s camera depe...

Page 61: ...n There are the following options 1 Volume 2 Do not disturb mode 3 F2 4 Configuration 1 2 3 4 1 USER Menu Adjust ring tone volume First of all you see and hear the current volume which can be increased or decreased with the corresponding arrow buttons indicated on the screen 2 USER Menu Do not disturb mode cancel call tone Function for deactivating the call tone Cancel the call tone The monitor s ...

Page 62: ...nstaller 4 USER Menu CONFIGURATION 4 1 1 Select panel ring tone Selecting this option you can change the ring tone that is heard on the monitor when you make a call from the street panel Once selected it displays and sounds the current ring tone pressing the or button you can select and listen to the different available ring tones on the monitor The ring tone selected is what is heard on the monit...

Page 63: ...e guard unit makes a call to a monitor Once this option is selected it displays and sounds the current ring tone pressing the or button you can select and listen to the different available ring tones on the monitor The selected ring tone is what is heard on the monitor when the guard unit makes a call to a monitor To access the information relative to the Duox System manuals related products catal...

Page 64: ... to adjust brightness contrast and colour while you have received a call without hanging up or when performing an auto start camera see Functions chapter Auto start With the video image on the screen short press the MENU button and a menu appears on the screen to adjust the image s brightness contrast and colour 1 Select the contrast brightness and colour settings with the corresponding buttons Br...

Page 65: ...l and on the monitor causing the screen to start up You can pick up the phone receiver and have a conversation with the street panel The communication will automatically terminate after 90 seconds or at any time by hanging up the phone If communication is not established picking up the receiver with the entry panel the monitor will automatically turn off after 30 seconds With the monitor in standb...

Reviews: