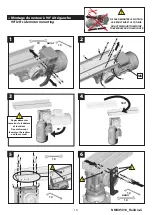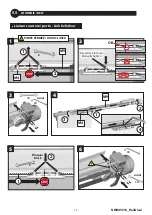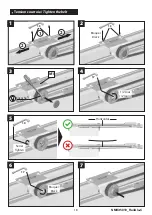
background image

NMKit5010_RailAlu-C

19

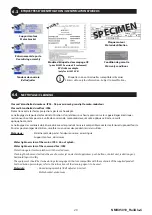
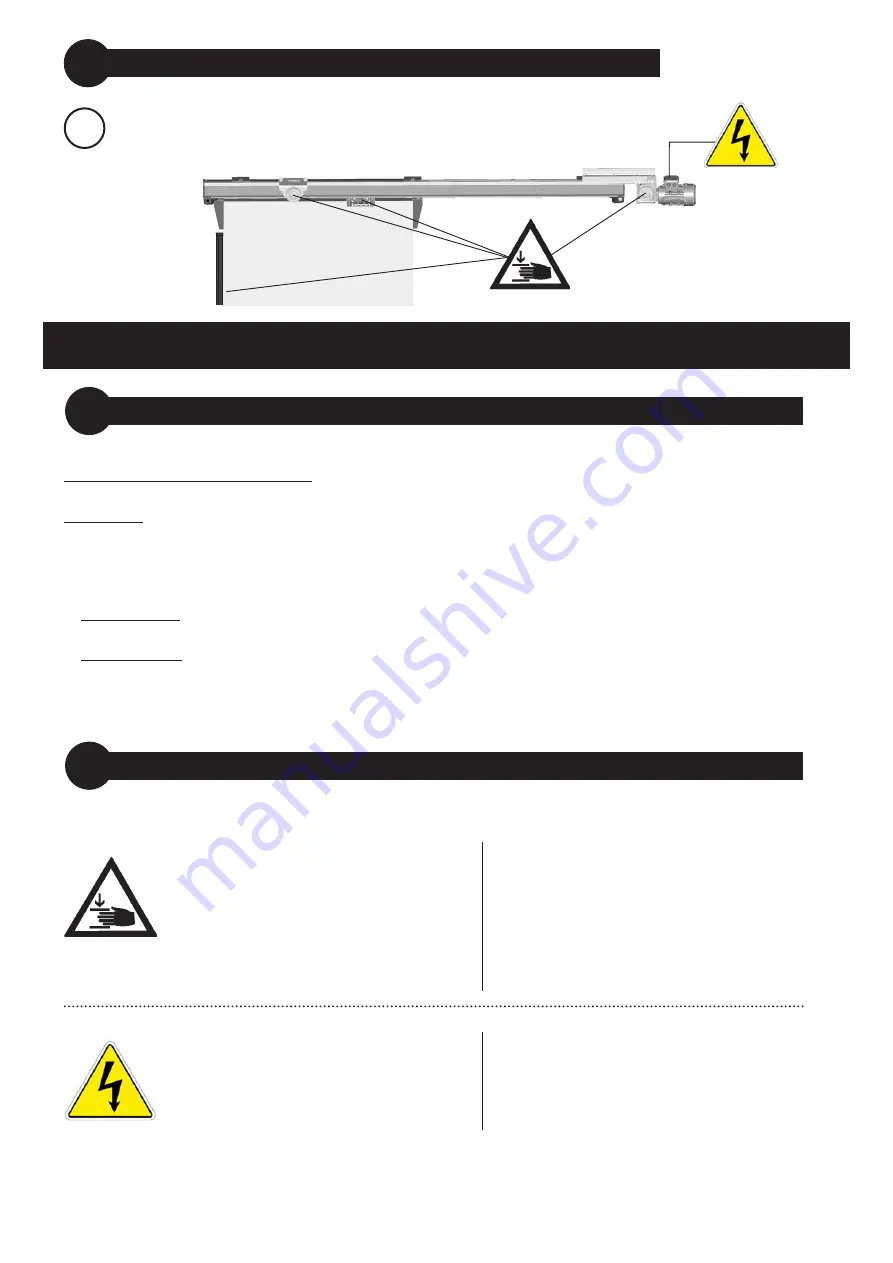
Les étiquettes doivent être placées le plus près possible des zones de risque.

Stickers must be as nearest as possible to the risk.

6 - UTILISATION / 

USING

Respecter les spécifications du § 4 - Caractéristiques du produit. Utiliser les commandes prévues (bouton, badge...).
En cas de panne des portes motorisées :

L'utilisateur peut ouvrir la porte en actionnant la poignée intérieure ou extérieure.
Précautions :
En cas d’urgence : Appuyer sur le bouton noir du boîtier de commande (arrêt du moteur).
En cas de panne : Couper le sectionneur et utiliser les poignées prévues à cet effet.

.  Ecrasement des doigts placés entre la

   courroie et les poulies (tendeur ou moteur)
.  Ecrasement des doigts placés entre

   l'entraînement de porte et le dessous du rail
.  Main placée entre le chariot et la butée,

   en fin d'ouverture ou de fermeture
.  Main placée sur la bande de roulement,

   lors du déplacement du vantail (galets)

.  Risque d’électrocution
.  Ne pas projeter d'eau
.  Ne pas projeter de poussières ou de copeaux
.  Ne rien introduire dans le coffret

   électrique


6.1

UTILISATION PREVUE / 

NORMAL USING


6.2

Risques consécutifs à des actions intentionnelles de personnes autres que l’utilisateur

Risks following intentional acts of persons other than the user

i

POSE DES ETIQUETTES DE SECURITE / 

SECURITY STICKERS FIXING


5.6

Respect § 4 specifications - Product Characteristics. Use the required commands (wall button, badge ...).
In case of failure:

The user can open the door with the internal or external handle.
Safety measures:

In case of emergency

:  push on the black button of the wall command box ( stop the motor).

In case of failure

: put the switch off and use the required handle.

.  

Crushing of fingers placed between the belt

   and the pulleys (belt adjuster and motor)

.

  Crushing of fingers placed between the door 

   drive and the above of the rail

.

  Handle between trolley and butt during the

   end of door opening or closing

.

  Handle on the way of the rollers, when the

   door moves

.  

Danger: risk of electric shock

.  

Do not spray with water

.  

Do not spray dust or shavings

.  

Do not introduce anything into

   command box

Summary of Contents for F5010SVPH

Page 1: ...legal action 1 Pr cautions de montage Mounting precautions 2 Transport 3 Stockage Storage 4 Caract ristiques du produit Characteristics 5 Montage m canique Mechanical mounting 5 1 Pr paration du rail...

Page 2: ...t withstands stacking of 4 others automatic kits 1 PRECAUTIONS DE MONTAGE MOUNTING PRECAUTIONS Veuillez respecter les r glementations en vigueur dans le pays d installation Les points suivants doivent...

Page 3: ...matic quip s du Kit 5010 S curit horizontale ou verticale en fonction des r glementations en vigueur dans le pays d installation Feu clignotant Nous consulter pour toute demande sp cifique bordure r s...

Page 4: ...50 2320 2420 M4 Entra nement de porte Door driving assembly M6 Ensemble moteur Motor unit M3 NE PAS UTILISER DO NOT USE M7 Visserie moteur Motor screws 2120 30 50 2320 2420 M5 NE PAS UTILISER DO NOT...

Page 5: ...0 B 2X 613 2X 593 2X 560 2X 565 Fermatic 2320 80 Kg maxi Fermatic 2120 60 Kg maxi Fermatic 2130 80 Kg maxi Fermatic 2150 120 Kg maxi Fermatic 2420 120 Kg maxi C X largeur de porte Door width R recouvr...

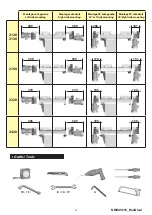
Page 6: ...59 181 155 160 151 206 176 185 180 10 13 4 8 10 17 Outils Tools Montage cot gauche Left side mounting Montage cot droit Right side mounting Montage90 cot gauche 90 Left side mounting Montage90 cot dro...

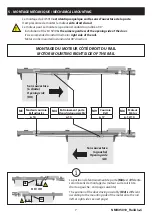
Page 7: ...de l entrainement de porte M4 est diff rente selon le sens de montage du moteur sur le rail c t droit ou gauche voir page suivante The position of the door driving assembly M4 is different according t...

Page 8: ...ail with very little changes compared with standard mounting It s necessary to Reverse the position of the belt adjuster M1 and its adjustment screw A Reverse the position of the door driving assembly...

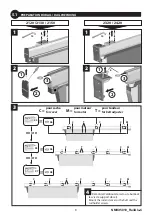
Page 9: ...X6 X8 X5 X7 2320 2420 2120 2130 2150 2 3 2 pour cache for cover C C C M T C C C C C M T OU OR OU OR 1 1 C M T pour moteur for motor pour tendeur for belt adjuster Remonter l embout de rail ou la but e...

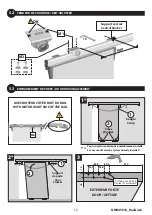
Page 10: ...ASSEMBLY 5 3 AVEC MOTEUR C T DROIT DU RAIL WITH MOTOR RIGHT SIDE OF THE RAIL M4 Pour un syst me Fermatic pr alablement install For a manual Fermatic system already installed Sangle Strap Cales Wedges...

Page 11: ...syst me Fermatic pr alablement install For a manual Fermatic system already installed Sangle Strap Cales Wedges 1 2 Support de porte Door bracket 1 2 EXTERIEUR PORTE DOOR OUTSIDE 10 20 32 5 32 5 32 5...

Page 12: ...150 A 206 15 B B A 1 2 M6 1 1 2 OK Bloquer Block Bloquer Block 13 1 1 2 2 3 4 Montage c t droit du rail 2120 2130 2150 Mounting right side of the rail B A 1 2 M6 1 1 2 OK 13 3 4 Haut Top Bas Bottom B...

Page 13: ...1 13 B 6 C M6 1 2 OK 13 3 4 B C 1 M6 1 2 OK 13 3 4 B C 1 1 B C A M7 2 Bloquer Block Bloquer Block 2 B C Haut Top Bas Bottom Montage c t droit du rail 2320 2420 Mounting right side of the rail NE PAS D...

Page 14: ...possible de monter celui ci en l inclinant 90 de fa on r duire son encombrement Depending on the system installation the space available in the right end rail can be short for mounting the motor in it...

Page 15: ...tion du moteur pour montage c t gauche Transformationofthemotorforleftsidemounting NE PAS DEMONTER LE MOTEUR LE REDUCTEUR ET LE CODEUR DO NOT DISMOUNT THE MOTOR THE REDUCER AND THE ENCODER Ne pas demo...

Page 16: ...4 6 ou or ou or Montage du moteur 90 c t gauche 90 left side motor mounting NE PAS DEMONTER LE MOTEUR LE REDUCTEUR ET LE CODEUR DO NOT DISMOUNT THE MOTOR THE REDUCER AND THE ENCODER Ne pas demonter le...

Page 17: ...C 17 STOP COURROIE BELT 5 5 Liaison courroie porte Link belt door 8 Bloquer Block 10 10 STOP 8 10 10 2 3 6 2 4 3 1 2 1 1 2 1 OK PORTE FERM E DOOR CLOSED M4 M9 M9 M4 4 Resserrer la main Manually tight...

Page 18: ...NMKit5010_RailAlu C 18 Tension courroie Tighten the belt 13 1 2 2 1 13 Bloquer Block 17 Encoche Notch 4 3 M1 Serrer Tighten 10 Horizontal 17 6 7 2 1 2 tour 1 2 round 5 Bloquer Block...

Page 19: ...s projeter d eau Ne pas projeter de poussi res ou de copeaux Ne rien introduire dans le coffret lectrique 6 1 UTILISATION PREVUE NORMAL USING 6 2 Risques cons cutifs des actions intentionnelles de per...

Page 20: ...ass of the motor IP55 Do not splash Water tightness class of the command box IP65 Protection against water splashes with the suited cover Cleaning the door must exclude the use of a water jet on elect...
Page 21: ...de l entretien Regularity of maintenance Crit res de mise au rebut Criteria for scrapping Courroie Belt 20 000 cycles ou annuel 20 000 cycles or yearly Amorce de d chirure Beginning of tear Tendeur de...

Reviews: