NMKit5010_RailAlu-C
8
600
600
200
200
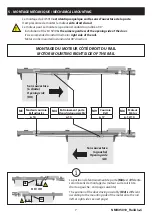
Si l’installation ne permet pas un montage standard du moteur (côté droit du rail), il est tout à fait possible
de le monter côté gauche, avec un minimum de modifications par rapport au montage standard :
Inverser la position du tendeur de courroie (M1) et de sa vis de réglage (A)
Inverser la position de l’entrainement de porte (M4)
Inverser la position du moteur (M6) sur son support
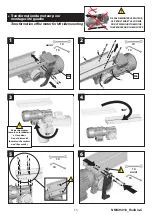
Pour procéder au montage des différents éléments du kit,
se reporter aux rubriques du montage standard indiquées
ci-dessous en inversant les vues.
Depending on the system installation, the space available in the right
end rail can be short for mounting the motor in its standard confi-
guration (right side of the rail). In that event it’s possible to mount
the motor left side of the rail, with very little changes compared with
standard mounting. It’s necessary to:
Reverse the position of the belt adjuster
(M1)
and its adjustment
screw (A)
Reverse the position of the door driving assembly
(M4)
Reverse the position of the motor
(M6)
on its bracket
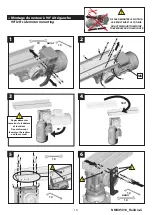
To mount the different parts of the Kit, see the drawings below.
Remember to reverse the drawings
of the standard mounting.
Support central
Central bracket
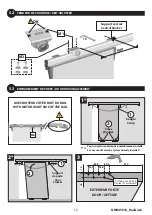
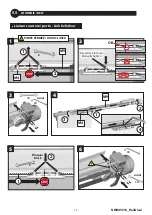
MONTAGE DU MOTEUR CÔTÉ GAUCHE DU RAIL
MOTOR MOUNTING LEFT SIDE OF THE RAIL
Sens ouverture
(à droite)
Opening side
(RH)
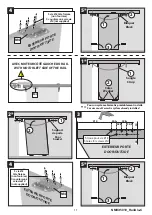
Sens ouverture
(à gauche)
Opening side
(LH)
Support central
Central bracket
M9
Courroie
Belt
p. 17
M4
Entrainement porte
Door driving assembly
p. 11
!
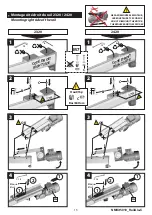
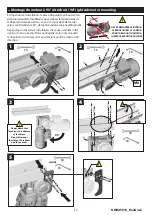
M6
Moteur
Motor
p. 15/16
OK
A
!
10
M1
Tendeur courroie
Belt adjuster
p. 10
Montage en usine - En cas de démontage
la garantie ne sera plus assurée
Factory assembly - In case of disassembly
the warranty will no longer be assured
!
NE PAS DEMONTER
LE MOTEUR,
LE REDUCTEUR
ET LE CODEUR
DO NOT DISMOUNT THE MOTOR,
THE REDUCER AND THE ENCODER

