background image

21

MODEL No.: PPL9001.A • 02/2022 •


704518

AFTER SALES SUPPORT

e-mail: info.aldi@positecgroup.com

1300 889 028

(toll free)

900W Planer

Warranty

Your new FERREX® 900W Planer will more than satisfy your expectations.
It has been manufactured under stringent FERREX® Quality Standards to 

meet superior performance criteria.
You will find your new 900W Planer easy and safe to operate, and, with 

proper care, it will give you many years of dependable service.

CAUTION. 

Carefully read through this entire instruction manual before 

using your new FERREX® 900W Planer.
Take special care to heed the Cautions and Warnings.
Your FERREX® 900W Planer has many features that will make your job faster 

and easier. Safety, performance, and dependability have been given top 

priority in the development of this 900W Planer, making it easy to maintain 

and operate.
Use only FERREX® replacement parts for your product.
Non-conforming parts or modifications made to parts will void your 
warranty.

Environmental protection

Recycle unwanted materials instead of disposing of them as waste. All 

tools, hoses and packaging should be sorted, taken to the local recycling 

centre and disposed of in an environmentally safe way. Dispose of used 

motor oil in a manner that is compatible with the environment. We suggest you 

take it in a sealed container to your local service station for reclamation. Do not 

throw it in the trash or pour it into the earth.

Summary of Contents for 704518

Page 1: ...anual 704518 900W PLANER Read all safety warnings and all instructions thoroughly before operating this product Ensure you keep your manual in a safe place for future reference IM ed 2 02 2022 Product...

Page 2: ...be read with a smartphone camera and that contains a link to a website or contact details for example Advantage You are not required to manually enter a website address or contact details How it work...

Page 3: ...ies in respect of the product that the consumer has under the Competition and Consumer Act 2010 and similar state and territory laws Our goods come with guarantees that cannot be excluded under the Au...

Page 4: ...epth 13 Operation 13 On off trigger 13 Standard surface planing 14 Planing with the parallel guide 14 Edge chamfering 15 Rebating 15 Maintenance 16 Blade fitting and changing 16 Replacing a drive belt...

Page 5: ...ng and correct use of the 900W Planer on pages 13 15 as well as the maintenance instructions on pages 16 20 Intended use of the 900W Planer It is exclusively intended for home use It is not designed f...

Page 6: ...ctions on its use To reduce the risk of injury user must read instruction manual Wear hearing protection Wear eye protection Wear breathing protection Conforms to relevant standards for electrical saf...

Page 7: ...c Keep children and bystanders away while operating a power tool Distractions can cause you to lose control 2 Electrical safety a Power tool plugs must match the outlet Never modify the plug in any w...

Page 8: ...off position before connecting to power source and or battery pack picking up or carrying the tool Carrying power tools with your finger on the switch or energising power tools that have the switch o...

Page 9: ...f parts and any other condition that may affect the power tool s operation If damaged have the power tool repaired before use Many accidents are caused by poorly maintained power tools f Keep cutting...

Page 10: ...ury Note The above warning applies only to planers without an automatic closing guard 2 Hold the power tool by insulated gripping surfaces only because the cutter may contact its own cord Cutting a li...

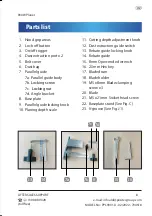
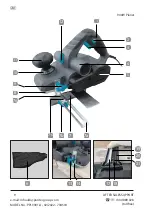
Page 11: ...dy 7b Locking screw 7c Locking nut 7d Angle bracket 8 Base plate 9 Parallel guide locking knob 10 Planing depth scale 11 Cutting depth adjustment knob 12 Dust extraction guide switch 13 Rebate guide l...

Page 12: ...9 MODEL No PPL9001 A 02 2022 704518 AFTER SALES SUPPORT e mail info aldi positecgroup com 1300 889 028 tollfree 900W Planer 6 9 10 7 5 4 8 11 1 2 3 7a 7b 7c 7d 12 13 14 17 18 19 20 21...

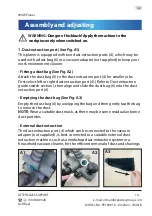
Page 13: ...on port 4 for smaller jobs First select left or right dust extraction port 4 Refer to Dust extraction guide switch section then align and slide the dust bag 6 into the dust extraction port 4 Emptying...

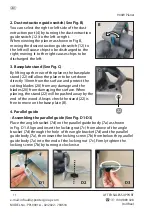
Page 14: ...e baseplate stand 22 will allow the planer to be set down directly 10mm from the surface and protect the cutting blades 20 from any damage and the blades 20 from damaging the surface When planing the...

Page 15: ...ds or backwards to the desired position Then securely tighten the locking screw 7b by turning it clockwise 5 Rebate guide The rebate guide 14 allows the user to set any rebate depth from 0 to 11mm For...

Page 16: ...wn in Fig F2 The scale graduation on the cutting depth adjustment knob is 0 5 mm The clockwise rotation increases the planing depth the anti clockwise rotation reduces the planing depth Always work fr...

Page 17: ...all of the base plate 8 flat on the work surface to prevent the cutting blade 20 jumping Move the planer evenly over the work surface For most applications 0 2mm max cutting depth will produce a good...

Page 18: ...d supported near the edge Place the V groove 23 over the edge of the workpiece to be chamfered Be sure the blades 20 are not touching the workpiece Position the V groove 23 absolutely flat on the edge...

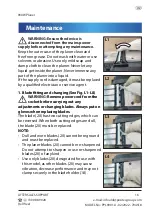
Page 19: ...ed it must be replaced by a qualified electrician or service agent 1 Blade fitting and changing See Fig L1 L8 WARNING Remove power cord from the socket before carrying out any adjustments or changing...

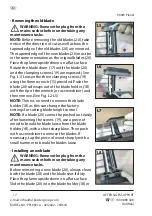
Page 20: ...ided Push the blade 20 sideways out of the blade holder 18 with the tip of the wrench or a screwdriver and then remove See Fig L2 L5 NOTE There is no need to remove the blade holder 18 as this can cha...

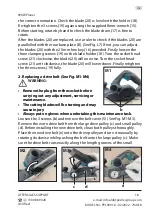
Page 21: ...ockwise the blade 20 will now rise Turn the socket head screw 21 anti clockwise the blade 20 will lower down Finally retighten the three screws 19 fully 2 Replacing a drive belt See Fig M1 M4 WARNING...

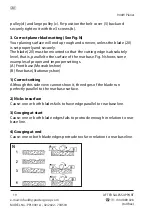
Page 22: ...cutting edge is absolutely level that is parallel to the surface of the rear base Fig N shows some examples of proper and improper settings A Front base Moveable shoe B Rear base Stationary shoe 1 Cor...

Page 23: ...keep the openings clean and dry Store the device and its accessories inside the carry case and in a location that is protected from dust moisture and direct sunlight and that is also out of the reach...

Page 24: ...r FERREX 900W Planer has many features that will make your job faster and easier Safety performance and dependability have been given top priority in the development of this 900W Planer making it easy...

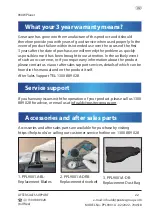
Page 25: ...to our attention In the unlikely event of such an occurrence or if you require any information about the product please contact us via our after sales support services details of which can be found i...

Page 26: ...off trigger 1 3Contactcustomerservice Planer does not plane properly 2 1 Blades are dull 2 2 Blades are not installed correctly 2 1 Change the blades 2 2 Install the blades correctly Refer to Install...

Page 27: ...50Hz Rated power 900 W No load speed 18000 min Max cutting depth 3 mm Max cutting width 82 mm Max rebate depth 11 mm Protection degree II Net weight 3 25 kg Product dimensions 300 165 175 mm Product...

Page 28: ...e not entirely satisfied with this product please return it to your nearest ALDI store within 60 days from the date of purchase for a full refund or replacement or take advantage of our after sales su...

Reviews: