SUN P7
13
EN
cod. 3540I811 - 04/2011 (Rev. 00)
Burner lighting
•
Switch on the power, operating the main switch ahead of the burner.
•
To fill the auger with pellets, see sec. 3.4.
•
close the thermostat line (boiler/room).
Burner setting
1.
Connect a combustion analyser to the boiler outlet and leave the burner working at
max. for 30 minutes; meanwhile, check the efficiency of the flue pipe.
2.
MAKE SURE THE COMBUSTION CHAMBER IS IN NEGATIVE PRESSURE
3.
Check the combustion at max. burner power (adjusted according to boiler nominal
power).
4.
Combustion parameters:
•
O
2
between 5% and 9%
•
CO between 150 and 1000 ppm
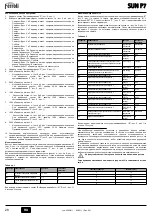
To set the burner, change the fan set point by modifying the relevant parameter (see
the section “
Service parameters menu
” and
and table 2
in cap. 2.4).
The CO value depends on the quality of pellets, the amount of dirt in the combustion
head and boiler draught.
To operate the burner in MODULATING mode, it is necessary to modify the param-
eter “
T18
” and then carry out points 5 and 6 described below.
5.
Check the other burner steps, reducing the value of parameter u02 to 1 (see the sec-
tion “
Service parameters menu
” and
table 1
in cap. 2.4).
6.
Set the parameter u02 to the correct value.
4.3 Maintenance
A
Periodically check the cleanness of the burner parts that tend to become dirty
depending on the quality of the pellets or due to poor burner adjustment.
The burner requires periodical maintenance which must be performed by qualified per-
sonnel at least once a year.
The basic operations to carry out are:
•
check and cleaning the internal parts of the burner and boiler as indicated in the fol-
lowing sections;
•
complete combustion analysis (after at least 10 minutes' operation) and check of
correct settings;
Opening of casing and burner disassembly
B
Before carrying out any checking or cleaning inside the burner, disconnect the
power to the burner by means of the main system switch.
To open
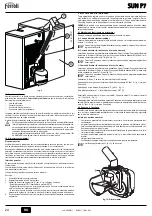
Undo the screws (A) and remove the casing (B). The internal components, motor, shut-
ter, etc., can be directly accessed.
To disassemble
Undo the screws (A) and remove the casing (B), undo the nut (C) and disconnect the
body, undo the fixing screws (D) and remove the nozzle (E).
fig. 11
Checks on parts and components
Fan
Make sure no dust has accumulated inside the fan and on the blades: it reduces the air
flow, thus causing pollutant combustion.
Combustion head
Make sure all parts of the combustion head are intact, not warped by the high tempera-
ture, free of impurities coming from the room, and correctly positioned.
Photoresistance
Remove any dust on the glass. The photoresistance is press-on; to remove, pull it out-
wards.
4.4 Troubleshooting
The burner is equipped with an advanced self-diagnosis system. In case of a burner
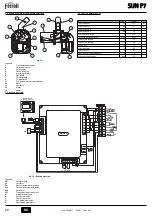
fault, the display (detail 7 - fig. 1) will flash indicating the fault code.
There are faults that cause permanent shutdown (marked with the letter
"A"
): to restore
operation, press the button
"P"
(detail 5 - fig. 1) for 1 second; if the burner fails to start,
it is necessary to firstly eliminate the fault.
Other faults (indicated with the letter
"F"
) cause temporary shutdowns that are automat-
ically reset as soon as the value returns within the burner's normal working range.
Table. 3 - List of faults
5. TECHNICAL DATA AND CHARACTERISTICS
5.1 Dimensions
fig. 12
A
C
D
E
B
Code
Fault
Cause
Cure
A01
No ignition shut-
down
Pellet container empty
Fill the container with pellets
Auger cable broken or disconnected
Restore the connection
Faulty igniter resistance
Replace and empty the head of pellets
Combustion head dirty
Empty and clean it
Pellet feed duct blocked
Free it, make sure the combustion head is
not clogged and empty it if necessary
F02
Parasite flame
elimination
The demand for heat has ended, but the
burner detects flame
Wait for end of post-ventilation
A02
Shutdown for par-
asite flame
Photoresistance short circuit
Replace the photoresistance
Extraneous light strikes the photoresist-
ance
Eliminate the light source
A04
Auger safety ther-
mostat shutdown
Incorrect ignition parameters
Check the transparent parameters 03=51
and 04=12
Boiler under pressure
Clean it and check correct minimum flue
draught (10Pa)
Faulty safety thermostat
Replace it
F05
Incorrect pipe
pressure adjust-
ment
Pressure sensor connection tube
squashed
Replace
Fan motor damaged
Replace
Fan dirty
Clean it
F06
Pressure trans-
ducer fault (dis-
connected)
Wiring disconnected
Check the wiring or replace the sensor
F10
Boiler shell probe
fault (if enabled)
Sensor damaged
Check the wiring or replace the sensor
Wiring shorted
Wiring disconnected
454
253
315
Ø 139
218
288
Ø 60
162
Ø190


