Section 5: Troubleshooting
5.4 Troubleshooting Procedures
0101-8292-0, Rev. C
5-17
CV-12SLX User Manual
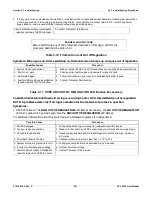
3.
Loose or faulty line power connection 3.
Check for secure connections on main three-phase line power connector on
rear of unit.
4.
Fault condition(s) whose investigation
requires removal of HVPS top cover.
4.
Contact Temescal Field Service.
Table 5-2 One or More Interlocks Not Made
Symptoms
•
TCS displays
PSU1_RDY_ALM
( = Power Supply Control Not Ready Timeout Alarm)
•
HVPS Front Panel:
INTERLOCKS OK
and
POWER SUPPLY FAULT
LEDs light red
•
EBC issues one of the following alarms:
Aux Connect Water Supply Interlock Alarm, Aux Connect Aux
Interlock Alarm,
Aux Connect Vacuum Interlock Alarm,
Aux Connect Tank Interlock Alarm
. In
addition, one of the LEDs in the High Voltage/Gun Interlocks section of the Diagnostics screen is unlit.
For additional information about this fault mode, see Ishikawa Diagram #2.
Possible Causes
Procedure
1. Interlock indicated by EBC is not made.
1.
Troubleshoot the external indicated external interlock(s) (i.e., Tank (=
vacuum cubicle doors), Vacuum, Auxiliary, Water, Position.
2. Top-cover interlock switch on either
HVPS or FPS is not made.
2.
First make sure that the top covers of the HVPS and the FPS are secured
properly in place. If so, make sure that the HVPS-FPS cable (PN 0620-6672-
0) is securely connected to HVPS rear-panel connector J5 and to FPS
connector J102
3.
Fault condition(s) whose investigation
requires removal of HVPS top cover.
.
3.
Contact Temescal Field Service.
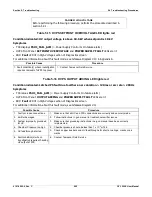
Table 5-3 General Condition: HVPS
Powered Up But Fails to Achieve HV Ready State
Symptoms
•
TCS displays
PSU1_RDY_ALM
( = Power Supply Control Not Ready Timeout Alarm)
•
EBC issues
HVPS Not Ready Timeout
alarm
Possible Causes
Procedure
1. On systems equipped with a Temescal
PopTop e-beam gun, the crucible cover is
not in the Down position.
1.
Verify that cover is physically in the Down position and that the gun’s Down
position switch is correctly adjusted.
2. Confirm that the HVPS front-panel
POWER ON
LED is lit and that all HV
and gun interlocks are made.
2.
Check interlock string (see Table 5-2).
3. Faulty or loose connection(s) at one
end of the HV Control-Vacuum System
I/O cable (PN 0620-9840-0).
3.
Verify that cable is securely connected to HVPS J4 and to connectors HVJ1
and HVJ2 on the remote controller rear panel.
4. An externally supplied HV READY
signal is not high.
4.
Troubleshoot the vacuum system end of the HV IS READY loop.
5.
Fault condition(s) whose investigation
requires removal of HVPS top cover.
.
5.
Contact Temescal Field Service.


