background image

ILM6P89

ILM6P89

18

19

English

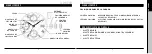
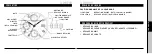
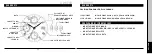
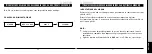
SETTING THE DAY AND TIME (HOUR, 24 HOUR, MINUTE AND SECOND)

SETTING THE MONTH (BY QUICK OPERATION)
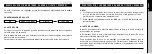
NOTE:
Make sure you have correctly set AM/PM before setting the time.
When the day changes over, it is a.m..
(Day changes over between 0:00a.m. and 5:30a.m. or little later)
Check am./p.m. by the 24hour hand. 
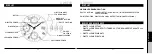
SETTING THE TIME 

After setting the day, set the hour and minute hands.
Turn the hour/minute hands in a clockwise direction to set the time.
To ensure time is set accurately, first turn the minute hand 5 minutes ahead of desired 
time and then turn back (in a counterclockwise) to the desired time.
After setting the time, use a time signal to synchronize the watch by pushing crown to 
the normal position to start the second hand going.

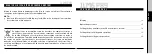
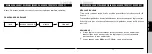
Each  time  the  month-adjustment  button  is  pushed,  the  month  advances  one 
month at a time.
Be sure to press firmly on the button when making month changes.

NOTE:

Do not set the month when the date hand is between the 26th and 31st. 
Move the date hand out of this period. After this operation, return the date 
hand to the proper setting. (When the date hand is between the 26th and 
31st, month quick setting can not be made or if a quick setting is attempted, 
the month may not advance to the next month as normal.)

The month and date are synchronized such that when adjusting the date at 
the end of short months (less than 31days), the month automatically adjusts 
to the correct month. The month disc changes around midnight of the 31st.

Summary of Contents for 18160

Page 1: ...MULTIFUNCTION ILM6P89 MANUAL DE INSTRUCCIONES INSTRUCTION MANUAL MANUEL D INSTRUCTION BETRIEBSANLEITUNG MANUALE DI FUNZIONAMENTO...

Page 2: ..._________________________________________________________13 MANUEL D INSTRUCTION_______________________________________________________________________________________________21 BETRIEBSANLEITUNG_ ___...

Page 3: ...______________________________________________________________________________________7 Ajuste del d a y la hora hora 24 horas minuto y segundo ________________________________________8 Ajuste del mes...

Page 4: ...RMAL DE LA CORONA PRIMERA POSICI N OPERACI N R PIDA FECHA DIRECCI N CONTRARIA A LAS AGUJAS DEL RELOJ SEGUNDA POSICI N AJUSTE DE LA HORA D EL D A DIRECCI N DE LAS AGUJAS DEL RELOJ D A DE LA SEMANA SEGU...

Page 5: ...los minutos en la direcci n de las agujas del reloj para ajustar la hora Para asegurar que la hora se ha ajustado correctamente primero gire la manecilla de los minutos hasta una posici n 5 minutos po...

Page 6: ...i n del bot n de ajuste del mes el nombre de ste cambia al siguiente Apriete el bot n con firmeza para cambiar el mes NOTA No ajuste el mes cuando la manecilla de la fecha est entre el d a 26 y el 31...

Page 7: ...n cualquier punto de recogida habilitado La recogida selectiva el tratamiento la valoraci n y el reciclaje contribuyen a la salvaguarda de nuestro medio ambiente y a la protecci n de nuestra salud 13...

Page 8: ...T POSITION 24HOUR HAND MONTH DISC MONTH ADJUSTMENT BUTTON NORMAL CROWN POSITION NORMAL CROWN POSITION 1ST POSITION QUICK OPERATION DATE COUNTERCLOCKWISE 2ND POSITION TIME DAY SETTING CLOCKWISE OPERATI...

Page 9: ...osition to stop the second hand at 0 12 o clock Turn the hour minute hands in a clockwise direction to set a day In order to set the day you must advance the hour hand by 24 hours per day NOTE If the...

Page 10: ...use a time signal to synchronize the watch by pushing crown to the normal position to start the second hand going Each time the month adjustment button is pushed the month advances one month at a tim...

Page 11: ..._____________________________________________________________________________________________________________ 22 Proc dure de fonctionnement____________________________________________________________...

Page 12: ...HEURES DISQUE DES MOIS BOUTON DE R GLAGE DU MOIS 1e POSITION POSITION NORMALE DE LA COURONNE POSITION NORMALE DE LA COURONNE 1e POSITION OP RATION RAPIDE DATE SENS ANTI HORAIRE 2e POSITION R GLAGE HE...

Page 13: ...osition pour arr ter la trotteuse sur 0 12 heures Tournez les aiguilles des heures minutes dans le sens horaire pour r gler un jour Pour r gler le jour vous devez faire avancer l aiguille des heures d...

Page 14: ...les aiguilles des heures minutes dans le sens horaire pour r gler l heure Pour garantir un r glage correct de l heure tournez d abord l aiguille des minutes avec 5 minutes d avance par rapport l heure...

Page 15: ...___________________________________________________________________________________30 Bedienungsverfahren_______________________________________________________________________________________________...

Page 16: ...EITE POSITION ERSTE POSITION NORMALE KRONENPOSITION NORMALE KRONENPOSITION ERSTE POSITION SCHNELLBET TIGUNG DATUM IM ENTGEGENGESETZTEN UHRZEIGERSINN ZWEITE POSITION EINSTELLEN VON UHRZEIT TAG IM UHRZE...

Page 17: ...en Drehen Sie den Stunden und den Minutenzeiger im Uhrzeigersinn um einen Tag einzustellen Um den Tag einzustellen m ssen Sie den Stundenzeiger jeweils um 24 Stunden pro Tag vorstellen HINWEIS Wenn de...

Page 18: ...Uhrzeit Nachdem Sie die Uhrzeit eingestellt haben stimmen Sie die Uhr anhand eines Zeitsignals ab Dr cken Sie dazu die Krone in die Normalposition damit sich der Sekundenzeiger in Bewegung setzt Bei j...

Page 19: ...______________________________________________________38 Procedura di impostazione_____________________________________________________________________________________________________39 Impostazione d...

Page 20: ...A CORONA PULSANTE DI REGOLAZIONE DEL MESE POSIZIONE NORMALE DELLA CORONA 1a POSIZIONE IMPOSTAZIONE RAPIDA DATA SENSO ANTIORARIO 2a POSIZIONE IMPOSTAZIONE ORARIO GIORNO SENSO ORARIO PROCEDURA DI IMPOST...

Page 21: ...posizione per fermare la lancetta dei secondi sullo 0 le 12 Girare le lancette di ore minuti in senso orario per impostare il giorno Per impostare il giorno necessario far avanzare la lancetta delle o...

Page 22: ...te AM PM Quando cambia il giorno a m Il giorno cambia nell intervallo fra le 0 00 a m e le 5 30 a m o poco dopo Verificare a m p m con la lancetta delle 24 ore Ogni volta che si preme il pulsante di r...

Page 23: ...contenitori per lo smaltimento dei componenti del Suo orologio al quarzo La raccolta differenziata il trattamento la valorizzazione ed il riciclaggio di tali prodotti contribuiscono alla salvaguardia...

Page 24: ......

Reviews: