4 Getting Started
Festo CDPX-… en 1203NH
4-3
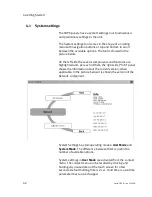
System settings in
System Mode
can be activated with the so-
called Emergency system access procedure. This procedure
consist in tapping in the middle of the touch screen with a
finger at a high frequency while the systems powering up. The
Emergency procedure can only be accessed at power-up.
“
User mode
” is the simplest possible interface where a
generic user can get access to the basic settings of the
panel:
·
Calibrate Touch
: allows to calibrate the touch screen
interface
·
Network
: allows to change the options of the panel on-
board network card
·
Time
: allows to change the panel RTC options, including
time zone and DST
·
Display settings
: automatic backlight turnoff and
brightness adjustment
·
BSP settings
: allows to check the
BSP
(
B
oard
S
upport
P
ackage) version (example 2.37), check the operating
hours timers for the unit and separately for the backlight,
enable/disable the buzzer, enable/disable the use of the
“low battery” front LED indicator
·
Plugin list
: allows to check the presence of optional
plugin modules installed
“
System Mode
” (only intended for service activity) is the
complete interface of the System Settings tool where all the
available options are available; in addition to the options
available in the “User Mode” we have the following important
options:
·
Format Flash
: allows to format the internal panel flash
disk
Caution
Formatting will erase ALL data on the flash disk.
·
Resize Image Area
: allows to resize the flash portion
reserved to store the splash screen image displayed by
the unit at power up; default settings are normally ok for
all the units
Summary of Contents for CDPX
Page 2: ......
Page 4: ......
Page 20: ...3 Installation Festo CDPX en 1203NH 3 2 Abb 3 2 Abmessungen des CDPX X A W 7 ...
Page 21: ...3 Installation 3 3 Festo CDPX en 1203NH Abb 3 3 Abmessungen des CDPX X A S 10 ...
Page 22: ...3 Installation Festo CDPX en 1203NH 3 4 Abb 3 4 Abmessungen des CDPX X A W 13 ...
Page 43: ......
Page 59: ...3 Installation Festo CDPX en 1203NH 3 2 Fig 3 2 Dimensions for CDPX X A W 7 ...
Page 60: ...3 Installation 3 3 Festo CDPX en 1203NH Fig 3 3 Dimensions for CDPX X A S 10 ...
Page 61: ...3 Installation Festo CDPX en 1203NH 3 4 Fig 3 4 Dimensions for CDPX X A W 13 ...
Page 80: ...4 Getting Started Festo CDPX en 1203NH 4 7 ...
Page 81: ......
Page 82: ......

