Festo SOEL-...1606d English
26
SOEL-
Instructions of use
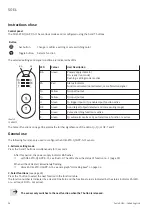
Control panel
The SOEL-RTD-Q50-PP-S-7L has various modes and is configured using the S and T buttons.
Button
S
Set button:
Change / confirm a setting or set a switching point
T
Toggle button: Select a function
The selected settings and signal condition are indicated by LEDs.
LED
Colour
Use/Description
BA
Green
Power supply indicator
On: ready (run mode)
Flashing: setting mode is active
ZA
Red
Status indicator
Function activated/not activated, or confirmation signal
Q
1
Yellow
Q
1
input/output
Q
2
Yellow
Q
2
input/output
H
Green
Q
1
trigger input or Q
1
enable input function active
OK
Green
Good target (object detected and in measuring range)
T
Green
Pulse stretching function is active
Z
Green
Q
1
automatic centre or Q
1
automatic zero function is active
The table of functions on page 28
explains the further significance of the LEDs: Q
1
, Q
2
, H, OK, T and Z
General use
The following four steps are used to configure the SOEL-RTD-Q50-PP-S-7L sensor:
1. Activate setting mode
Press the S and T buttons simultaneously for 3 seconds
After this period, the power supply indicator BA flashes
set SOEL-RTD-Q50-PP-S-7L, see Illustr. 9. The LEDs show the status of function no. 1 (page 28)
When all the LEDs start immediately flashing
Unlock SOEL-RTD-Q50-PP-S-7L, see paragraph “Unlocking keys” on page 34
2. Select functions
Press the T button to select the next function in the function table.
The function number is indicated by a clear LED pattern and the function status is indicated by the status indicator ZA (LED
on = active, LED off = not active).
The sensor only switches to the next function when the T button is released.
Illustr. 9
15400272
BA
ZA
Q
1
Q
2
H
OK
T
Z
S
T
Summary of Contents for SOEL-RTD-Q50-PP-S-7L
Page 2: ......
Page 4: ...4 Inhalt Content Contenu Deutsch 5 English 21 Français 37 ...
Page 20: ...Festo SOEL 1606d Deutsch 20 SOEL ...
Page 36: ...Festo SOEL 1606d English 36 SOEL ...
Page 52: ...Festo SOEL 1606d Française SOEL 52 ...
Page 53: ......

