6
1
2
2
1
9
Working with the electric
power tool
WARNING
Risk of injury
► Always secure the workpiece in such a
manner that it cannot move while being
machined.
Observe the following information:
– Do not overload the machine by pressing
with excessive force! The best sanding re
sults are achieved with moderate applica
tion pressure. The sanding performance
and quality are mainly dependent on the
selection of the correct abrasive.
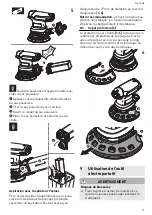
– Hold the machine with one hand by the
handle
[1-9]
to ensure safe guidance.
For sanding, we recommend the following set
tings for the adjusting wheel
[1-3]
:
Sanding work
Adjusting wheel set
ting
– Sanding with max. abrasion
– Sanding off old paint
– Sanding of wood and veneered sur
face prior to paintwork
– Intermediate sanding of paintwork on
surfaces
5–6
– Sanding thinly applied undercoat
– Sanding wood with sanding cloth
– Edge breaking on wooden parts
– Smoothing primed wooden surfaces
4–5
– Sanding solid wood and veneered
edges
– Sanding rebate of windows and doors
– Intermediate sanding of paintwork at
edges
– Light sanding of natural wood win
dows using sanding cloth
– Smoothing wooden surfaces using
sanding cloth before staining
– Rubbing stained surfaces with a
sanding cloth
– Rubbing or removing excess lime
stone residue using sanding cloth
3–4
– Intermediate sanding of paintwork on
stained surfaces
– Cleaning natural wood window re
bate using sanding cloth
2–3
– Sanding stained edges
– Sanding thermoplastics
1–2
9.1
Extension Cord
If an extension cord is required, it must have
sufficient cross-section to prevent an excessive
drop in voltage or overheating. An excessive
drop in voltage reduces the output and can lead
to failure of the motor. The table below shows
you the correct cord diameter as a function of
the cord length for this tool.
Tab. 9.1: Cord Size in A.W.G
Tool`s Ampere Rating Cord Lenght in Feet
25 50 100 150
3-6
18 16 16
14
6-8
18 16 14
12
8-10
18 16 14
12
10-12
16 16 14
12
12-16
14 12 -
-
English
12


