14
Pull the release ring
[6-3]
forwards.
Attach the tool chuck to the drill spindle
[6-4]
.
Release the ring
[6-3]
.
Detaching the CENTROTEC
Pull the release ring
[6-3]
forwards.
Remove the tool chuck.
Changing tools
Pull back the green release ring
[6-2]
to attach
or detach tools with a CENTROTEC shank.
When attaching the tool, rotate until the hexa-
gon shank
[6-1]
engages in the hexagon holder
on the drill spindle.
Release the ring
[6-2]
.
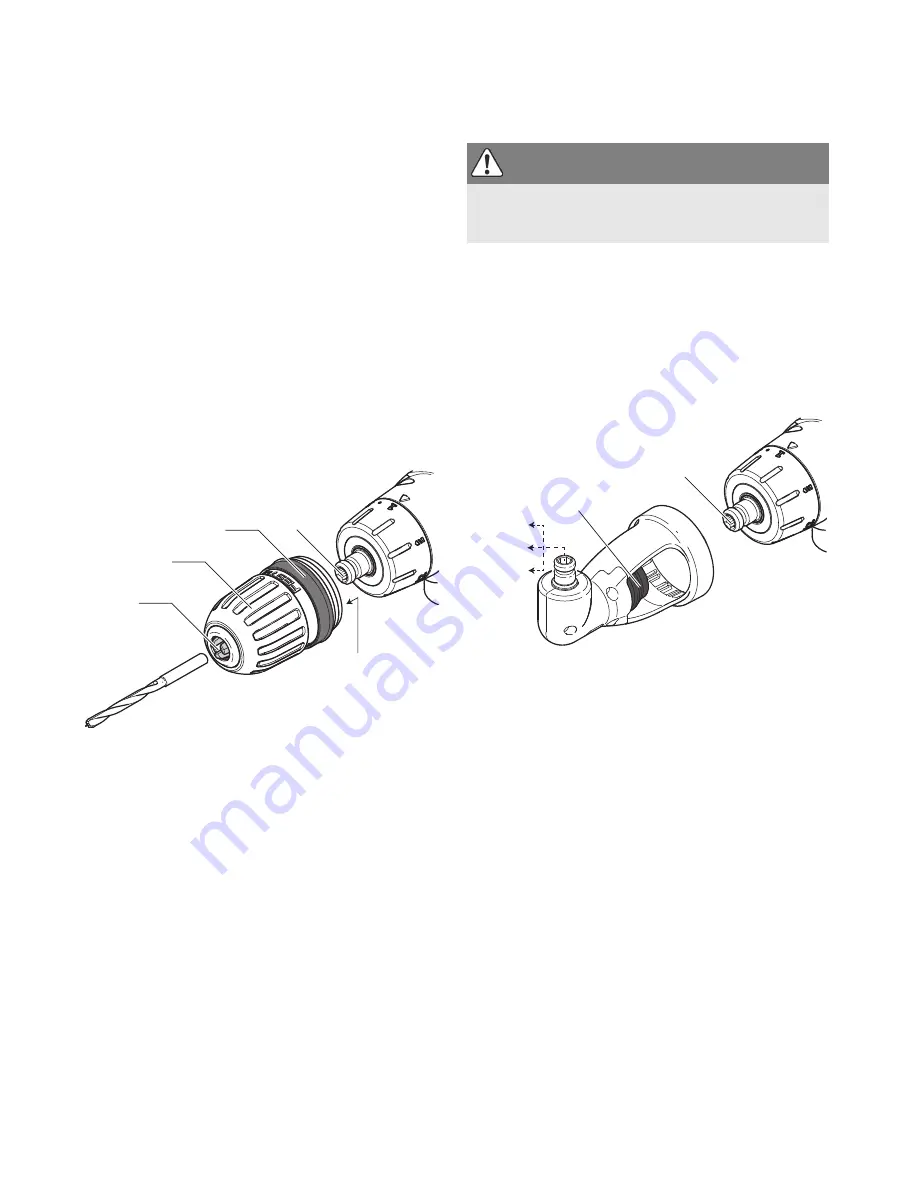
Chuck BF-FX 10
The chuck BF-FX 10 is used for clamping drill and
screwdriver bits up to 10 mm chuck diameter.
Attaching the chuck BF-FX 10
Attach the chuck to the drill spindle
[7-4]
.
Pull the release ring
[7-3]
forwards.
Turn until the hexagon pin
[7-5]
on the chuck
engages in the hexagon socket holder in the
drill spindle.
Push the chuck all the way onto the drill spindle.
Release the ring
[7-3]
.
Detaching the chuck BF-FX 10
Pull the release ring
[7-3]
forwards.
Remove the chuck.
Changing tools
Turn the clamping sleeve
[7-2]
anticlockwise to
open the clamping jaws
[7-1]
.
The arrow on the spindle indicates the opening
direction.
Insert the tool into the chuck.
Turn the clamping sleeve
[7-2]
clockwise to
clamp the tool.
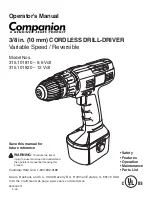
Right angle chuck XS-AS
The right angle chuck XS-AS (partly accessories)
allows you to work (drill, fasten) vertically in rela-
tion to the longitudinal axis on the machine.
Fitting the right angle chuck XS-AS
Pull the green release ring
[8-1]
forwards.
Fit the right angle chuck to the drill spindle
[8-
2]
.
Turn the chuck until is engages in the required
position.
You can engage the right angle chuck in 16 dif-
ferent positions.
Release the ring
[8-1]
.
Removing the right angle chuck XS-AS
Pull the green release ring
[8-1]
forwards.
Remove the right angle chuck.
Changing tools
The tools can be fixed on the right angle chuck via
CENTROTEC tool chuck, the chuck BP-XS 8 or BP-
XS 10 or directly into the drill spindle.
7
7-1
7-2
7-4
7-5
7-3
CAUTION
Risk of injury
Clamp the tool centrally in the chuck!
8
8-1
8-2
WH-CE
BF-FX 8
BF-FX 10


