background image

Sidus - electronic timer 

5/11 

T1 

T2 

T3 

T4 

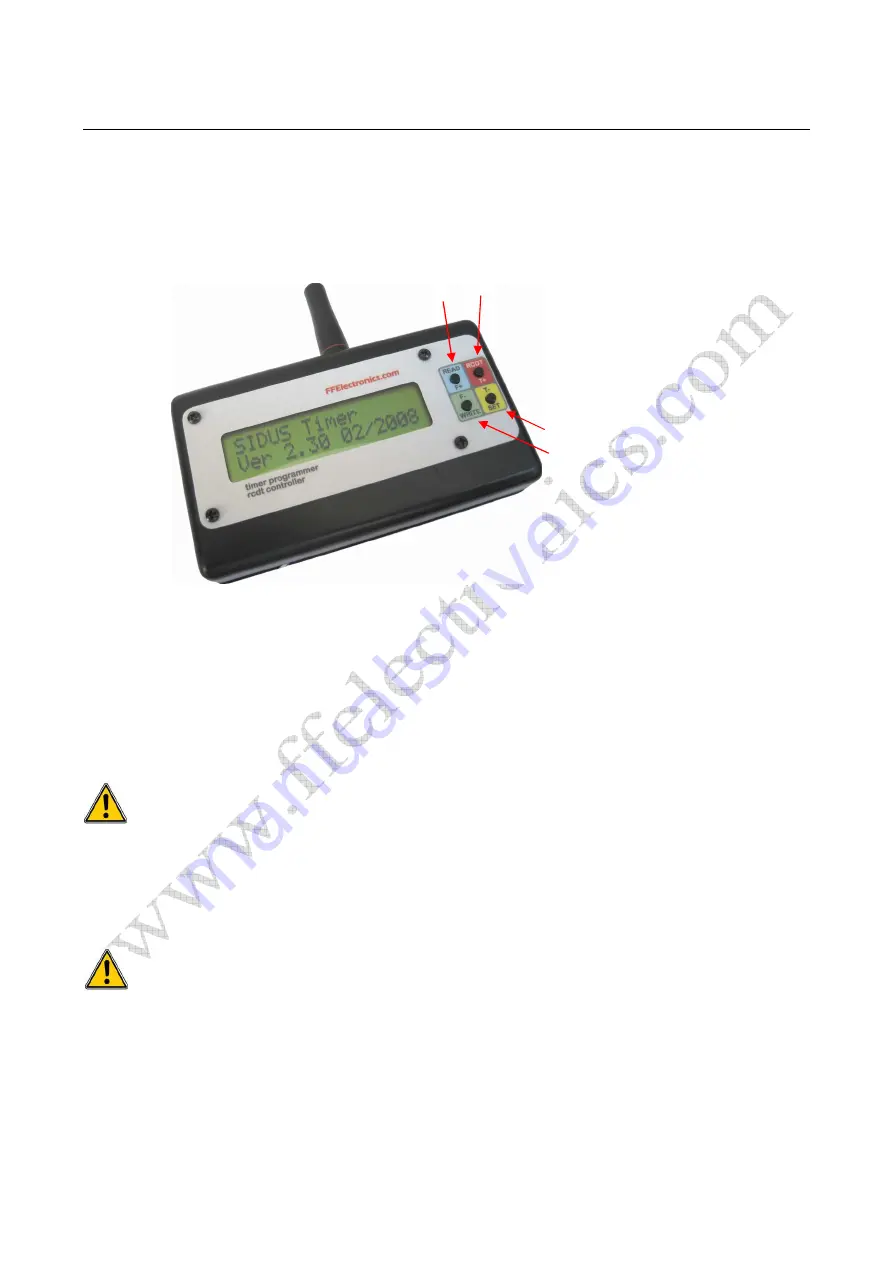
Programmer  

T1, T2, T3, T4 keyboard 

Through  these  4  keys  it  is  possible  to  read,  modify,  rewrite  the  timing  sequence  and 
dethermalize  the  model.  It  is  also  possible  to  change  the  default  settings  and  accurately 
adjust the micro servo positioning. The function of each key depends on the state of the 
Programmer and if it is pressed for a short or long time. 


Automatic switch off and Programmer battery check 

The Programmer goes to sleep if idle for about 120 sec. and wakes up by pressing one of 
the keys. If the data have not been transferred to the Timer they will be lost. If the voltage 
is  insufficient,  the  Programmer  displays 

Battery  low!

  and  goes  back  to  sleep to prevent 

the batteries from being harmed. 

Notes about Programmer’s key pressing  

The Programmer has only 4 keys. A long key pressure (press and hold) or a short 
key pressure (press and release) may be required, depending on the situations and 
according  to  the  following  rule:  choices  displayed  in  upper  case  (e.g.  READ

WRITE,..) require a long pressure, choices displayed in lower case (e.g. Servo,..) require 
a short pressure 

Notes about Programmer 

 Timer IR communication 


The Programmer and the Timer communicate over an optical link. When using the 
Programmer  make sure to: 
 

1.  check  that  the  Timer  is  ON  (RED  or  GREEN  led  ON),  if  not  just  turn  it  back  on  by 

shortly pressing the start switch 

2.  keep  the  Timer  and  the  Programmer  with  the  IR  sensors  mutually  visible  (distance 

shorter than 20 cm) 

Summary of Contents for Sidus F1C

Page 1: ...Sidus Sidus Sidus Sidus F1C F1C F1C F1C FAI Free Flight Electronic Timer Operating Manual Version 4 0 Jun 2010 M U 2007 2010...

Page 2: ...to the pictures of next page to recognize the system components Connect the Timer control board 1 to the battery 2 and to the micro servo by matching the color of plugs and cables The Timer comes wit...

Page 3: ...enna socket SE MECHANICAL ASSEMBLY OPTION Timer Control Board Timer Battery MAGNETIC START SWITCH Hall Sensor BOTTOM VIEW Servo Battery Hall sensor Charger PROGRAMMER IR sensor aperture LCD display RD...

Page 4: ...RED and GREEN 3 flashes Timer battery pack to be recharged Using the Timer The function of the start switch depends on the current state of the Timer Starting from a discharged Timer GREEN led ON disc...

Page 5: ...ent the Programmer displays Battery low and goes back to sleep to prevent the batteries from being harmed Notes about Programmer s key pressing The Programmer has only 4 keys A long key pressure press...

Page 6: ...erisk close to the function that must be modified then keep T1 pressed until the asterisk turns into w write and release it the function is ready to be modified Shortly press T3 T4 to increase decreas...

Page 7: ...mer allows changing the positions assumed by the disc for each function 1 Press and release T4 Servo to enter the FUNCTION menu The disc moves to the start position 2 Press T3 func or T4 func to incre...

Page 8: ...rmediate position safer than DT in order to prevent model damage due to the high speed it has probably reached If the RDT is activated again or if it is activated when the engine is not running the di...

Page 9: ...o the Timer recharge cable of the control board through the adapter cable supplied the battery can remain connected to the Timer A spare battery can be directly connected to the 2 pin socket on the ch...

Page 10: ...e battery when needed The battery pack ensures about 80 flights of 180 seconds each Do not recharge it too frequently just refresh it from one flight session to another If you are not going to fly the...

Page 11: ...rn Dethermalization The effect is the same as the termination procedure Be aware that this command is accepted also during climb On the Programmer press and keep pressed the red button to dethermalize...

Reviews: