72
73
>
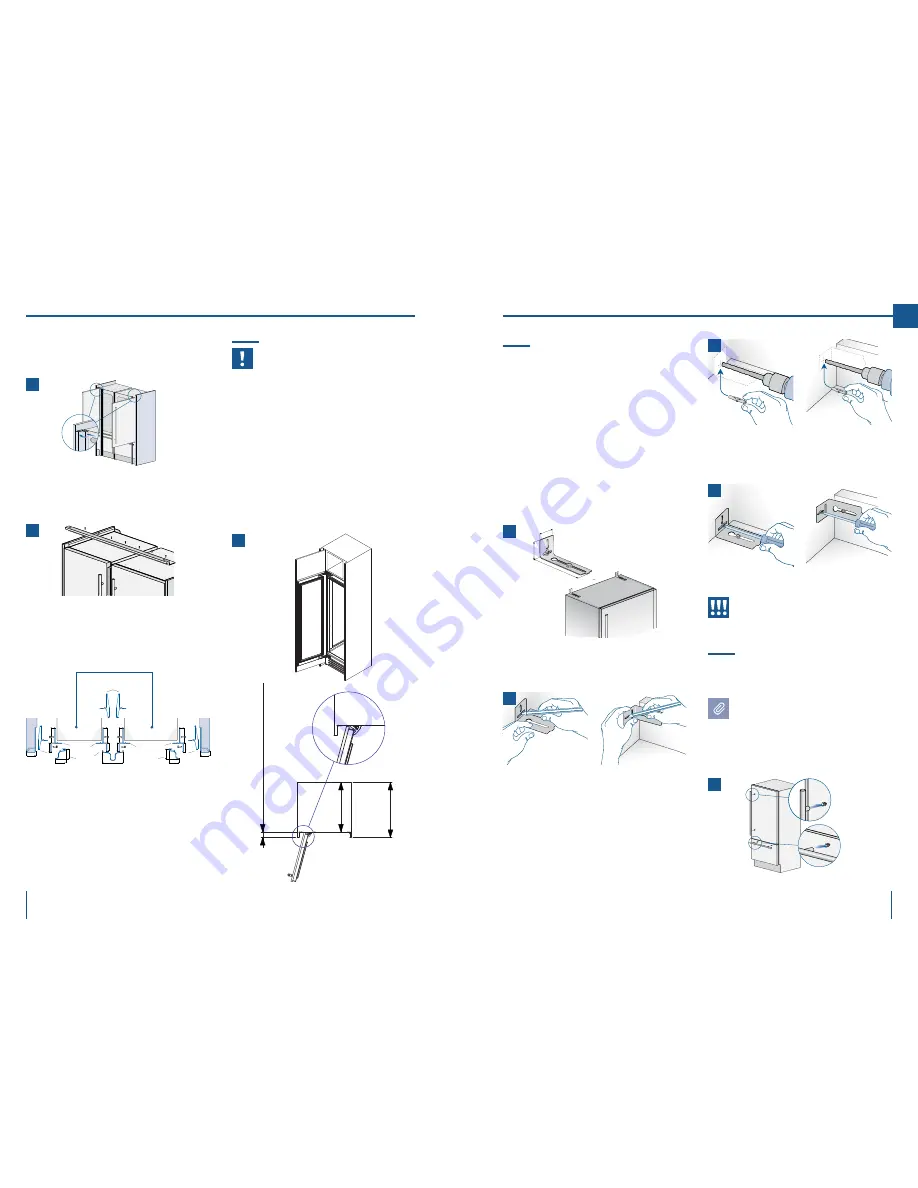
Attach the aluminum cover
[ 7 ]
to each side pro-
file, pressing onto them until they ‘click’ together.
>
Mount the top panel
[ 8 ]
on top of the unit, using
the screws provided with the kit.
>
Adjust the height of the unit with the leveling feet
and the back wheels.
Side panels and central profile mounting
A
- Alluminium connecting element,
alternatively:
C
- plastic connecting brackets
D
Central Connection
E
Central covering and connection system
H
Side panel
5.4 Maximum cabinet depth over
“Integrated” refrigerator with
single door panel
It is possible that the design of the kitchen and,
in particular, of the niche where the “
Integrated
”
refrigerator is going to be fitted includes a cabinet
right above the refrigerator itself that must be
closed with the same panel mounted on the
Integrated refrigerator door.”
In this case,
the total depth of the cabinet without
the door (above the refrigerator) must not exceed
the total depth of the refrigerator itself
[ 1 ]
.
This will allow the panel attached to the refrigerator
door to open correctly without interference during
its rotation up to 105°.
1
6.1 Anti-tipping safety assembly
To prevent the appliance from tipping over
an extra-long kit is vailable up on request
if the appliance needs to remain distanced
from the wall, it is mandatory to install two
brackets on the upper part of the appliance
for fixing it securely to the wall.
Operate as follows:
>
The brackets should be applied as illustrated us-
ing the provided screws and expansion plugs.
Place a bracket on the top of the appliance in corre-
spondence to the fixing holes and against the wall
[ 1 ]
.
>
Mark up the holes position on the wall
[ 2 ]
.
>
Drill the wall with an 8 mm (3/8”) bit and insert
the expansion plug
[ 3 ]
.
6. COMPLETING THE INSTALLATION
www.fhiaba.com · info@fhiaba.com · Info Line +39 0434 420160
>
Reposition the bracket and fix it first to the cabi-
net and then to the wall
[ 4 ]
.
To avoid danger of the appliance tipping over
it is mandatory to secure the appliance to
the wall by means of two special brackets.
6.2 Mounting the handles
on stainless front
To mount the handles onto the door and
the drawer operate as follows:
Operate as follows:
>
Insert the two handle spacers onto the supports
already available on the door and the drawer
[ 1 ]
.
EN
5. INSTALLATION
H
H
E
D
A
C
B
A
C
B
D
6,5 (
¼”
)
6,5 (
¼”
)
18 (
¾”
)
44,4 (1
¾”
)
18 (
¾”
)
6,5 (
¼”
)
20 (
¾”
)
22 (
7⁄8”
)
22 (
7⁄8”
)
25 (1”)
6,5 (
¼”
)
20 (
¾”
)
22 (
7⁄8”
)
25 (1”)
22 (
7⁄8”
)
C
Appliance
585 (23”)
650 (25 ⅝”)
47 (1 ⅞”) + fr
ont panel thickness
152 (6”)
59 (
2
3⁄8
”)
45 (1
5⁄8
”)
7
8
1
2
3
4
1


