background image

10 


DISPLAY 

The  display  on  the  handlebar  will  turn-on  after  powering  the 
kickscooter. 
The display shows: 


the speed during use of the electric kickscooter; speed is showed 
in mph by default, but it can be switched to Km/h (1);  


the  gear:  maximum  speed  with  gear  1  is  of  around  10Km/h, 
maximum speed with gear 2 is of around 15Km/h and maximum 
speed with gear 3 is of around 25Km/h. Gears can be switched 
pressing the power-button. For safety reason, the change of gear 
can be done when the kickscooter is stopped only (2);  


the icon for lights: front and rear lights must always be turned-on 
during the use of the kickscooter (3);  


Bluetooth icon: not valid for this model (4);  


brake icon: it turns on when the brake lever is used (the light of 
the rear light will be brighter when the brake is activated) (5);  


ODO info that indicates the total mileage (this information will be 
kept after switching off the device) (6);  


TRP info that indicates the single driving distance after switching 
on (the distance info will be cleared after switching off the device) 
(7);  


ODO or TRP details (8);  


alarm icon for low battery (9): when all four led lights in the bottom 
are fully turned-off, this icon turns-on; it is suggested to stop, turn-
off the electric kickscooter, and provide for a new battery charge; 


led lights that shows the battery level of charge (10): during use 
of the kickscooter, the 4 LED lights are lit. During consumption of 
the battery the indicators turn-off, one by one. If 4 LED lights are 
lit, mean full power. If 3 LED lights are lit, mean 85-70% power. 
When only 1 LED light is lit, there is a charge of around 10-15%.  

Summary of Contents for F500-F85 350PL

Page 1: ...1 Model F500 F85 350PL FOLDABLE ELECTRIC KICKSCOOTER USER MANUAL ORIGINAL INSTRUCTIONS ...

Page 2: ...2 PAGE 3 EN PAGE 27 POL ...

Page 3: ...e battery must be moved from the appliance before it is scrapped The appliance must be disconnected from the supply mains when removing the battery The battery is to be disposed of safely Do not recharge non rechargeable batteries WARNING FOR BATTERY CHARGER This appliance is not a toy Children shall not play with the appliance Adult supervision is required for minors This appliance can be used by...

Page 4: ...r This kickscooter is for personal entertainment only It is prohibited to use it as public transportation This kickscooter can be used by one user at one time only Please check whether the tires are damaged If anything abnormal please provide for maintenance Please use the product if in good condition only If you lose control during driving you may cause damage to you or to other people For privat...

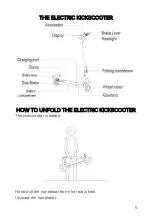
Page 5: ...5 THE ELECTRIC KICKSCOOTER HOW TO UNFOLD THE ELECTRIC KICKSCOOTER The kickscooter is folded Hand pull the handlebar from the rear wheel Upward the handlebar ...

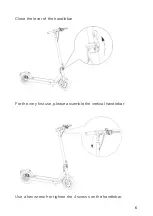
Page 6: ...6 Close the lever of the handlebar For the very first use please assemble the vertical handlebar Use a hex wrench to tighten the 4 screws on the handlebar ...

Page 7: ...7 When the installation is done please test the power switch HOW TO FOLD THE ELECTRIC KICKSCOOTER Open the clamp of the handlebar ...

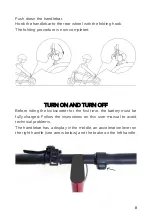
Page 8: ...ompleted TURN ON AND TURN OFF Before riding the kickscooter for the first time the battery must be fully charged Follow the instructions on this user manual to avoid technical problems The handlebar has a display in the middle an acceleration lever on the right handle see arrow below and the brake on the left handle ...

Page 9: ...ndlebar for 3 seconds to turn on the kickscooter When the kickscooter is powered press twice the same button to turn on off the front light Press the same button again to turn off the kickscooter The unit will automatically turn off when not in use for approximately 10 minutes ...

Page 10: ... brake lever is used the light of the rear light will be brighter when the brake is activated 5 ODO info that indicates the total mileage this information will be kept after switching off the device 6 TRP info that indicates the single driving distance after switching on the distance info will be cleared after switching off the device 7 ODO or TRP details 8 alarm icon for low battery 9 when all fo...

Page 11: ...11 After turning on the electric kickscooter verify the level of the battery power on the display verify the green red light and put one foot on the pedal Stand on pedal with one leg only ...

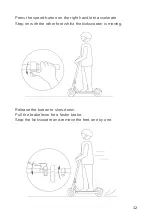
Page 12: ...tton on the right handle to accelerate Step on with the other foot whilst the kickscooter is moving Release the button to slow down Pull the brake lever for a faster brake Stop the kickscooter and remove the feet one by one ...

Page 13: ...attery before the first use Fully charge the battery every 60 days even if the kickscooter is not used for long periods The battery charge and therefore the maximum distance is affected by some factors like 1 Ground when ground is not flat the discharge is increased 2 Weight of the user 3 Ambient temperature 4 Drive style and speed will affect the life of the battery charge a constant and moderate...

Page 14: ...charging If giving to someone for the holidays leave it in its partially charged state Don t take it out of the package to bring it to a full charge and then wrap it back up Often the product comes partially charged Leave it in that state until it is ready to be used Do not ride near vehicular traffic It is important to wear safety gear when using this device a skateboard helmet knee and elbow pad...

Page 15: ...tery Charging should be in a safe dry and clean environment The kickscooter must be powered off before proceeding with charging Do not use the kickscooter when charging the battery 1 Open the protective cover on the kickscooter Ensure the charging port is dry and insert the battery charger into the kickscooter charging port The other end of the charger must be connected to the mains to activate th...

Page 16: ...evel during charge must be 5 95 If the temperature is higher than 40 C the scooter functioning might be damaged and battery life might be reduced WARNING When battery is completely empty 0 charge a normal charge of 4 5 hours might not be sufficient It is necessary to proceed with a 24 hours charge TRANSPORTING THE BATTERY Lithium batteries are considered dangerous goods Please check the local law ...

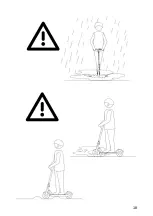
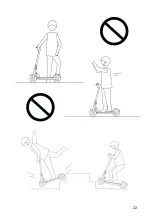
Page 17: ...0 Pay attention to the ground The kickscooter is made for smooth and flat grounds 11 Do not use the electric kickscooter with puddles snow mud ice 12 Do not modify or replace the parts of the kickscooter by yourself Any action must be followed by the Retailer or the authorized Service Centre 13 Before use please check if anything abnormal Turn on the kickscooter Check the battery power level on th...

Page 18: ...18 ...

Page 19: ... the maximum weight is not reach 10 Overweight is prohibited for your safety Functions of the kickscooter might be damaged 11 Underweight is prohibited for your safety The kickscooter might not be under control anymore 12 The speed of the kickscooter is affected by the road type the ambient temperature the maintenance of the battery 13 Always keep safety distance between you and other vehicles peo...

Page 20: ...20 ...

Page 21: ...21 ...

Page 22: ...22 ...

Page 23: ...would be permanently damaged STORAGE OF THE ELECTRIC KICKSCOOTER Please make sure your kickscooter is fully charged before storing it If the kickscooter is stored for long time ensure a full charge every 2 months Do not store the kickscooter at less than 0 C Keep the kickscooter inside its own packaging or cover it to prevent dust Keep the kickscooter in a dry indoor place WARNING Do not open the ...

Page 24: ...4 5 hours Ground distance around 15 cm Unfolded body size 110 x 43 x 115 cm approx Net weight 14 kg approx Wheel diameter 8 5 inches AFTER SALE SERVICE Please contact your Retailer for any technical problem WARRANTY Carefully read all instructions before using the electric kickscooter Do not use the electric kickscooter if use is forbidden Do not use the electric kickscooter if this might cause da...

Page 25: ...d of these substances can cause harm to human health or the environment To protect natural resources and to promote material reuse please separate batteries from other types of waste and recycle them through your local free battery return system CORRECT DISPOSAL OF THE PRODUCT According to the Directive 2012 19 UE This marking on the product accessories or literature indicates that the product and...

Page 26: ...tive purposes only Our Company is not responsible for improper use of the product Our Company reserves the right to modify the product and the content of this manual without prior notice Manufactured under lIcense of FCA Italy S p A FIAT and 500 are trademarks of and lIcensed by the FCA Group CompanIes IMPORTED AND DISTRIBUTED BY 4CV MOBILE SP Z O O SP K UL BRONIEWSKIEGO 28 01 771 WARSZAWA POLAND ...

Page 27: ...żytkownicy poniżej 18 lat ale powyżej 10 lat powinni używać hulajnogi jak również dokonywać czynności konserwacyjnych wyłącznie pod nadzorem osób dorosłych Niniejsza instrukcja została przygotowana ze starannością lecz nie możemy zagwarantować że jest ona wolna od błędów W przypadku stwierdzenia błędu prosimy skontaktować się z centrum serwisowym Informacje zawarte w tym dokumencie konstrukcja urz...

Page 28: ...omercyjnego środka transportu Urządzenie jest pojazdem jednoosobowym Zabronione jest używanie pojazdu przez dzieci poniżej dwunastego roku życia kobiety w ciąży i osoby w podeszłym wieku Zabronione jest używanie hulajnogi na drogach publicznych Przed każdym użyciem należy skontrolować stan techniczny urządzenia w szczególności stan kół i ogumienia W razie jakichkolwiek wątpliwości należy przekazać...

Page 29: ...29 ELEMENTY HULAJNOGI ROZKŁADANIE HULAJNOGI Hulajnoga jest złożona można ją przenosić Zwolnij klamrę umieszczoną na kierownicy z haczyka umieszczonego na błotniku tylnym Podnieś pałąk kierownicy do ...

Page 30: ...30 pozycji pionowej Zablokuj dźwignią jak na rysunku Przed pierwszym użyciem zamontuj kierownicę na pionowym pałąku ...

Page 31: ...31 Użyj klucza sześciokątnego do przykręcenia czterech wkrętów Wypróbuj działanie włącznika pod kierownicą SKŁADANIE HULAJNOGI Otwórz dźwignię zabezpieczającą ...

Page 32: ...ĄCZANIE HULAJNOGI Przed pierwszym użyciem hulajnogi akumulator musi zostać w pełni naładowany Prosimy zapoznać się z procedurą ładowania opisaną w instrukcji obsługi Kierownica hulajnogi zawiera wyświetlacz umieszczony na środku manetkę przyspieszenia po prawej stronie patrz niżej i dźwignię hamulca po lewej ...

Page 33: ...yłączyć urządzenie Hulajnoga automatycznie wyłączy się jeśli pozostaje nieużywana przez okres ok 10 min WYŚWIETLACZ Wyświetlacz umieszczony na kierownicy włącza się po włączeniu zasilania hulajnogi Wyświetlacz pokazuje prędkość jazdy w km h można przełączyć wskazanie na mph 1 ustawiony bieg tryb jazdy maksymalna prędkość na 1 szym biegu wynosi ok 10 km h na 2 gim ok 15 km h i na 3 cim ok 25 km h T...

Page 34: ...tywany w czasie gdy urządzenie jest wyłączone 6 TRP licznik przebiegu dziennego pokazuje przebieg aktualnej wycieczki od chwili włączenia hulajnogi i jest kasowany po wyłączeniu urządzenia 7 szczegóły wskazań ODO lub TRP 8 alarm baterii 9 symbol pojawia się gdy bateria jest w pełni rozładowana a cztery diody LED w dolnej części wyświetlacza obrazujące stopień naładowania akumulatora wygaszone Nale...

Page 35: ...35 Po włączeniu hulajnogi sprawdź na wyświetlaczu stan rozładowania baterii i włączony tryb pracy maksymalnnej prędkości Postaw jedną nogę na platformie hulajnogi ...

Page 36: ...szenia na prawej części kierownicy aby ruszyć Postaw drugą nogę na hulajnodze kiedy jest w ruchu Zwolnij manetkę aby wyhamować powoli Naciśnij dźwignię hamulca z lewej strony kierownicy aby zahamować Zdejmij nogi z hulajnogi jedną po drugiej ...

Page 37: ...abronione jest przeciążanie hulajnogi jak i używanie przez osoby o niższej wadze niż dozwolona Może to skutkować upadkiem użytkownika utratą kontroli nad hulajnogą lub jej uszkodzeniem BATERIA Stopień i szybkość rozładowania baterii jest warunkowana licznymi czynnikami 1 Powierzchni po której jeździmy wyboista i pochyła droga zwiększa szybkość rozładowania 2 Wagą kierowcy 3 Temperaturą otoczenia 4...

Page 38: ...mności normalne 4 5 godzinne ładowanie może być niewystarczające Niezbędne jest ładowanie 24 godzinne ŁADOWANIE BATERII Przed pierwszym użyciem hulajnogi należy naładować baterię 1 Upewnij się że gniazdo do podłączenia ładowarki jest czyste Podłącz wtyczkę ładowarki do hulajnogi a drugą do gniazda AC 230V Dioda LED w ładowarce zaświeci się na czerwono informując o rozpoczęciu procesu ładowania aku...

Page 39: ...rzechowuj ładowarkę oraz hulajnogę w suchych warunkach w otwartej przestrzeni np nie ładuj hulajnogi zamkniętej w szafie z dala od materiałów łatwopalnych Nie podłączaj ładowarki do urządzenia zaraz po zakończeniu jazdy Odczekaj godzinę aż hulajnoga wystygnie tj osiągnie temperaturę otoczenia Podczas ładowania baterii temperatura otoczenia musi być w przedziale 0 40 C a wilgotność powietrza 5 95 Z...

Page 40: ...wać tylko oryginalnej baterii i ładowarki dostarczonej wraz z hulajnogą Nie używaj hulajnogi jeśli poczujesz zapach dymu wydobywający się z okolic hulajnogi Nie używaj hulajnogi jeśli zauważysz jakiekolwiek wycieki substancji Nie dotykaj żadnych substancji wyciekających z hulajnogi w szczególności z baterii PRZEWOŻENIE HULAJNOGI I BATERII Baterie litowe traktowane są jako materiały niebezpieczne P...

Page 41: ...6 Produkt nie jest odpowiedni dla dzieci poniżej 10 lat 7 Młodzież poniżej 18 lat powinna użytkować produkt pod nadzorem dorosłych 8 Jadąc na hulajnodze zachowuj bezpieczny odstęp od innych osób Miej na uwadze że stojąc na hulajnodze jesteś wyższy ok 15cm 9 Zwracaj uwagę na sygnalizację stanu baterii Jeśli jest zbyt niski bateria bliska całkowitego wyczerpania hulajnoga może zatrzymać się gwałtown...

Page 42: ...42 ...

Page 43: ...ym terenie 8 Jadąc utrzymuj stopy na środku platformy 9 Nie rozpoczynaj jazdy i nie zatrzymuj się gwałtownie Gwałtowne ruchy mogą spowodować utratę kontroli nad hulajnogą 10 Nie używaj hulajnogi w nocy i w miejscach ciemnych o ograniczonej widoczności 11 Tylko jedna osoba może poruszać się na hulajnodze w danej chwili nawet jeśli dopuszczalne obciążenie jest większe 12 Nie jeździj podczas deszczu ...

Page 44: ...ość od innych pojazdów ludzi przeszkód 17 Nie używaj a czasie deszczu Unikaj mokrych nawierzchni Sterowanie hulajnogą może zostać ograniczone i spowodować upadek kierowcy 18 Unikaj użytkowania na powierzchniach pokrytych śniegiem lub lodem 19 Nie używaj hulajnogi w niebezpiecznych warunkach lub miejscach 20 Używaj i przechowuj z daleka od źródeł ognia lub ciepła ...

Page 45: ...45 ...

Page 46: ...46 ...

Page 47: ...47 ...

Page 48: ... układy elektroniczne mogą ulec trwałemu uszkodzeniu Zabroniony jest samodzielny demontaż jakiekolwiek naprawy modyfikacje i zmiany konstrukcyjne hulajnogi PRZECHOWYWANIE ELEKTRYCZNEJ HULAJNOGI Upewnij się że bateria hulajnogi jest w pełni naładowana przed długotrwałym przechowywaniem Ładuj baterie do pełna co 2 miesiące Nie przechowuj hulajnogi w warunkach poniżej 0 C Przechowuj hulajnogę w orygi...

Page 49: ...ków terenowych prędkości jazdy etc Kąt natarcia 15 Zasilanie AC 110V 240V 50 60HZ Bateria 7500mAh Lithium rechargeable battery Moc baterii 270Wh Napięcie baterii 36V Pojemność baterii 7 5Ah Wilgotność względna dozwolona 5 95 Czas ładowania baterii około 4 5 godzin Wysokość podstawy około 15 cm Wymiary 110 x 43 x 115 cm Masa około 14 kg Średnica kół 8 5 SERWIS TECHNICZNY Obsługa serwisowa gwarancyj...

Page 50: ... zużytych baterii aby wyjąć baterię z obudowy POPRAWNA UTYLIZACJA PRODUKTU Zgodnie z Dyrektywą 2012 19 UE To oznaczenie umieszczone na produkcie akcesoriach lub dokumentacji oznacza że produktu i jego akcesoriów nie należy usuwać razem z innymi odpadami domowymi Aby uniknąć szkodliwego wpływu na środowisko naturalne i zdrowie ludzi wskutek niekontrolowanego usuwania odpadów prosimy oddzielić te pr...

Page 51: ... niezgodnie z instrukcją i zawartymi w niej ostrzeżeniami i uwagami a także niezgodnie z powszechnie obowiązującym prawem Manufactured under lIcense of FCA Italy S p A FIAT and 500 are trademarks of and lIcensed by the FCA Group CompanIes Importer I wyłączny Dystrybutor 4cv MOBILE SP Z O O SP K UL BRONIEWSKIEGO 28 01 771 WARSZAWA Poland serwIs serwis 4cv gsm pl MADE IN CHINA ...

Page 52: ...stania z produktu lub jego wadliwe działanie 3 Uprawniony z gwarancji jest zobowiązany dostarczyć kompletne urządzenie w oryginalnym opakowaniu lub opakowaniu zabezpieczającym przed uszkodzeniem mogącym powstać w czasie transportu zawierające wszystkie akcesoria ładowarki uchwyty kable do oddziału Dystrybutora Serwis 4CV ul Wrocławska 6 01 493 Warszawa wraz z kartą gwarancyjną dowodem zakupu oraz ...

Page 53: ...terki lub zakwalifikowania jej jako nie podlegającej gwarancji klient ponosi koszty ekspertyzy w wysokości 50 zł netto oraz koszty przesyłki 9 Niniejsza gwarancja nie wyłącza nie ogranicza ani nie zawiesza uprawnień kupującego wynikających z przepisów o rękojmi za wady rzeczy sprzedanej 10 Terytorialny zasięg ochrony gwarancyjnej to terytorium Rzeczpospolitej Polskiej Nazwa sprzętu Model sprzętu N...

Page 54: ...54 ...

Page 55: ...55 ...

Page 56: ...56 ...

Reviews: