background image

THANK YOU

We appreciate the trust and confidence you have placed in Fiberon through the purchase of this railing. We strive to continually create quality 

products designed to enhance your home. Visit us online to see our full line of products available for your home improvement needs. Thank you 

for choosing Fiberon!

INSTALLATION MANUAL

ARMORGUARD

®

 DELUXE RAILING

Questions, problems, missing parts? Before returning to the store,  

call Fiberon Customer Service 

8 a.m. - 5 p.m., EST, Monday - Friday

1-800-230-7547

FIBERONDECKING.COM

Part #SEC19 CW 6KD

SEC19 CW 8KD
SEC19 CWS 6KD HW

Summary of Contents for ARMORGUARD SEC19 CW 6KD

Page 1: ... your home Visit us online to see our full line of products available for your home improvement needs Thank you for choosing Fiberon INSTALLATION MANUAL ARMORGUARD DELUXE RAILING Questions problems missing parts Before returning to the store call Fiberon Customer Service 8 a m 5 p m EST Monday Friday 1 800 230 7547 FIBERONDECKING COM Part SEC19 CW 6KD SEC19 CW 8KD SEC19 CWS 6KD HW ...

Page 2: ...IMPORTANT Please consult local zoning laws in regards to load requirements and bottom space requirements for rails All supporting structures must be in accordance with applicable building codes Neighborhood associations and or historic districts may regulate size type placement and ability of railing Apply for permits if required by local authorities and codes Ensure compliance prior to installati...

Page 3: ...tructure on which the manufacturer s products are installed 4 Defects in or failure arising from decking structure resulting from water caused by improper installation workmanship maintenance or repair 5 any Act of God including but not limited to flooding hurricane tornado wind earthquake lightning hail etc 6 discoloration fading spotting or staining from or caused in whole or in part by mold mil...

Page 4: ... Flange 4 DD 10 x 1 in self tapping screw 4 EE Screw caps 4 FF 10 x 1 5 in screw 8 GG 10 x 2 in screw 4 ANGLE BRACKET HARDWARE KIT OPTIONAL NN OO MM PP Part Description Quantity per kit MM 10 x 1 in screw 12 NN 10 x 2 in screw 8 OO Angle bracket 4 PP Driver bit 1 STAIR RAILING HARDWARE KIT JJ KK HH II LL Part Description Quantity per kit HH Top upper stair bracket 1 II Bottom upper stair bracket 1...

Page 5: ... posts before securing NOTE For best results cut post sleeves with a carbide tipped blade minimum 32 tooth NOTE Special installation requirements are needed if using metal surface mount posts Please contact Fiberon at 1 800 573 8841 for direction If using cove moulding slide the post down into the cove moulding prior to securing any railings Fig 1 Fig 1 Measure the inside distance between properly...

Page 6: ...g sure that the distance from the end of the rail to the first baluster slot is equal on both ends of the rail The minimum distance from a post to first baluster slot is 2 in for clearance from the brackets See Fig 3 2 in Fig 3 Place the rails together so that the top and bottom baluster slots are aligned Mark the bottom rail for the inside distance between the posts and rail brackets see Fig 4 Cu...

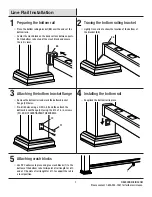
Page 7: ...w the location of the bottom of the bracket BB BB 3 Attaching the bottom bracket flange Remove the bottom rail and mark the bottom bracket flange CC holes Pre drill holes using a 5 32 in bit and then attach the bottom bracket flange CC using the 10 x 1 5 in screws FF DO NOT OVERTIGHTEN THE SCREWS CC FF 4 Installing the bottom rail Snap lock the bottom rail in place 5 Attaching crush blocks Use PVC...

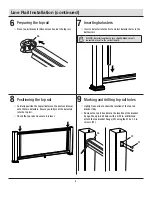
Page 8: ...ength 8 Positioning the top rail Carefully position the top rail between the posts and lower onto the two balusters Ensure you fully seat the balusters into the top rail Check the top rail and ensure it is level 9 Marking and drilling top rail holes Lightly trace a line to show the location of the top rail bracket AA Remove the top rail and mark the location of the bracket flange Then pre drill ho...

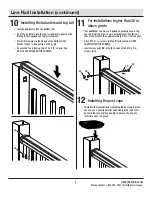
Page 9: ...NOT OVERTIGHTEN THE SCREWS GG AA 11 For installations higher than 30 in above grade Two additional screws are required to properly secure the top rail Predrill a 5 32 in hole perpendicular into the flat face of the bracket AA approximately 1 2 in from the post Drive 10 x 1 in screws DD until fully seated DO NOT OVERTIGHTEN THE SCREWS Insert screw caps EE onto the heads of the 10 x 1 in screws DD D...

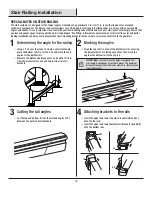
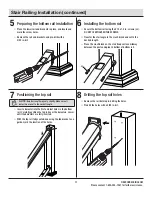
Page 10: ...railing Using a 2 x 4 over the steps to create a consistent angle place the bottom rail 1 over the 2 x 4 and mark the end angles for the bottom rail Measure the distance between posts and subtract 1 8 in from the measurement on each end to allow for stair brackets 1 2 Marking the angles Align the top rail 1 on top of the bottom rail 2 ensuring the baluster holes are facing each other Then mark the...

Page 11: ...sh block and cut to the desired length Place the crush block on the stair tread surface midway between the posts and glue to bottom of bottom rail LL 7 Positioning the top rail NOTE Baluster length may vary slightly Make sure all balusters are cut to the correct length Insert a baluster into the first and last holes in the bottom rail Carefully position the top rail over the balusters Lower until ...

Page 12: ...TEN THE SCREWS NOTE Using extended drill bits is recommended to prevent damage to the rail and allow a more perpendicular driving angle LL 10 Installing the caps Complete the installation by installing the post cap in place You can use a quality exterior adhesive in order to do this but note that you will not be able to remove the cap at a later time once it is glued ...

Page 13: ...uted underside surface of the bottom rail Mark the proper cutting angle Ensure baluster holes are equidistant from the end of rail to ensure proper vertical alignment of balusters 45 40 35 30 25 20 20 25 30 35 40 45 2 Making the angle cuts Make the angle cuts in the top and bottom rails 45 40 35 30 25 20 45 3 Installing the angle brackets Align the angle bracket OO with the cut in each rail Inset ...

Page 14: ...stions problems missing parts Before returning to the store call Fiberon Customer Service 8 a m 5 p m EST Monday Friday 1 800 230 7547 FIBERONDECKING COM Retain this manual for future use FIB 717 PKG 6 19 ...

Reviews: