background image


Inserting


and


Removing


SFP


Modules


Identify


the


Latch


Type


of


the


SFP


Module


SFP


Modules


have


various


latching


mechanisms


to


secure


them


into


the


SFP


Cage


of


a


device.


The


FiberPlex


WDM


can


support


a


host


of


manufacturers


and


brands


of


SFP


Modules


so


the


user


may


encounter


any


number


of


different


latches.


Some


of


these


are


described


below.


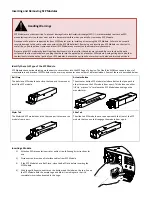
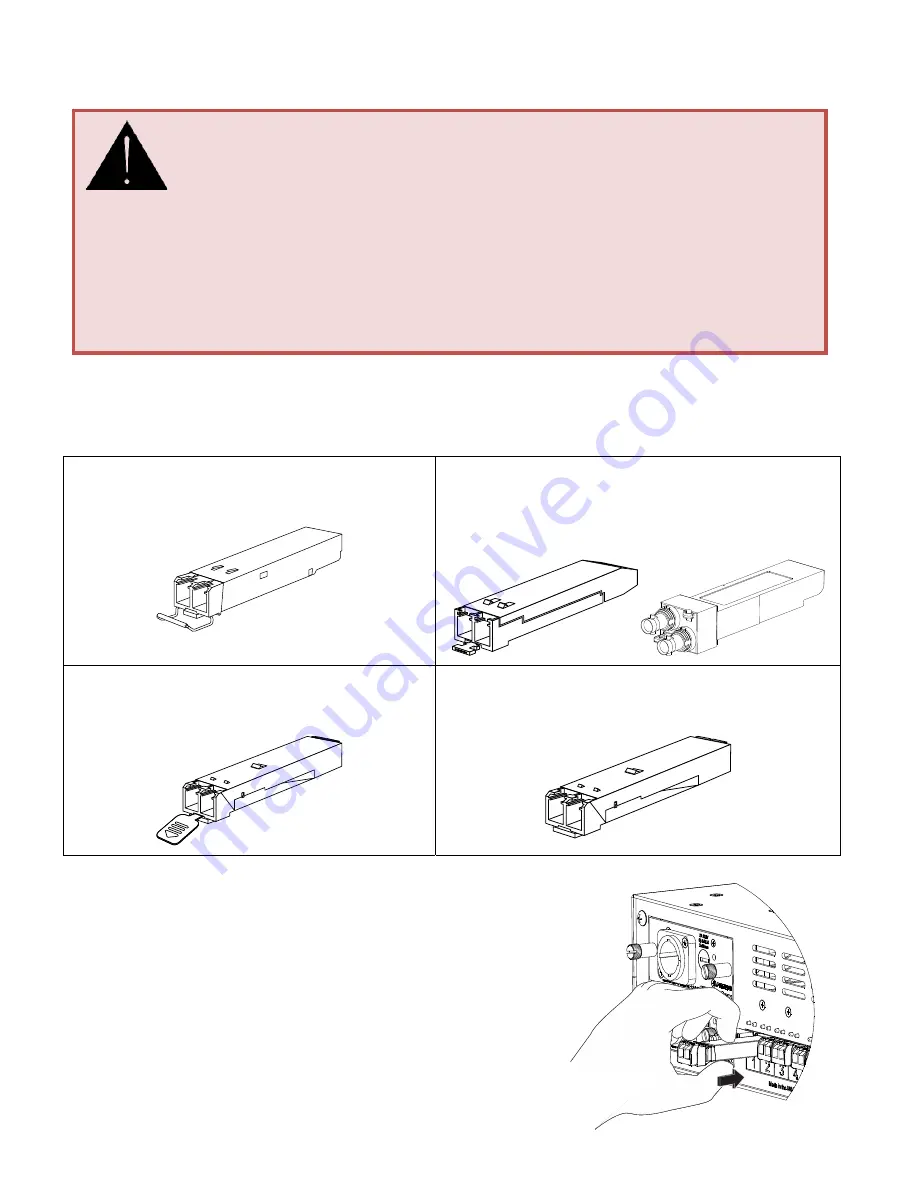
Bail


Clasp


The


bail


clasp


SFP


module


has


a


clasp


that


you


use


to


remove


or


install


the


SFP


module.


Actuator


Button


The


actuator


button


SFP


module


includes


a


button


that


you


push


in


order


to


remove


the


SFP


module


from


a


port.


This


button


can


either


lift


‘Up’


or


press


‘In’


to


release


the


SFP


Module


depending


on


the


manufacturer.


Mylar


Tab


The


Mylar


tab


SFP


module


has


a


tab


that


you


pull


to


remove


the


module


from


a


port.


Slide


Tab


The


slide


tab


SFP


module


has


a


tab


underneath


the


front


of


the


SFP


module


that


you


use


to


disengage


the


module


from


a


port.


Inserting


a


Module


1)


Attach


an


ESD

preventative


wrist


or


ankle


strap,


following


its


instructions


for


use.


2)


Disconnect


and


remove


all


interface


cables


from


SFP


Module.


3)


If


the


SFP


Module


has


a


Bail


Clasp


,


close


the


Bail


Clasp


before


inserting


the


SFP


Module.


4)


With


the


gold


finger


connector


on


the


bottom


and


the


label


on


the


top,


line


up


the


SFP


Module


with


the


empty


cage


and


slide


it


in


making


sure


that


it


is


completely


inserted


and


seated


in


the


cage.


Handling


Warnings


SFP


Modules


are


static


sensitive.


To


prevent


damage


from


electrostatic


discharge


(ESD),


it


is


recommended


to


attach


an


ESD


preventative


wrist


strap


to


your


wrist


and


to


a


bare


metal


surface


when


you


install


or


remove


an


SFP


Module.


Disconnect


all


optical


or


copper


cables


from


SFP


Modules


prior


to


installing


or


removing


the


SFP


Module.


Failure


to


do


so


could


result


in


damage


to


the


cable,


cable


connector


or


the


SFP


Module


itself.


Removing


and


inserting


an


SFP


Module


can


shorten


its


useful


life,


so


you


should


not


remove


and


insert


SFP


Modules


any


more


often


than


is


absolutely


necessary.


Protect


optical


SFP


modules


by


inserting


clean


dust


covers


into


them


after


the


cables


are


removed.


Be


sure


to


clean


the


optic


surfaces


of


the


fiber


cables


before


you


plug


them


back


into


the


optical


ports


of


another


SFP


module.


Avoid


getting


dust


and


other


contaminants


into


the


optical


ports


of


your


SFP


modules,


because


the


optics


will


not


work


correctly


when


obstructed


with


dust.

Summary of Contents for WDM16

Page 1: ...USER MANUAL Active Wave Division Multiplexer WDM16 WDM8A WDM8B...

Page 2: ......

Page 3: ...us the apparatus has been exposed to rain or moisture does not operate normally or has been dropped The apparatus shall not be exposed to dripping or splashing No objects filled with liquids such as v...

Page 4: ...I equipment must be earthed separately Grounding the unit is one of the measures for protection against electrical shock hazard dangerous body currents Hazardous voltage may not only be caused by defe...

Page 5: ...sal of Used Equipment Used equipment contains valuable raw materials as well as substances that must be disposed of professionally Please dispose of used equipment via an authorized specialist dealer...

Page 6: ...Active Wave Division Multiplexer Combines 16 or 8 optical channels into a single fiber pair Each channel independently supports data rates from 155 MB up to 3 GB SMPTE compatible internal fiber optics...

Page 7: ...the number of Active Wave Division channels and the associated internal wavelengths that are supported The chassis dimensions and power supplies remain identical The WDM16 supports all of the 16 stand...

Page 8: ...if there is mechanical damage or if the unit fails to operate notify FiberPlex and make the shipping materials available for the carrier s inspection Chassis Mounting Mount the chassis using fastener...

Page 9: ...ystem is functioning normally PS1 Shows status indication of the power supply in PS Slot 1 top slot Color indications can be interpreted using the following table LED State Condition Off No power supp...

Page 10: ...INF 8074i more information later in this manual They are fixed bi directional ports and cannot support dual TX or dual RX SFPs Any standard MSA complaint SFP can be used in these slots including but n...

Page 11: ...Power Supply Module AC Inlet Power is provided through a Neutrik powerCON TRUE1 connector Connect to 100 240 VAC power source using the supplied AC power cord Fuse Compartment Contains the fuse for th...

Page 12: ...lete redundancy The second supply can be inserted at any time in the unused power supply slot Insert the supply first then apply external AC power The PSMAC and the WDM16 8 support hot swapping of the...

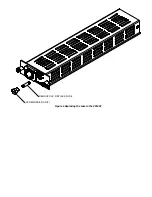
Page 13: ...REMOVE CAP REPLACE FUSE SCREWDRIVER SLOT Figure 6 Replacing the Fuse in the PSMAC...

Page 14: ...e SFP Module has a Bail Clasp close the Bail Clasp before inserting the SFP Module 4 With the gold finger connector on the bottom and the label on the top line up the SFP Module with the empty cage an...

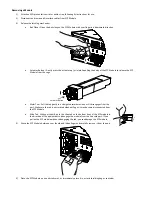
Page 15: ...Tab Pull the tab gently in a straight outward motion until it disengages from the port Make sure the tab is not twisted when pulling as it may become disconnected from the SFP Module Slide Tab With y...

Page 16: ...nnecting the cable requires grasping the cable connector with your full hand and pulling back the release ring with your thumb and fore finger while pulling the connector straight out See Neutrik docu...

Page 17: ...the WDM16 The pinouts of the connectors are as follows Connector Pin Function 1 Rx to the WDM 2 RX to the WDM 3 TX from the WDM 4 TX from the WDM A standard crossover RJ11 cable can be used to daisych...

Page 18: ...gical conditions allowing the longer sequences of ones or zeros to pass without error The Fiberplex Technologies WDM16 and WDM8 Active Coarse Wave Division Multiplexer has Video Enhanced optics pre in...

Page 19: ......

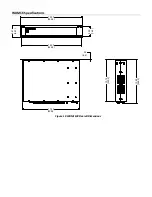
Page 20: ...WDM16 Specifications 19 00 482 6 3 00 76 2 3 47 88 1 18 33 465 5 25 6 4 17 25 438 2 13 12 333 2 13 62 346 0 Figure 10 WDM16 8 Overall Dimensions...

Page 21: ...ax Data Rate MB 155 3000 Recommended Jitter psec 40 Operating Voltage VDC 3 3 Maximum Current mA 350 Internal CDWM Optical Interfaces Min Typ Max Aggregate Optical Launch Level dB 1 0 1 Aggregate Rece...

Page 22: ...n 286 mm 2 625 in 67 mm 1 25 in 32 mm 1 1 lb 0 5 kg SPECIFICATIONS AC POWER SUPPLY Min Typ Max Power Supply Input Voltage VAC 100 110 240 Input Frequency Hz 40 400 Power Factor 92 Output 1Voltage VDC...

Page 23: ......
Page 24: ...WDMUM 1401 18040 412 Guilford Rd Annapolis Junction MD 20701 fiberplex com clients fiberplex com 301 604 0100...

Reviews: