background image

35 

11.2 Enter a Customer & Product Code by Scanner

24


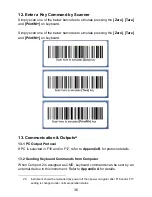
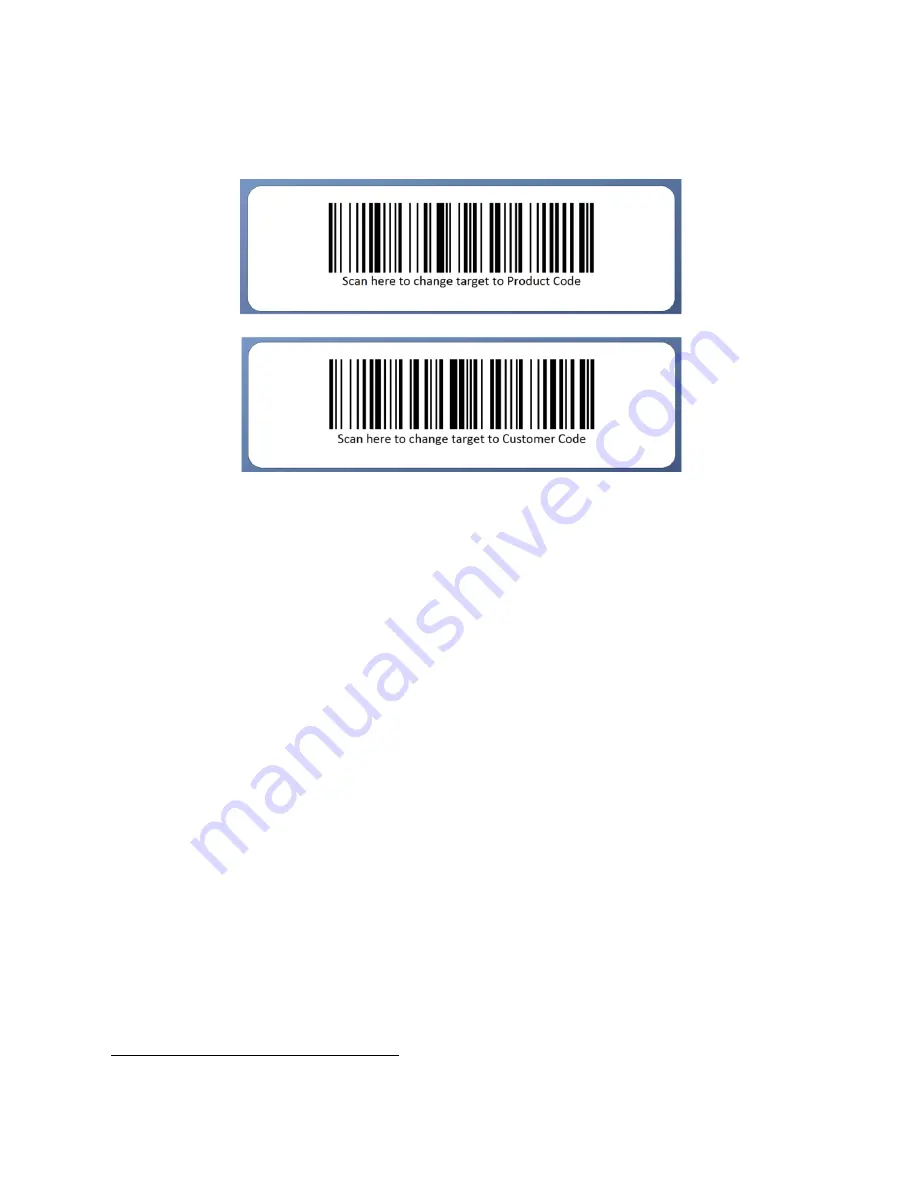
Default scanner input target is product code. To change scanner input target, 
scan either one of the below barcodes, then scan a customer or product barcode. 


11.3 Clear a Customer & Product Code Entered 

To  clear  a  customer/product  code  entered,  press 

[Hold]

  for  procedures 

2


paragraph 11.

1

, the press 

[Print/M+]


11.4 Print a Customer & Product Code Entered

25


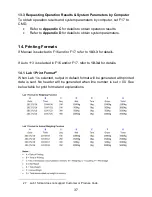
Once a customer/product code is entered, it will be printed automatically through 
the assigned comport. No other setting is required. 


24

       Maximum = 15 digits. 

25

       Print format LAB 1 does not support customer/product code. 

Summary of Contents for CSa

Page 1: ...CSa Advance Wireless Crane Scale Operation Manual Full Version PLEASE READ THIS MANUAL VERY CAREFULLY BEFORE OPERATING THIS INSTRUMENT Specifications subject to change without prior notice V100 Feb 2018 ...

Page 2: ...2 ...

Page 3: ...2 Keys Display on Remote Controller 12 4 Power Battery Recharging 13 4 1 Power Adaptor 13 4 2 Built In Rechargeable Battery 13 5 Initial Setup 13 5 1 Internal Functions Settings 13 5 2 How to Enter Select Internal Function 13 5 3 IR Remote Controller Key Function under Internal Function Mode 14 5 4 Internal Function Table 15 5 5 Weight Unit Conversion 18 5 6 Auxiliary Function Modes 19 5 7 Auto Po...

Page 4: ...en data is accumulated to memory 23 6 7 4 Memory recall and clearance 23 7 Weighing Mode 24 8 Peak Hold Mode 25 9 Animal Weighing Mode 25 9 1 Description of Animal Weighing Mode 25 9 2 Basic Animal Weighing Settings 25 9 3 Start using Animal Weighing 26 10 Wireless Communication 26 10 1 Default Settings of Built in Bluetooth WIFI Module 26 10 2 Default Settings of Built in WIFI Module 27 10 3 Comp...

Page 5: ...g Formats 37 14 1 Lab 1 Print Format 37 14 2 Standard Lab 2 Print Format 38 14 3 Customizing Lab 2 Print Format 39 14 3 1 Print output format variants table 39 14 3 2 To edit custom Lab 2 print output format 40 14 4 Lab 3 Data Base Output Format 41 14 5 Lab 4 Print Format 42 14 6 Lab 5 Print Format 43 15 Label Printing 44 15 1 Label Format Groups Label File Names 44 15 1 1 FL1 Label Format Group 1...

Page 6: ...esult Commands 57 Appendix D System Parameter Inquiry Commands 59 Appendix E TSC Printer Installation Setup Procedures 68 E 1 Before Installation 68 E 1 1 Printer Installation 68 E 1 2 Uploading TCF File to Printer 69 Appendix F Create Upload Label to TSC Printer 70 F 1 Selecting the Correct Edition for Bartender Software 70 F 2 Adding Information from Instrument to Label Uploading to a TSC Printe...

Page 7: ...orized personnel only Do not attempt to change any parameters under internal function number F60 F99 Contact your dealer for installation and technical assistance 1 2 Seal Serial Number This instrument is legal for trade only when it is sealed and or stamped and bearing a serial number Do not attempt to break the seal or stamp or serial number affixed to this instrument No warranty service will be...

Page 8: ...ale a This instrument must be hanged via a strong media e g a wire rope or a metal hook to a firm support that can withstand at least 5 times of the maximum capacity of this instrument b Make sure that this instrument is hanged vertically c Avoid using this instrument in any environment where excessive wind flow vibration and extreme temperature change exist 1 6 Support Service Always contact your...

Page 9: ...9 2 Specifications ...

Page 10: ...10 3 Keys Display Connection Points ...

Page 11: ...when instrument is at zero status 8 Net Indicator Visible when net result is being displayed 9 kg Stable Indicator Visible when weight unit is kg Flashing Weight unstable Lit on Weight stable 10 Newton Stable Indicator Visible when weight unit is Newton Flashing Weight unstable Lit on Weight stable 11 lb Stable Indicator Visible when weight unit is lb Flashing Weight unstable Lit on Weight stable ...

Page 12: ...ndicator Visible when IR signal is being transmitted G Zero Press this key to set weight displayed to zero when unloaded H Print M Press this key to send print data out and or accumulate current value to memory2 I Unit Press this key to shift among various weight units if weight unit conversation is enable J Set When in operation mode Press and release to Introduce a preset tare value3 When in wei...

Page 13: ...e recharge the built in batter for at least 8 hours to ensure the best battery performance 5 Initial Setup 5 1 Internal Functions Settings Application parameters can be checked and set through internal function Set all preferred operation parameters according to 5 4 5 2 How to Enter Select Internal Function5 Follow the below procedures for internal function setup a In weighing function press and h...

Page 14: ... by 1 Go to next Alphabet Symbol during Customer Product code data input process Unit Go to previous page previous parameter Mover cursor to left Print M Enter save and return Func Go to next page next parameter Mover cursor to right MC Quick access to 10th internal function number Decrease value by 1 Go to previous alphabet Symbol during Customer Product code data input process Off Quit without s...

Page 15: ...lue is 188888 Example B 12 followed by 45678 means that actual span value is 1245678 Press Zero to quit to F1 F2 All Segment Check All display segments and LED indicators will be lit on Check if any segments or indicators are missing F3 Capacity Division Default Weight Unit Display basic metrology characteristics capacity division and weight unit Value displayed Max 1e F4 Date Format Date DD M YY ...

Page 16: ... 1 Strong Ft 2 Normal Ft 3 Weak F11 Auxiliary Function PEK Peak On OFF Ani Animal On OFF PCd Quick Acces to Product Code Setting On OFF F12 Auto Tare Function OFF On Conti Notes OFF Auto Tare Function disable On Only the first table weight applied will be tare off Minimum tare load 2d Conti All stable weight applied will be tare off Minimum tare load 10d F13 Repetitive Tare Function OFF On If F12 ...

Page 17: ...us F18 Machine ID and Group Number I Machine ID Gp Group Number Press Print M to save a Machine ID number 0000 9999 entered or press Hold clear machine ID Then press Print M to go to Group Number setting Press Print M to save a Group Number 00 99 entered or press Hold clear machine ID F19 Manual Customer Product Code Setting H Code M Code L Code Product code accepts space dash numeric numbers capi...

Page 18: ...isplay brightness will switch to minimum when weight remains unchanged for 30 seconds Note Auto Power Saving will be disabled when an energized power adaptor is plugged in F33 Statistic Data Output Sd On Sd OFF F38 WIFI BT on off Fi WIFI On OFF BT Bluetooth On OFF Restart instrument by power off then power on again after F38 setting is changed under normal operation status 5 5 Weight Unit Conversi...

Page 19: ...ighing mode select Anion to disable select AnioF Then press Print M to confirm and go to next mode setting To enable Quick access to Customer Product Code Setting mode select PCdon to disable select PCdoF Then press Print M to confirm 5 7 Auto Power Off This instrument is equipped with various auto power off parameters Refer to internal function number F7 of 5 4 for detail and setting 5 8 Display ...

Page 20: ...n number F28 setting instrument may ask for operator number input If this is the case Input 4 digit operator number then press Print M to enter or Press Zero to skip operator number when oP appears i At this point instrument is in weighing mode and is ready for operation 6 3 Set Weight to Zero when Unloaded If zero result is not obtained when unloaded press Zero to set weight displayed to zero 6 4...

Page 21: ... cancelled automatically 6 4 3 Manual Repetitive Tare F13 7 When F13 is set to OFF this instrument does not permit multiple tare operation Tare effect can only be cancelled when container is removed and gross weight is zero When F13 is set to ON this instrument will permit multiple manual tare operation provided that gross weight does not below zero 6 4 4 Preset Tare F63 8 9 Preset tare allows a p...

Page 22: ...yed before power off will be employed again automatically when re powered on 6 6 Weight Units11 To display result in preferred weight unit press Unit until the preferred weight unit indicator appears The working mode employed before power off will be employed again automatically when re powered on 6 7 Memory Accumulation12 There are 2 types of memory accumulation a Automatic accumulation mode and ...

Page 23: ...ctions accumulated to memory 2 This instrument returns to normal display status after 2 seconds 6 7 4 Memory recall and clearance Accumulation data will be stored in memory and will not be erased by normal power off by pressing the Power Zero key process But changing weight unit or to another working mode will automatically erase accumulation data stored Follow below procedures to recall and clear...

Page 24: ...press Zero After Zero is pressed the Zero Indicator will appear18 3 If a container is used apply it first to instrument and then press Tare After Tare is pressed the Net Indicator will appear19 4 The weight of the object is displayed automatically Notes To hold the current weight result press Hold Current result will be displayed in flashing To refresh the weight result or unlock weight result bei...

Page 25: ...Animal Weighing Mode Animal weighing mode is used to weigh live animals 9 2 Basic Animal Weighing Settings 1 Refer to 5 5 on how to select the desired weight unit 2 Enter Animal Weighing mode 3 Press and hold Set for 2 second to enter weight release parameter setting 4 Press Func or Unit key to select the preferred weight release variation value 10 parameters are available from Off to 20 5 10 para...

Page 26: ...ight reading manually press Hold 10 Wireless Communication There are 2 built in bi directional communication ports on this instrument Comport 1 can be used for Bluetooth or TTL communication Contract your dealer in case TTL output is needed Setting of comport 1 is done through internal function number F16 Comport 2 supports only WIFI communication Setting of comport 2 is done through internal func...

Page 27: ... working modes except Off LP50 and TSC accept scanner data input during operation All working modes except Off LP50 and TSC accept and responses to System Parameter Inquiry and also System Parameter Setting commands during operation When both ports are set to data string related modes Print M key is used as M memory accumulation and can only be activated when value is stable and 20d If both compor...

Page 28: ...ailable Press Func or Unit until the preferred parameter appears then press Print M to save 5 Instrument displays time interval in second between each output 10 parameters 0 0 5 1 1 5 10 30 60 90 120 and 300 are available 0 continuous output Press Func or Unit until the preferred parameter appears then press Print M to save 6 At this point PC setup is completed 10 3 2 When comport is set as CMD 1 ...

Page 29: ...uto Accumulation 2 parameters on off are available Press Func or Unit until the preferred parameter appears then press Print M to save On when pressing Print M during normal operation the instrument does print and M at the same time Off when pressing Print M during normal operation the instrument does print only 5 Instrument displays Stability control 2 parameters Yes no are available Press Func o...

Page 30: ...ndividual transaction This format supports weighing piece count and ATM mode only Refer to 10 3 3 3 for other settings LP 50 Output to LP 50 label printer Refer to 10 3 3 4 for other settings TSC Output to TSC label printer Refer to 10 3 3 4 for other settings 10 3 3 1 Other settings if Lab 1 is selected 1 Instrument displays Line number Line number is the number of lines in between which the repo...

Page 31: ...nt displays label file number FL1 01 FL1 99 to print in label format group 1 Press Func or Unit until the preferred label file number appears then press Print M to save 3 Instrument displays label file number FL2 01 FL2 99 to print in label format group 2 Press Func or Unit until the preferred label file number appears then press Print M to save 4 At this point LP 50 TSC setup is completed 10 3 4 ...

Page 32: ...displays print format 7 parameters Lab 1 Lab 2 Lab 3 Lab 4 Lab 5 LP 50 and TSC Instrument will not generate any output if the actual weight is less than the parameter weight selected Press Func or Unit until the preferred parameter appears then press Print M to save Lab 1 Output in Landscape direction If Lab 1 is selected refer to 10 3 3 1 for other settings Lab 2 Output in Portrait Direction If L...

Page 33: ...parameter appears then press Print M to save Note baud rate parity and data length settings will be bypassed when Bluetooth or WIFI is enabled in F38 If it is the case baud rate 115200 will be employed by default 4 At this point scanner setup is completed 11 Customer Product Code This instrument supports product and customer code entry Both Product and Customer code accept numeric numbers letters ...

Page 34: ...Code for customer code P Code for product code then press Print M to confirm 2 Instrument displays H code followed by the 1st 5 digits Enter the first 5 digits of the code here then press Print M to confirm 3 Instrument displays M code followed by the 2nd 5 digits Enter the 7th 12th digits of the code here then press Print M to confirm 4 Instrument displays L code followed by the 3rd 5 digits Ente...

Page 35: ...e 11 3 Clear a Customer Product Code Entered To clear a customer product code entered press Hold for procedures 2 paragraph 11 1 the press Print M 11 4 Print a Customer Product Code Entered25 Once a customer product code is entered it will be printed automatically through the assigned comport No other setting is required 24 Maximum 15 digits 25 Print format LAB 1 does not support customer product ...

Page 36: ...unication Outputs26 13 1 PC Output Protocol If PC is selected in F16 and or F17 refer to Appendix B for protocol details 13 2 Sending Keyboard Commands from Computer When Comport 2 is assigned as CMD keyboard commands can be sent by an external device to this instrument Refer to Appendix A for details 26 Instrument should be re started by power off then power on again after F16 and or F17 setting ...

Page 37: ...em parameters 14 Printing Formats If Manual is selected in F16 and or F17 refer to 10 3 3 for details If Auto 1 3 is selected in F16 and or F17 refer to 10 3 4 for details 14 1 Lab 1 Print Format27 When Lab 1 is selected output in default format will be generated with printed data is sent No header will be generated when line number is set 00 See below table for print format and explanations 27 La...

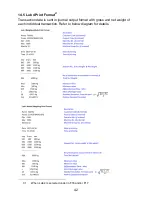
Page 38: ...andard Lab 2 Print Format28 Standard ticket receipt printout of various function modes are described illustrated below Refer to below diagram for printout content 28 When Lab 2 is selected under in F16 and or F17 ...

Page 39: ...ts table Symbol Description End Edit finished Cr LF Insert one blank row dAtE Date of printing time Time of print nEt Net weight tArE Tare weight GroSS Gross weight trAnS Transaction sequent number if this transaction is accumulated to memory ACC Total accumulated weight when accumulation function is in effect SiGn Signature P Code Product code Peak Peak hold value Id Machine ID GrouP Machine grou...

Page 40: ...details stored d Press Print M to confirm or select other variant or command by press Func or Unit Then press Print M to confirm and save e This instrument displays Line 2 and the last variant or command stored f Repeat steps d and e for other lines g To finish editing select command End then press Print M to confirm h This instrument returns to and displays the current internal function number i ...

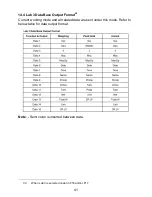
Page 41: ...ase Output Format30 Current working mode and all related data are sent under this mode Refer to below table for data output format Note Semi colon is inserted between data 30 When Lab 3 is selected under in F16 and or F17 ...

Page 42: ...ab 4 Print Format31 Transaction data is sent in journal output format with gross and net weight of each individual transaction Refer to below diagram for details 31 When Lab 4 is selected under in F16 and or F17 ...

Page 43: ...ab 5 Print Format32 Transaction data is sent in journal output format with time and net weight of each individual transaction Refer to below diagram for details 32 When Lab 5 is selected under in F16 and or F17 ...

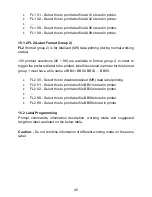
Page 44: ...de This will retrieve wrong data of non current working mode 3 Print only label data when the same working mode is in operation 4 Do not combine data of various working modes on same label This will retrieve wrong data of non current working mode 15 1 Label Format Groups Label File Names 2 label format groups are available these are FL1 label file group 1 and FL2 label file group 2 15 1 1 FL1 Labe...

Page 45: ...referred label to be printed label files stored in printer for this format group 1 must have a file name of BB01 BB02 BB03 BB99 FL2 00 Select this to disable totalized MR data label printing FL2 01 Select this to print label file BB01 stored in printer FL2 02 Select this to print label file BB02 stored in printer FL2 98 Select this to print label file BB98 stored in printer FL2 99 Select this to p...

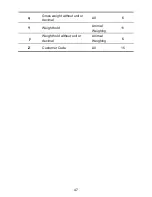
Page 46: ...ccumulated transaction 8 digits with leading space All 8 m No of accumulated transaction 6 digits with leading zero All 6 N Total accumulated weight All 9 n Total accumulated weight without unit or decimal All 6 O Net weight All 10 o Net weight without unit or decimal All 6 P Tare weight All 10 p Tare weight without unit or decimal All 6 Q Gross weight All 10 33 Prompt commands are case sensitive ...

Page 47: ...47 q Gross weight without unit or decimal All 6 Y Weight hold Animal Weighing 11 y Weight hold without unit or decimal Animal Weighing 6 Z Customer Code All 15 ...

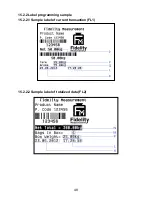
Page 48: ...48 15 2 2 Label programming sample 15 2 2 1 Sample label of current transaction FL1 15 2 2 2 Sample label of totalized data FL2 ...

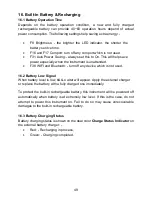
Page 49: ...ent is unattended F38 WIFI and Bluetooth turn off any device which is not used 16 2 Battery Low Signal When battery level is low bAt Lo alter will appear Apply the external charger or replace the battery with a fully charged one immediately To protect the built in rechargeable battery this instrument will be powered off automatically when battery is at extremely low level If this is the case do no...

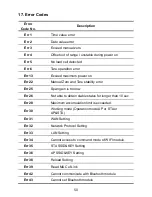
Page 50: ...Err 25 Span gain is too low Err 26 Not able to obtain stable status for longer than 10 sec Err 28 Maximum accumulation limit is exceeded Err 30 Working mode Operation mode AP or STA or AP STA Err 31 WAN Setting Err 32 Network Protocol Setting Err 33 LAN Setting Err 34 Cannot access to command mode of WIFI module Err 35 STA SSID KEY Setting Err 36 AP SSID KEY Setting Err 38 Reload Setting Err 39 Re...

Page 51: ...mp cloth If necessary use a mild detergent in water b Do not use any harsh abrasive material acetone volatile solvent thinner or alcohol for cleaning c Verify the accuracy of this instrument periodically Re calibrate if necessary In some countries calibration requires authorized qualified agent Contact your dealer for more information d Store this instrument in a dry and clean place e Recharge bat...

Page 52: ...simulate keyboard entries To enable keyboard commands connect the external peripheral which generates keyboard commands to Comport 2 and set Comport 2 to CMD Keyboard Command format as below a Hex code 0D CR then b Hex code 0A LF then c Letter shown on below illustration diagram then d Space Hex code 20 35 Keyboard commands are case sensitive ...

Page 53: ...53 Appendix B PC Output Protocols ...

Page 54: ...54 ...

Page 55: ...55 ...

Page 56: ...56 ...

Page 57: ... 0A LF then c Command code listed on below command table then d Space Hex code 20 Refer to below table for commands details Operation Result Commands Table Prompt Command37 Description a Peak Value b Product Code c Total accumulated pieces d Machine ID e Machine Group Number f Operator Number g Customer Code J Current status weight and tare weight values K Date L Time 36 Connect the external perip...

Page 58: ...et weight o Net weight without unit or decimal P Tare weight p Tare weight without unit or decimal Q Gross weight q Gross weight without unit or decimal R HI limit S LO limit T Comparison Result U Number of piece V Average piece weight Y Weight hold y Weight hold without unit or decimal Z Read internal count AD value ...

Page 59: ...Notes a If more than one parameter semi colon separation is inserted between parameters b Response from instrument always end up with Hex code 0D 0A Aa Calibration weight unit and application d1 calibration weight unit 0 kg 1 lb d2 application 0 none 1 OIML 2 NTEP Ab Decimal format decimal point of kg g and lb d1 decimal format 0 dot fixed d2 kg 0 no decimal 1 1 decimal place 4 4 decimal place d3 ...

Page 60: ... length 8 including decimal with leading space Hex code 20 Ad Capacity 2 of kg g lb d1 mode 0 Off 1 dual weighing range 2 dual interval d2 capacity in kg Data length 8 including decimal with leading space Hex code 20 d3 capacity g Data length 8 including decimal with leading space Hex code 20 d4 capacity lb Data length 8 including decimal with leading space Hex code 20 Ae Division 1 of kg g lb d1 ...

Page 61: ...0 d2 gravity of location of operation place Data length 8 including decimal with leading space Hex code 20 Ah Linearity Compensation Function 0 Off 1 On Ai ad value of zero point offset value weight value of LD1 ad value of LD1 weight value of LD2 and ad value of LD2 d1 ad value of zero point Data length 8 including decimal with leading space Hex code 20 d2 weight value of LD1 Data length 8 includ...

Page 62: ...e 20 d2 span weight value Data length 8 including decimal with leading space Hex code 20 d3 net span AD value Data length Data length 8 integers only with leading space Hex code 20 Ak Weight unit enable disable for kg g and lb d1 kg 0 Off 1 On d2 g 0 Off 1 On d3 lb 0 Off 1 On Al Filter strength 0 level 1 1 level 2 7 level 8 8 level 9 Am Initial Zero range manual zero range auto zero tracking speed...

Page 63: ...ability control 0 no disable 1 Yes enable d2 manual tare stability control 0 no disable 1 Yes enable Ap Auto power off time backlight brightness auto power saving keypad buzzer and system buzzer d1 auto power off time 0 Off 1 1 minute 2 3 minute 3 5 minute 4 10 minute 5 20 minute d2 backlight brightness 01 04 01 lowest 04 highest d3 auto power saving 00 Off 01 On d4 keypad buzzer 0 Off 1 On d5 sys...

Page 64: ...a length 8 integers only with leading space Hex code 20 d6 Lo Limit for counting Integer only Data length 8 integers only with leading space Hex code 20 Ar Comport 1 working mode baud rate output protocol print stability control transmission interval Auto Accumulation number of copy check result control print format label format group 1 file number label format group 2 file number d1 working mode ...

Page 65: ... 1 copy 7 8 Copy d8 check result control 0 no disable 1 Yes enable d9 print format 0 Lab 1 1 Lab 2 2 Lab 3 3 Lab 4 4 Lab 5 5 LP 50 6 TSC d10 label format group 1 file number 00 99 00 file AA00 1 file AA01 98 file AA98 99 file AA99 d11 label format group 2 file number 00 99 00 file BB00 1 file BB01 98 file BB98 99 file BB99 d12 data length 0 7bit 1 8bit d13 parity 0 none 1 0dd 2 even d14 minimum ou...

Page 66: ... Auto 3 3 Manual 4 PC 5 CMD 6 Off d2 baud rate 0 1200 1 2400 3 4800 3 9600 4 19200 5 38400 6 57600 7 115200 8 256000 d3 protocol 0 Protocol 1 1 Protocol 2 8 Protocol 9 d4 print stability control 0 no disable 1 Yes enable d5 transmission interval 0 int 0 1 int 0 5 2 int 1 0 3 int 1 5 9 int 300 d6 Auto Accumulation 0 Off disable 1 On enable d7 number of copy 0 1 copy 7 8 Copy d8 check result control...

Page 67: ...th 2 with leading zero At Current weight unit and function mode d1 weight unit 0 kg 1 g 2 lb d2 function mode 0 weighing 1 piece count 2 AT 1 3 peak hold 4 animal weighing Av Auxiliary Function mode enable disable status d1 Piece count 0 Off 1 On d2 ATM 0 Off 1 On d3 Peak Hold 0 Off 1 On d4 Animal Weighing 0 Off 1 On Aw Machine ID group number d1 4 digit machine ID number Nothing no machine ID is ...

Page 68: ...w tscprinters com cms upload download _en DiagTool_V163 zip 4 TCF file for printer The suitable TCF file can be downloaded at For TDP247 and TDP345 www fi measurement com resource driversnsoftwares For TTP247 and TTP345 www fi measurement com resource driversnsoftwares E 1 1 Printer Installation 1 Turn off the printer connect the appropriate cable and then turn on the printer 2 If the printer supp...

Page 69: ...ust be uploaded to printer 1 Connect printer with computer 2 Power on printer 3 Download the correct TCF file point 4 of E 1 4 Unzip the download file and save in to computer 5 Run Diagnostic tool for printer 6 Click on Command Tool 7 Click on Send file 8 Double click on the TCF file and it will be uploaded to printer automatically ...

Page 70: ... or Automation then click OK 4 At this point correct Bartender edition is selected F 2 Adding Information from Instrument to Label Uploading to a TSC Printer The below procedures is based on Bartender Label Software If a different label creating software is used contact your label software for more details if in doubt 1 Create the foundation of a label by Bartender All information to be obtained f...

Page 71: ...tion from instrument for example net gross tare weight and product code to be sent to printer and printed on label 11 Double click on the preferred data source to which variant s has have to add a check the box below External Keyboard then b enter the appropriate command on the Prompt Box refer to 15 2 1 for command detail 12 Select Auto on the Source box under Template Field 13 Repeat point 11 to...

Page 72: ...72 Fidelity Measurement Co Ltd www fi measurement com e mail info fi measurement com ...

Reviews: