BASIC OPERATION
7
POWER MODULE FRONT/REAR PANEL DESCRIPTION
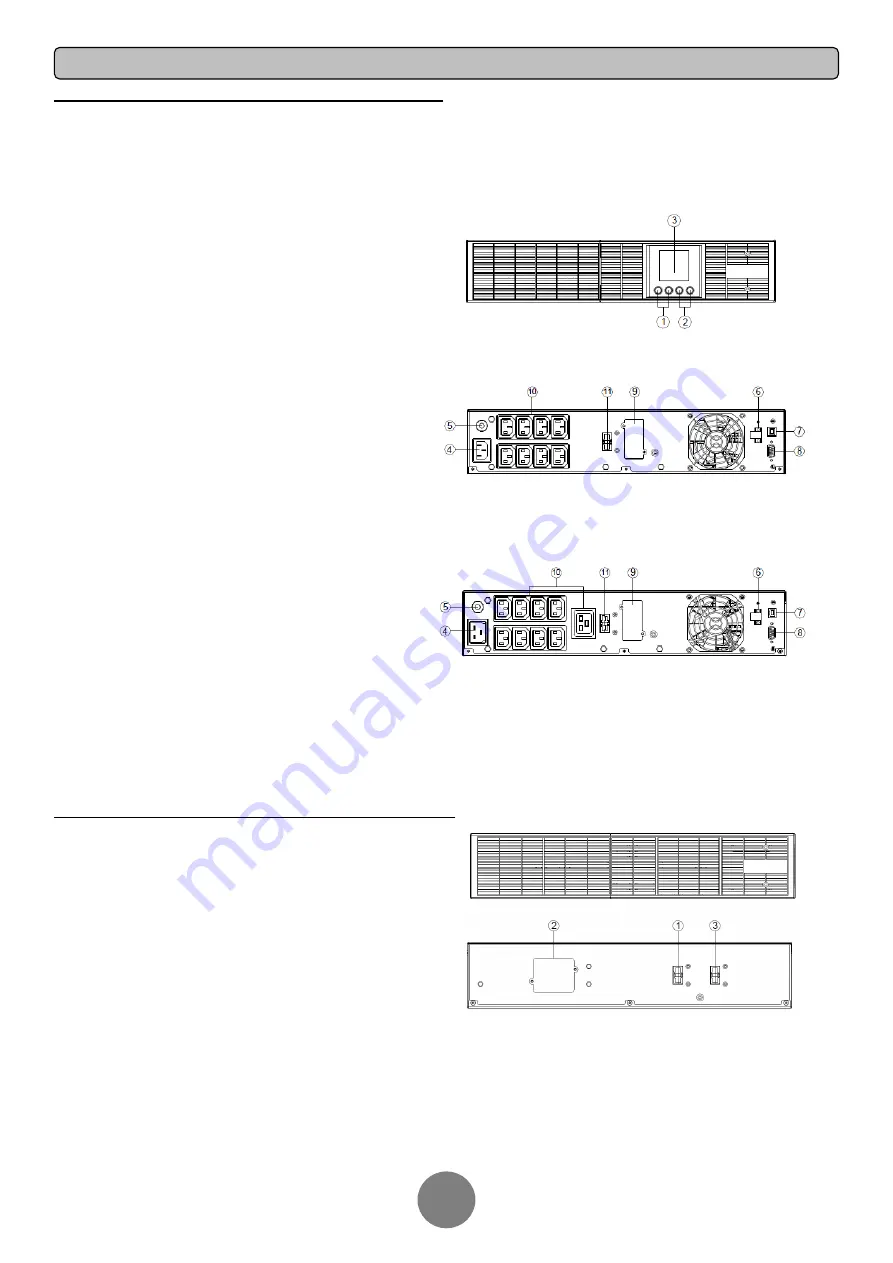
1. Power On/Off Button
Master ON/OFF for the UPS.
2. Function Buttons
Scroll up, scroll down, select and cancel LCD menu.
3. Multifunction LCD Readout
Indicate status information, settings and events.
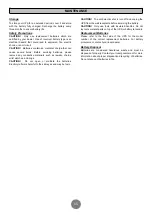
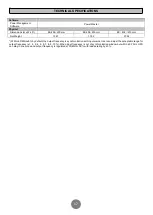
4. AC Input Inlet
Connect the AC Power cord to a properly wired and
grounded outlet.
5. Input Circuit Breaker
Provide input overload and fault protection.
6. EPO (Emergency Power Off) Connector
Enable Power-Off in emergency from a remote
location.
7. USB port
This is a connectivity port which allows communication
and control between the UPS and the connected
computer. It is recommended to install the Power
master software on the PC/Server connected with the
USB cord.
8. Serial Port
Serial port provides communication between the UPS
and the computer. The UPS can control the computer’s
shutdown during a power outage through the
connection while the computer can monitor the UPS
and alter its various programmable parameters.
9. SNMP/HTTP Network slot
Slot to install the optional SNMP card for remote
network control and monitoring.
10. Battery Backup & Surge Protected Outlets
Provide battery backup and surge protection. They
ensure power is provided to connected equipment over
a period of time during a power failure.
11. Extended Runtime Battery Module Connector
Connect to additional external battery modules.
Front view KR RTC 1000/2000/3000 VA
Back view KR RTC 1000VA-3Batt. /2000VA-4Batt.
Back view KR RTC 3000VA-6Batt.
BATTERY MODULE FRONT/REAR PANEL DESCRIPTION
1. Input Connector
Use this input connector to daisy chain the next Battery
module. Remove the connector cover for access.
2. On-board Replaceable Fuse Cover
Replaceable fuse is accessible from the rear panel. It
must be done by qualified personnel.
3. Output Connector
Use this output Connector to connect the Battery
module to the Power module or to the next Battery
module.
External Battery Bank for 24V/36V/48V/72V ups


