BK601
4
3
Uscita secondaria
Secondary outlet
Seconde sortie
Zweitausgang
Salida secundaria
ȼɫɩɨɦɨɝɚɬɟɥɶɧɵɣɜɵɩɭɫɤ
Uscita primaria
Main outlet
Première sortie
Hauptausgang
Salida primaria
Ƚɥɚɜɧɵɣɜɵɩɭɫɤ
Uscita secondaria
Secondary outlet
Seconde sortie
Zweitausgang
Salida secundaria
ȼɫɩɨɦɨɝɚɬɟɥɶɧɵɣɜɵɩɭɫɤ
Uscita primaria
Main outlet
Première sortie
Hauptausgang
Salida primaria
Ƚɥɚɜɧɵɣɜɵɩɭɫɤ
Uscita Secondaria
Secondary outlet
Seconde Sortie
Zweitausgang
Salida Secundaria
ȼɫɩɨɦɨɝɚɬɟɥɶɧɵɣɜɵɩɭɫɤ
Uscita Primaria
Main outlet Shower
Première Sortie
Hauptausgang
Salida Primaria
Ƚɥɚɜɧɵɣɜɵɩɭɫɤ
Premere
Push
Presser
Drücken
Tirar
ɇɚɠɚɬɶ
Tirare
Pull
Tirer
Ziehen
Apretar
Ɍɹɧɭɬɶ
Svitare il pomolo (1) tenendo fermo il perno (2).
Unscrew the knob (1) by holding the pivot steady (2)
Dévisser le bouton en tenant fermement la tige.
Beim Halten des Zapfens (2), den Knopf aufschrauben (1).
Desenroscar el pomo (1) teniendo fijo el tornillo (2).
Ɉɬɜɢɧɬɢɬɶɪɭɤɨɹɬɤɭɭɞɟɪɠɢɜɚɹɧɟɩɨɞɜɢɠɧɵɦɲɬɢɮɬ
2.5
6
7
10
9
5
8
1
2
INSTALLAZIONE
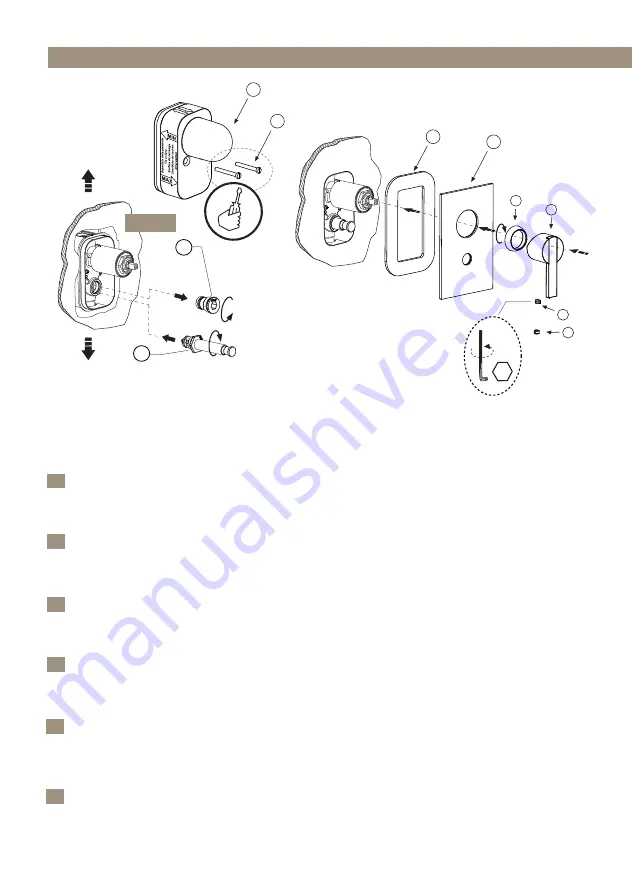
Rimuovere dal corpo incasso il coperchio di protezione (1) dopo aver svitato le viti (2). Svitare il tappo (3) e avvitare il deviatore (4).
Avvitare sul bicchiere porta cartuccia il cappuccio copricartuccia (5). Applicare la guarnizione adesiva in spugna (6) sul retro della piastra di
copertura (7). Posizionare la piastra di copertura. Inserire la leva (8) sull'asta della cartuccia ed avvitarla con il grano (9) mediante una
chiave a brugola da 2,5 mm. Applicare nel foro per il grano sulla leva, il tappino (10).
INSTALLATION
Remove the cover cap (1) from the built-in body after having unscrewed the screws (2). Unscrew the cap (3) and screw the diverter (4).
Screw the cartridge cover ring (5) on the cartridge holder. Put the adhesive seal in sponge (6) at the rear of the cover plate (7). Place the
cover plate. Insert the handle (8) on the cartridge rod and screw it with the screw (9) using a 2,5 mm allen spanner. Put the small cap (10)
in the hole of the screw on the handle.
INSTALLATION
Enlever du corps encastré le couvercle de protection (1) après avoir dévissé les vis (1). Dévisser le bouchon (3) et visser l’inverseur (4).
Visser sur l’emboitement porte-cartouche le capuchon qui bloque la cartouche (5). Appliquer le joint adhésif en éponge (6) au derrière de
la plaque de couverture (7). Placer la plaque de couverture. Introduire la poignée (8) sur la tige de la cartouche et la visser avec la vis (9)
avec la clé six pans de 2,5 mm. Appliquer dans le trou pour la vis sur la poignée, le petit bouchon (10).
INSTALLATION
Die Schrauben (2) lösen und die Schutzkappe (1) vom UP-Körper abnehmen. Den Stopfen (3) ausschrauben und den Umsteller (4)
schrauben. Den Abdeckring (5) auf den Kartuschenhalter schrauben. Die Klebedichtung (6) auf die Rückseite der Abdeckplatte (7) anbrin-
gen. Die Abdeckplatte positionieren. Den Hebel (8) auf den Kartuschenstift setzen und mit der Schraube (9) mittels eines Inbusschlüssels
2,5 mm befestigen. Den Stopfen (10) über das Schraubenloch im Hebel setzen.
INSTALACIÓN
Sacar la protección (1) del cuerpo empotrado después haber desatornillado los tornillos (2). Desenroscar las plaquetas (3) y atornillar el
desviador (4). Poner el embellecedor del cartucho sobre el porta cartucho (5). Aplicar la junta adhesiva de esponja (6) detrás de la plaqueta
de cobertura (7).
Colocar la plaqueta de cobertura. Introducir la maneta (8) sobre la varilla del cartucho y atornillarla al tornillo de fijación (9) con una llave
hexagonal de 2,5 mm. Aplicar la plaqueta en el agujero del tornillo de fijación sobre la maneta (10).
ɍɋɌȺɇɈȼɄȺ
ɈɬɜɢɧɬɢɬɶɜɢɧɬɵɢɭɞɚɥɢɬɶɫɨɜɫɬɪɨɟɧɧɨɝɨɤɨɪɩɭɫɚɡɚɳɢɬɧɭɸɤɪɵɲɤɭɈɬɜɢɧɬɢɬɶɩɪɨɛɤɭɢɡɚɜɢɧɬɢɬɶɞɟɜɢɚɬɨɪ
ɇɚɫɬɚɤɚɧɟɤɚɪɬɪɢɞɠɚɡɚɜɢɧɬɢɬɶɤɨɥɩɚɱɨɤɤɚɪɬɪɢɞɠɚɍɫɬɚɧɨɜɢɬɶɤɥɟɣɤɭɸɩɪɨɤɥɚɞɤɭɢɡɝɭɛɤɢɧɚɡɚɞɧɟɣɫɬɨɪɨɧɟɩɥɢɬɵ
ɉɨɡɢɰɢɨɧɢɪɨɜɚɬɶɩɥɢɬɭȼɫɬɚɜɢɬɶɪɵɱɚɝɜɫɬɟɪɠɟɧɶɤɚɪɬɪɢɞɠɚɢɡɚɜɢɧɬɢɬɶɟɝɨɭɫɬɚɧɨɜɨɱɧɵɦɜɢɧɬɨɦɫɩɨɦɨɳɶɸ
ɲɟɫɬɢɝɪɚɧɧɨɝɨɤɥɸɱɚɦɦȼɫɬɚɜɢɬɶɜɨɬɜɟɪɫɬɢɟɭɫɬɚɧɨɜɨɱɧɨɝɨɜɢɧɬɚɧɚɪɵɱɚɝɟɩɪɨɛɤɭ
I
UK
F
D
E
RU
a
a
b
a
c
b
3
2
2
1
1
1
2
4
Per invertire la priorità dei flussi, attenersi alle seguenti indicazioni.
To reverse the priority of the flows follow these guidelines.
Pour inverser la priorité des flux suivre ces directives.
Zur Umkehrung der Priorität der fließt die folgenden Richtlinien.
Para invertir la prioridad de los flujos de seguir estas pautas.
ɑɬɨɛɵɢɡɦɟɧɢɬɶɩɪɢɨɪɢɬɟɬɩɨɬɨɤɨɜɫɥɟɞɭɣɬɟɷɬɢɦɪɟɤɨɦɟɧɞɚɰɢɹɦ
Avvitare il pomolo (1) tenendo fermo il perno(2).
Screw the knob (1) by holding the pivot steady (2).
Visser le bouton en tenant fermement la tige.
Beim Halten des Zapfens (2), den Knop anschrauben (1).
Roscar el pomo (1) teniendo fijo el tornillo (2).
Ɂɚɜɢɧɬɢɬɶɪɭɤɨɹɬɤɭɭɞɟɪɠɢɜɚɹɧɟɩɨɞɜɢɠɧɵɦɲɬɢɮɬ
BK601
I
UK
F
D
E
RU
BK601I
Summary of Contents for antoniolupi BIKAPPA Series
Page 13: ...5 4 6 7 8 9 10 11 180 a b c d ...
Page 16: ...BK701 BK702 Ø8 max 40mm 7 4 1 6 1 5 2 3 5 9 8 ...
Page 35: ...Ø8 BK210 2 a b c d e f g 2 5 ...
Page 36: ...BK613 Ø8 a b b c c d d 2 e e 2 f f ...
Page 37: ...MANUTENZIONE MAINTENANCE ENTRETIEN MANUTENCIÓN ɑɂɋɌɄȺ SERIE BIKAPPA WARTUNG ...
Page 46: ...BK701 BK702 2 1 1 3 4 5 6 7 8 9 10 2 5 3 6 3 6 3 ...
Page 52: ...05 2011 AT13741A00 ...


