BK602I
I
UK
F
D
E
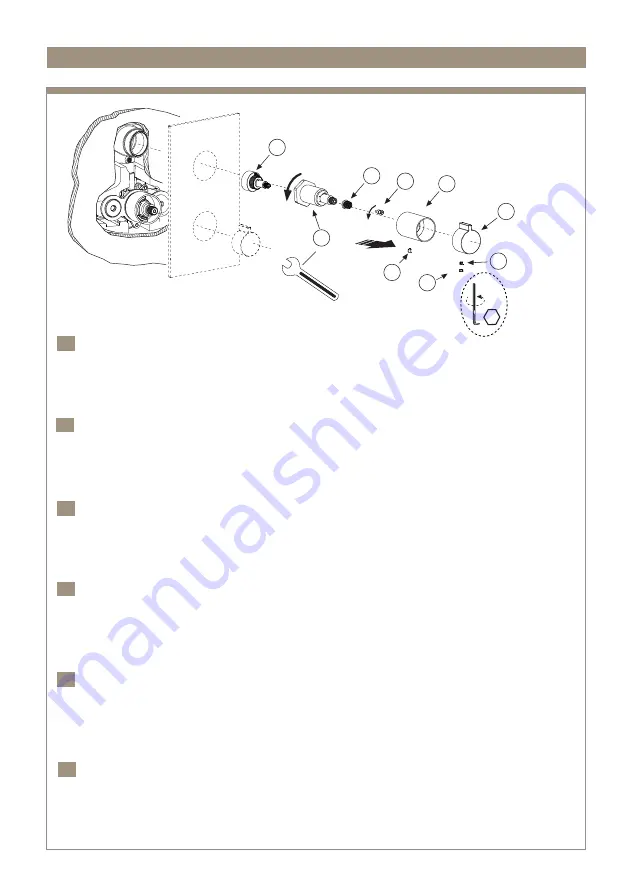
SOSTITUZIONE DELLA CARTUCCIA DEVIATRICE CON CHIUSURA
Chiudere le entrate dell'acqua fredda e calda.
Estrarre il tappino (3), svitare il grano (2) con una chiave a brugola da 2,5 mm e sfilare la maniglia (1). Togliere il carter (5) dopo
avere svitato il grano (4) con una chiave a brugola da 2,5 mm. Allentare la ghiera ferma cartuccia (6) con una chiave esagonale da
27 mm ruotando in senso antiorario. Svitare il perno (7) e sfilare la riduzione (8) e la cartuccia (9). Per il montaggio procedere in
ordine inverso assicurandosi che il perno di riferimento alla base della cartuccia sia correttamente posizionato nella sede
corrispondente all’interno del corpo incasso e che il piano sia accuratamente pulito.
REPLACING THE DIVERTER CARTRIDGE WITH LOCK
Shut off the hot and cold water inlets.
Remove the cap (3), unscrew the dowel (2) using a 2,5 mm hex key and remove the handle (1). Remove the casing (5) after having
unscrewed the dowel (4) using a 2,5 mm hex key. Loosen the cartridge retaining ring nut (6) using a 27 mm hex key, turning it
anti-clockwise. Unscrew the pin (7) and slip off the reduction (8) and the cartridge (9). To assemble, proceed in reverse order, making
sure that the reference pin at the base of the cartridge is properly positioned in its location inside the built-in body and that the
surface is thoroughly clean.
REMPLACEMENT DE LA CARTOUCHE DE DÉVIATION AVEC FERMETURE
Fermer les entrées de l’eau chaude et de l’eau froide.
Retirer le bouchon (3) et dévisser le rivet (2) avec une clé Allen de 2,5 mm et enlever la poignée (1). Enlever le carter (5) après avoir
dévissé le rivet (4) à l’aide d’une clé Allen de 2,5 mm. Desserrer la bague qui bloque la cartouche (6) avec une clé Allen de 27 mm
en pivotant dans le sens inverse des aiguilles d’une montre. Dévisser le pivot (7) et désenfiler la réduction (8) ainsi que la cartouche
(9). Pour le montage procéder dans le sens inverse en s’assurant que le pivot de référence à la base de la cartouche soit
correctement positionné dans le siège correspondant à l’intérieur du corps encastré et que le plan soit parfaitement propre.
AUSTAUSCH DER WEICHENKARTUSCHE MIT VERSCHLUSS
Die Warm- und Kaltwassereingänge schließen.
Den Stöpsel (3) entfernen, den Gewindestift (2) mithilfe eines Inbusschlüssels zu 2,5 mm abschrauben und den Hebel (1) abziehen.
Nach Lösen des Gewindestifts (4) mithilfe eines Inbusschlüssels zu 2,5 mm, das Gehäuse (5) entfernen. Den Gewindering (6) zur
Halterung des Einsatzes mithilfe eines Sechskantschlüssels zu 27 mm gegen den Uhrzeigersinn abschrauben. Den Stift (7)
abschrauben und dasReduzierstück (8) und die Kartusche (9) herausziehen. Für den Einbau umgekehrt vorgehen, wobei darauf zu
achten ist, dass der Bezugsstift an der Unterseite der Kartusche ordnungsgemäß in der Bohrung im Inneren des Einbaukörpers sitzt
und die Auflagefläche vollkommen sauber ist.
SUSTITUCIÓN DEL CARTUCHO DESVIADOR CON CIERRE
Cerrar las entradas del agua fría y caliente.
Extraer el tapón (3), desatornillar el tornillo prisionero (2) con una llave Allen de 2,5 mm y extraer la manija (1). Eliminar el cárter (5)
después de haber desatornillado el tornillo prisionero (4) con una llave Allen de 2,5 mm. Aflojar la abrazadera de protección del
cartucho (6) con una llave hexagonal de 27 mm girando en sentido levógiro. Desatornillar el perno (7) y extraer la reducción (8) y el
cartucho (9). Para el montaje proceder en orden inverso asegurándose de que el perno de referencia en la base del cartucho esté
colocado correctamente en el alojamiento correspondiente en el interior del cuerpo empotrado y que el plano esté limpio.
ɁȺɆȿɇȺɄȺɊɌɊɂȾɀȺɉȿɊȿɄɅɘɑȺɌȿɅəɋɁȺɄɊɕɌɂȿɆ
ɉɟɪɟɤɪɵɬɶɩɨɞɚɱɭɝɨɪɹɱɟɣɢɯɨɥɨɞɧɨɣɜɨɞɵ
ɍɞɚɥɢɬɶɤɨɥɩɚɱɨɤɨɬɜɢɧɬɢɬɶɭɫɬɚɧɨɜɨɱɧɵɣɜɢɧɬɫɩɨɦɨɳɶɸɤɥɸɱɚɲɟɫɬɢɝɪɚɧɧɢɤɚɦɦɢɫɧɹɬɶɪɭɱɤɭɈɬɜɢɧɬɢɬɶ
ɭɫɬɚɧɨɜɨɱɧɵɣɜɢɧɬɫɩɨɦɨɳɶɸɤɥɸɱɚɲɟɫɬɢɝɪɚɧɧɢɤɚɦɦɢɫɧɹɬɶɤɨɠɭɯɈɫɥɚɛɢɬɶɡɚɠɢɦɧɨɟɤɨɥɶɰɨɤɚɪɬɪɢɞɠɚɫ
ɩɨɦɨɳɶɸɝɚɟɱɧɨɝɨɤɥɸɱɚɦɦɩɨɜɨɪɚɱɢɜɚɹɟɝɨɩɪɨɬɢɜɱɚɫɨɜɨɣɫɬɪɟɥɤɢɈɬɜɢɧɬɢɬɶɲɬɢɮɬɢɫɧɹɬɶɨɝɪɚɧɢɱɢɬɟɥɶɢ
ɤɚɪɬɪɢɞɠȾɥɹɦɨɧɬɚɠɚɜɵɩɨɥɧɢɬɶɜɫɟɞɟɣɫɬɜɢɹɜɨɛɪɚɬɧɨɦɩɨɪɹɞɤɟɭɛɟɞɢɜɲɢɫɶɱɬɨɭɫɬɚɧɨɜɨɱɧɵɣɲɬɢɮɬɜɨɫɧɨɜɚɧɢɢ
ɤɚɪɬɪɢɞɠɚɩɪɚɜɢɥɶɧɨɪɚɡɦɟɳɟɧɜɫɨɨɬɜɟɬɫɬɜɭɸɳɟɦɝɧɟɡɞɟɜɧɭɬɪɢɜɫɬɪɨɟɧɧɨɝɨɤɨɪɩɭɫɚɢɩɨɜɟɪɯɧɨɫɬɶɚɤɤɭɪɚɬɧɨɨɱɢɳɟɧɚ
RU
I
UK
F
D
E
SOSTITUZIONE DELLA CARTUCCIA DEVIATRICE CON CHIUSURA
Chiudere le entrate dell'acqua fredda e calda.
Estrarre il tappino (3), svitare il grano (2) con una chiave a brugola da 2,5 mm e sfilare la maniglia (1). Togliere il carter (5) dopo avere
svitato il grano (4) con una chiave a brugola da 2,5 mm. Svitare il perno (7) e sfilare la riduzione (8). Svitare la parte esterna del
deviatore (6) con una chiave esagonale da 30 mm in senso antiorario e sfilare la cartuccia (9) contenuta al suo interno.
Per il montaggio procedere in ordine inverso assicurandosi che il perno di riferimento alla base della cartuccia sia correttamente
posizionato nella sede corrispondente all’interno del corpo del deviatore e che il piano sia accuratamente pulito.
REPLACING THE DIVERTER CARTRIDGE WITH LOCK
Shut off the hot and cold water inlets.
Remove the cap (3); unscrew the dowel (2) using a 2,5 mm hex key and remove the handle (1). Remove the casing (5) after having
unscrewed the dowel (4) using a 2,5 mm hex key. Unscrew the pin (7) and slip off the reduction (8). Unscrew the outside part of the
diverter (6) using a 30 mm hex key in an anti-clockwise direction and remove the cartridge (9) contained within it. To assemble,
proceed in reverse order, making sure that the reference pin at the base of the cartridge is properly positioned in its location inside the
body of the diverter and that the surface is thoroughly clean.
REMPLACEMENT DE LA CARTOUCHE DE DÉVIATION AVEC FERMETURE
Fermer les entrées de l’eau chaude et de l’eau froide.
Retirer le bouchon (3) et dévisser le rivet (2) avec une clé Allen de 2,5 mm et enlever la poignée (1). Enlever le carter (5) après avoir
dévissé le rivet (4) à l’aide d’une clé Allen de 2,5 mm. Dévisser le pivot (7) et désenfiler la réduction (8). Dévisser la partie externe du
déviateur (6) à l’aide d’une clé Allen de 30 mm dans le sens inverse des aiguilles d’une montre et désenfiler la cartouche (9) contenue
à l’intérieur. Pour le montage procéder dans le sens inverse en s’assurant que le pivot de référence à la base de la cartouche soit
correctement positionné dans le siège correspondant à l’intérieur du corps du déviateur et que le plan soit parfaitement propre.
AUSTAUSCH DER WEICHENKARTUSCHE MIT VERSCHLUSS
Die Warm- und Kaltwassereingänge schließen.
Den Stöpsel (3) entfernen, den Gewindestift (2) mithilfe eines Inbusschlüssels zu 2,5 mm abschrauben und den Hebel (1) abziehen.
Nach Lösen des Gewindestifts (4) mithilfe eines Inbusschlüssels zu 2,5 mm, das Gehäuse (5) entfernen. Den Stift (7) abschrauben
und das Reduzierstück (8) herausziehen. Den äußeren Teil der Weiche (6) mithilfe eines Sechskantschlüssels zu 30 mm gegen den
Uhrzeigersinn abschrauben und die in seinem Inneren enthaltene Kartusche (9) herausziehen. Für den Einbau umgekehrt vorgehen,
wobei darauf zu achten ist, dass der Bezugsstift an der Unterseite der Kartusche ordnungsgemäß in der Bohrung im Inneren des
Weichenkörpers sitzt und die Auflagefläche vollkommen sauber ist.
SUSTITUCIÓN DEL CARTUCHO DESVIADOR CON CIERRE
Cerrar las entradas del agua fría y caliente.
Extraer el tapón (3); desatornillar el tornillo prisionero (2) con una llave Allen de 2,5 mm y extraer la manija (1). Eliminar el cárter (5)
después de haber desatornillado el tornillo prisionero (4) con una llave Allen de 2,5 mm. Desatornillar el perno (7) y extraer la
reducción (8). Desenroscar la parte externa del desviador (6) con una llave hexagonal de 30 mm en sentido levógiro y extraer el
cartucho (9) contenido en su interior. Para el montaje proceder en orden inverso asegurándose de que el perno de referencia en la
base del cartucho esté colocado correctamente en el alojamiento correspondiente en el interior del cuerpo del desviador y que el
plano esté limpio.
ɁȺɆȿɇȺɄȺɊɌɊɂȾɀȺɉȿɊȿɄɅɘɑȺɌȿɅəɋɁȺɄɊɕɌɂȿɆ
ɉɟɪɟɤɪɵɬɶɩɨɞɚɱɭɝɨɪɹɱɟɣɢɯɨɥɨɞɧɨɣɜɨɞɵ
ɍɞɚɥɢɬɶɤɨɥɩɚɱɨɤɨɬɜɢɧɬɢɬɶɭɫɬɚɧɨɜɨɱɧɵɣɜɢɧɬɫɩɨɦɨɳɶɸɤɥɸɱɚɲɟɫɬɢɝɪɚɧɧɢɤɚɦɦɢɫɧɹɬɶɪɭɱɤɭɈɬɜɢɧɬɢɬɶ
ɭɫɬɚɧɨɜɨɱɧɵɣɜɢɧɬɫɩɨɦɨɳɶɸɤɥɸɱɚɲɟɫɬɢɝɪɚɧɧɢɤɚɦɦɢɫɧɹɬɶɤɨɠɭɯɈɬɜɢɧɬɢɬɶɲɬɢɮɬɢɫɧɹɬɶɨɝɪɚɧɢɱɢɬɟɥɶ
Ɉɬɜɢɧɬɢɬɶɜɧɟɲɧɸɸɱɚɫɬɶɩɟɪɟɤɥɸɱɚɬɟɥɹɩɨɜɟɪɧɭɜɟɝɨɩɪɨɬɢɜɱɚɫɨɜɨɣɫɬɪɟɥɤɢɫɩɨɦɨɳɶɸɝɚɟɱɧɨɝɨɤɥɸɱɚɦɦɢ
ɜɵɧɭɬɶɧɚɯɨɞɹɳɢɣɫɹɜɧɭɬɪɢɧɟɝɨɤɚɪɬɪɢɞɠȾɥɹɦɨɧɬɚɠɚɜɵɩɨɥɧɢɬɶɜɫɟɞɟɣɫɬɜɢɹɜɨɛɪɚɬɧɨɦɩɨɪɹɞɤɟɭɛɟɞɢɜɲɢɫɶɱɬɨ
ɭɫɬɚɧɨɜɨɱɧɵɣɲɬɢɮɬɜɨɫɧɨɜɚɧɢɢɤɚɪɬɪɢɞɠɚɩɪɚɜɢɥɶɧɨɪɚɡɦɟɳɟɧɜɫɨɨɬɜɟɬɫɬɜɭɸɳɟɦɝɧɟɡɞɟɜɧɭɬɪɢɤɨɪɩɭɫɚɩɟɪɟɤɥɸɱɚɬɟɥ
ɢɩɨɜɟɪɯɧɨɫɬɶɚɤɤɭɪɚɬɧɨɨɱɢɳɟɧɚ
RU
BK603I
2.5
5
1
3
4
6
7
2
8
9
2.5
5
1
3
4
7
8
2
6
9
27
30
Summary of Contents for antoniolupi BIKAPPA Series
Page 13: ...5 4 6 7 8 9 10 11 180 a b c d ...
Page 16: ...BK701 BK702 Ø8 max 40mm 7 4 1 6 1 5 2 3 5 9 8 ...
Page 35: ...Ø8 BK210 2 a b c d e f g 2 5 ...
Page 36: ...BK613 Ø8 a b b c c d d 2 e e 2 f f ...
Page 37: ...MANUTENZIONE MAINTENANCE ENTRETIEN MANUTENCIÓN ɑɂɋɌɄȺ SERIE BIKAPPA WARTUNG ...
Page 46: ...BK701 BK702 2 1 1 3 4 5 6 7 8 9 10 2 5 3 6 3 6 3 ...
Page 52: ...05 2011 AT13741A00 ...


