Page 7
AIR FLOW ADJUSTMENTS
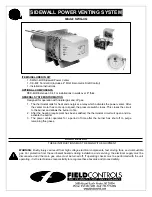
In order to obtain proper system draft, the power venter has an airflow adjustment damper built-in.
(See Figure 12) This damper should be used to make coarse draft adjustments while the barometric
should be used for finer adjustments. Changes in the adjustment of the 4" MG-1 Draft Control should
be made by adding or removing the washer-like weights (supplied with the control) to or from the
weight holder chain assembly. After the control is adjusted, its action will be entirely automatic, the
gate will open or close by itself to correct for changes in the draft. The control MUST be adjusted to
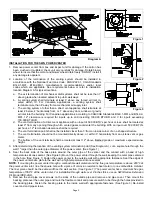
the desired draft setting by adding or removing the washer-type weights supported by the two chains
on the side of the draft control. (See Figure 13)
DO NOT
move the weight attached directly to the
gate, this is used only for balancing at the factory.
R
EFER TO THE FOLLOWING TO PROPERLY SET THE AIRFLOW ADJUSTMENTS ON THE
P
OWER
V
ENTER AND
D
RAFT
C
ONTROL
1. Set the adjustment damper in the SWG venter to its full open position.
2. Start with no weights on the chain hanger of the MG-1 draft control.
3. Follow the appliance manufacturer's procedures for starting the heating
appliance. Then adjust the thermostat to call for "Heat".
4. After the system has operated for at least 10 minutes to stabilize flue gas
temperatures, check for negative draft or up-draft at the heating appliance
outlet. Use a draft gauge, velocity meter or match test procedure.
5. Loosen the damper locking screw on the underside of the SWG outer pipe
and rotate the adjustment damper closed to obtain the minimum air flow
required to maintain draft. Then increase air flow slightly (10% over minimum
air flow rate) to ensure proper venting. If using a draft gauge, draft settings
should typically be -0.02" of water column draft at the appliance outlet. (Check equipment requirement.)
6. Observe the position of the gate on the draft control. It should be set so that during normal operation the gate is in the
midpoint of its swing. This will be approximately 30°-45° from vertical.
7. When first setting up the system the gate on the control will probably be fully open. Add washer weights to the chain
hanger until the gate stabilizes at the midpoint of its swing.
8. Changing the weight on the draft control will affect the system draft, therefore repeat steps 5 through 7 as necessary
until proper draft is obtained and the draft control gate is in the proper position.
9. Tighten the damper locking screw on the SWG to prevent it from moving during operation and secure the washer
weights on the draft control with the provided screw and nut.
W
HILE ADJUSTING THE SYSTEM AIRFLOW
,
TWO THINGS ARE ESSENTIAL
1. The appliance burner must operate for at least 10 minutes prior to setting the draft to stabilize flue gas temperatures.
2. An analysis of the flue gases is necessary to determine the percentage of CO
2
and check for the presence of CO.
Refer to the local gas company for the proper CO
2
readings and allowable CO levels.
Refer to the General Installation Inspection section to check for negative pressure problems in the building. If sufficient
combustion air for the burner is not provided, a flow reversal during the off cycle could occur within the venting system.
This may cause combustion problems as well as condensation that could block the air pressure sensing tube. It may also
contribute to premature motor failure. Combustion, and/or make-up air, should be supplied from outside the structure and
the air inlet should be on the same wall as the power venter discharge. For example, tightly constructed homes and
homes retro-fitted from electric heated systems are more likely to experience combustion and/or make-up air problems.
For further information consult Form #4199, "The Field Report - Effects of Insufficient Combustion Air" available from The
Field Controls Company.
PROVING SWITCH ADJUSTMENTS
Refer to the following for air pressure switch adjustment procedure and system
checkout procedures before operating the appliance continuously.
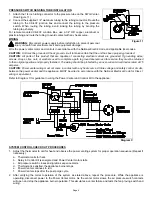
After proper air flow is established, the air pressure switch adjustment is made by
turning the adjustment screw clockwise (See Figure 14) until the burner operation
stops on the furnace. Slowly turn the adjustment screw counterclockwise until burner
ignites. Make notice of the position of the adjustment screw, then turn the adjustment
screw an additional 1/4 to 1/2 turn counterclockwise to ensure adequate switch
adjustment.
NOTE:
Under most circumstances, 1/4 turn is typical, however, 1/2 turn may be necessary to avoid short cycling due to
extreme wind fluctuations.
WARNING:
Failure to properly adjust the air pressure switch as specified in the proving switch section could lead to
improper operation of the venting system which will result in product damage, personal injury, or death.
Figure 12
Figure 13
Figure 14
Summary of Contents for 46334800
Page 10: ...Page 10...


