background image


Page 10

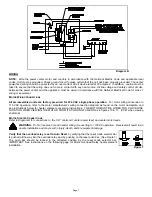
Figure 10

Figure 11

REPLACEMENT PARTS 

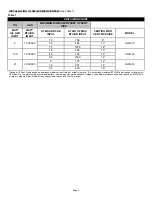
Should the motor or blower wheel need replacing, the following replacement items are available. The Repair Motor 
Assembly contains the Motor and Blower Wheel factory assembled to a mounting bracket. 


PART NUMBERS 

MODEL 

REPAIR MOTOR ASSEMBLY  BLOWER WHEEL 

SWG-10 

46414001 

46408200 

SWG-12 

46414002 

46408300 

SWG-14 

46414003 

46408400 


REMOVAL AND INSTALLATION OF THE SWG SERIES POWER VENTER MOTOR 
ASSEMBLY 

R

EMOVAL


1.  Disconnect power to the venter and lock out the source appropriately. 

2.  Remove the motor enclosure cover. 

3.  Disconnect the motor wiring and flex conduit from the motor.  (See Figure 10) 

4.  Using a nut driver or 1/4" drive deep socket, remove the six #8-32 lock nuts 

attaching the wheel cover and heat shield to the venter body.  (See Figure 12) 

5.  While supporting the motor assembly, remove the (3) 3/8" nuts and washers 

attaching the assembly bracket to the venter, leaving the uppermost nut for last.  
Carefully remove the motor assembly from the venter body, taking care to avoid 
damaging the blower wheel or dislodging balancing weights. 

6.  Temporarily replace the motor enclosure cover if the unit is to be reassembled at a 

later time. 

I

NSTALLATION


1.  Verify that power is disconnected to the venter motor leads and that the source is 

locked out appropriately. 

2.  After inspecting the motor and blower wheel for shipping damage, grasp the motor 

assembly and carefully insert the blower wheel into the venter body, using caution to 
avoid damaging the wheel or displacing balancing weights.  Grasp the wheel heat 
shield and guide it onto its mounting studs, then guide the motor bracket onto its 
three mounting tie rods.  (See Figure 11)  While supporting the motor, place a lock 
washer and nut on the uppermost tie rod end and fasten finger tight.  The motor 
assembly will now 'hang' by the uppermost tie rod and may be released. 

3.  Place the remaining (2) lock washers and nuts on their respective tie rods and fasten 

finger tight. 


SWG Repair 

Motor Assembly 

Blower 

Wheel 

Flex Conduit 

Knockout 

Mounting 
Tie Rod 

Cooling 
Fan Cover 

Summary of Contents for 46413900

Page 1: ...and 2 fuel oil appliances 1 The thermostat wall thermostat or aquastat calls for heat and energizes a relay which activates the power venter After the venter motor has come up to speed the pressure switch closes This closes the circuit to the burner and allows the burner to fire 2 For millivolt controlled water heaters using the CK 20 Series Control Kit the gas valve pressure switch activates the ...

Page 2: ...d venting system initial operational information is strongly recommended as a guide for service or burner tune up Enter this on the back page of this manual 2 Safety inspection of a venting system should be performed before and after installing a power venting system on an existing or new appliance Procedures to follow are those recommended by the National Flue Gas Code A N S I Z223 1 or refer to ...

Page 3: ...WG 10 16 296 10 40 735 12 13 5 1 900 000 86 1590 14 SWG 12 8 107 12 18 231 14 21 3 000 000 35 450 16 SWG 14 Rating at 100 psi Sizing based on appliance maximum input rate not actual firing rate Do not exceed maximum BTU HR input rating or maximum oil GPH input For multiple venting system applications add the input for each appliance Category I gas fired draft induced systems require an SWGII 4HD o...

Page 4: ...that the motor and blower wheel rotate freely DO NOT install if any damage is apparent Refer to unit sizing chart to check proper venting sizing 2 Location of the termination of the venting system should be installed in accordance with the National Fuel Gas Code A N S I Z223 1 manufacturer s recommendations and or local codes which are applicable See requirements below or refer to installation loc...

Page 5: ... siding is greater than 1 2 thick use a spacer plate or board behind the power venter mounting plate See Figure 2 NOTE If mounting the power venter though a combustible wall material a minimum clearance of 1 2 must be maintained between the venter outer pipe and combustible materials See Figure 3 The power venter has a maximum flue gas temperature of 650 F US 575 F Canada at the venter inlet 2 Rem...

Page 6: ...pe from the appliance to the power venter using a minimum number of elbows as possible The horizontal section of the vent pipe should have a slight upward slope from the appliance to the power venter For clearances to combustible materials multiple appliance venting and other installation requirements refer to the National Fuel Gas Code A N S I Z223 1 and or any applicable local codes or appliance...

Page 7: ...tor manufacturer s wiring connection diagram as found on the motor nameplate and see instructions below for heater element conversion instructions THE MOTOR MUST BE WIRED FOR CLOCKWISE ROTATION WHEN VIEWING THE MOTOR FROM ITS COOLING FAN END as in figures 10 11 CCW when viewing shaft end MOTOR STARTER CONNECTIONS Refer to Diagram B for connections to the CK control kit venter power feed and venter...

Page 8: ...proper venting For oil fired or gas fired power burners adjust draft to proper over fired draft If proper draft has been established tighten the adjustment locking screw For gas fired systems shut off thermostat and check for residual heat spilling from draft hood If this occurs a post purge timer may be required If so use a Field Controls PPC 5 Electronic Post Purge or a Control Kit which include...

Page 9: ...t the main burner is burning properly i e no floating lifting or flashbacks When performing smoke test on oil fired systems the burner should operate at a zero to a trace smoke This can indicate reduced available combustion air to burner 6 If appliances are equipped with high and low flame control or flame modulation check for proper main burner operation at low flame 7 Test for spillage at draft ...

Page 10: ...most nut for last Carefully remove the motor assembly from the venter body taking care to avoid damaging the blower wheel or dislodging balancing weights 6 Temporarily replace the motor enclosure cover if the unit is to be reassembled at a later time INSTALLATION 1 Verify that power is disconnected to the venter motor leads and that the source is locked out appropriately 2 After inspecting the mot...

Page 11: ...for the appropriate voltage and overload heater and for the proper rotational direction CW when facing motor cooling fan end as shown in Figure 11 8 Reinstall the motor conduit box cover 9 Install the motor enclosure making sure to start all screws before tightening 10 Reconnect power to the venter and test the venting system as discussed in the General Installation Inspection section INITIAL BURN...

Page 12: ...Page 12 P N 46413900 09 01 ...

Reviews: