background image

page 4 of 8

By running this fan through the night, homeowners can extract the maximum possible amount of heat from their 
home’s structure and contents. This essentially “pre-cools” the home ahead of the rise in temperature the next 
day, which reduces or can even eliminate the need for air conditioning. This VentCool Whole House Fan has been             
designed specifi cally for quiet and effi cient operation. As such, we strongly recommend homeowners run this fan 
through the night to reduce their energy expense.

With the above theory of operation in mind, adhere to the following guidelines when choosing a location for this 
fan:
•  Locate this fan in a central location, away from windows that will be opened during its operation. Installing this 

fan centrally promotes an even replacement of air throughout the home, and the longer the path of air travels 
from an open window to the fan, the greater the cooling effect.

•  The damper provided with this fan can only be installed in a horizontal orientation, thereby requiring the unit 

to be installed in the ceiling.

•  Locate this fan at the highest point possible. This exploits natural convection and helps the fan exhaust the    

hottest indoor air from the home.

•  Typically, the ideal location for this fan in a two-story home is in the open area at the top of the stairs.
•  Avoid locating this fan in a narrow space or over hard fl ooring as sound refl ecting off of hard surfaces can         

amplify its percieved noise.

•  Even though this fan is extremely quiet, we specifi cally recommend against installing it in a bedroom as                   

humans’ perception of noise is far greater when the surrounding environment is quiet (such as within a bed-
room at night).

•  Within the attic, locating the fan near an electrical outlet or power supply can minimize the need for additional 

electrical work.

INSTALLATION

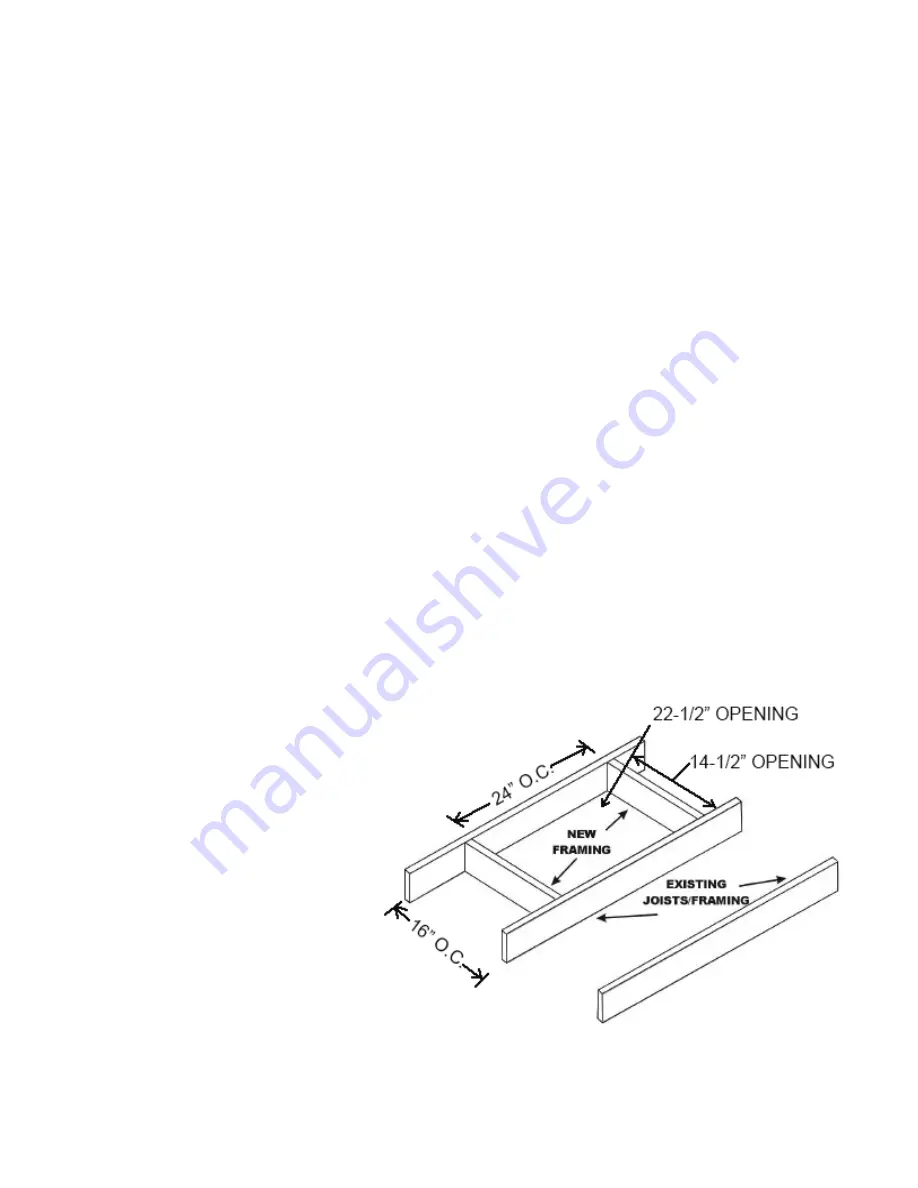
The 1.7 unit has been designed to fi t into a 14½” x 22½” wall or ceiling opening. Since most modern houses have 
been built with either 16” or 24” on-center (O.C.) spaced joists or studs, a simple “box” is constructed in the ceiling 
or wall.

In Figure 1 at right, two 24”x16”s (to match 
existing 24”x16” attic joists) have been 
cut 14½” long and nailed in place 24” O.C. 
apart to form the box shown.  If your joists 
or trusses use 2x4, 2x6, 2x10, etc., use the 
appropriate depth pieces.  For 24” O.C. joists, 
place the cross pieces 16” o.c. apart, creating 
a box with inside dimensions of 14½”x22½”.  

Use a stud fi nder to locate the joists 
or studs from the living space or drill 
pilot holes from the attic space to outline 
the grille opening in the drywall ceiling 
or wall.  Cut the opening with a drywall 
cutter. The opening should be 14½” x 22½”.

Place the included foam tape gasket over 
the top of the joists, position the fan on 
top of the joists, and attach the unit with 
the wood screws (included). Do not over
tighten the screws, since this may reduce 
the vibration isolation qualities of the foam
gasket.

Figure 1: Box Opening for VentCool 1.7

P/N 78010008000  05/19 Rev B

Summary of Contents for VentCool 1.7

Page 1: ...mage it may have sustained during shipping DO DO NOT INSTALL DAMAGED EQUIPMENT If you suspect this fan has been damaged during shipping contact NOT INSTALL DAMAGED EQUIPMENT If you suspect this fan has been damaged during shipping contact Field Controls technical support by phone at 1 800 742 8368 or email at fieldtec fieldcontrols com Field Controls technical support by phone at 1 800 742 8368 or...

Page 2: ...trols technical support for more information Some of the principles of this product s safe installation and operation are not immediately Some of the principles of this product s safe installation and operation are not immediately obvious Read the following safety information before continuing further obvious Read the following safety information before continuing further UNIT PARTS AND DIMENSIONS...

Page 3: ...homes have adequately ventilated attics not all do Because sufficient ventilation is so critical to this fan s performance it is important that the home s existing ventilation be verified before it is installed Since most attics have multiple vents often of different types it is necessary to count each vent noting its type and s ize Then apply the appropriate ratio to each vent to find its net fre...

Page 4: ...d flooring as sound reflecting off of hard surfaces can amplify its percieved noise Even though this fan is extremely quiet we specifically recommend against installing it in a bedroom as humans perception of noise is far greater when the surrounding environment is quiet such as within a bed room at night Within the attic locating the fan near an electrical outlet or power supply can minimize the ...

Page 5: ... control box regardless of whether or not it will be installed in a wall FAILURE TO FAILURE TO CONNECT THE WALL SWITCH WILL VOID THIS FAN S WARRANTY CONNECT THE WALL SWITCH WILL VOID THIS FAN S WARRANTY If it is not desired to be installed in a wall the switch can be connected to the control box and left in the attic with the CAT5 cable kept spooled The fan s control box is mounted to its side Loo...

Page 6: ...all switch Set the switch in place and secure its face plate to the mounting bracket using the attached white screws POWER CONNECTION After unit and wall switch are installed plug the attached power cord into a 120 Volt 60 Hz grounded outlet with uninterrupted power For reference Figure 6 shows the general wiring scheme of the VentCool 1 7 system including optional accessories Figure 4 Wall Switch...

Page 7: ...estions regard the installation operation or maintenance of this fan questions regard the installation operation or maintenance of this fan WIRELESS REMOTE OPTIONAL A wireless remote is an available accessory for this fan It is not included as part of this fan s standard control package Briefly the steps for installing the remote are as follows Plug the provided blue CAT5 cable into the remote rec...

Page 8: ...ARRANTY For warranty information about this or any Field Controls product visit For warranty information about this or any Field Controls product visit www fieldcontrols com ventCool www fieldcontrols com ventCool Field Controls Technical Support Field Controls Technical Support 1 800 742 8368 1 800 742 8368 fieldtec fieldcontrols com fieldtec fieldcontrols com page8of8 Phone 252 522 3031 Fax 252 ...

Reviews: