Use and operation | Working with angle grinder
1
4
FDBP
200951-E
BELT SANDER
EN
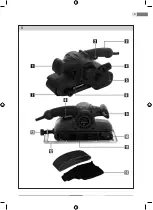
With the smooth face of the frame uppermost (facing you), fit the nub of
the depth adjustment knob into the fixing channel, so that the nibs on the
sides of the frame are positioned in the framing slots on the sides of the base
Rotate the Depth Adjustment Knob (13) anti-clockwise so that the
nibs on the frame engage within the framing slots in the base
Fitting
theDus
tbag
Push fit the Dust Bag (14) onto the Dust Extraction Port (4) or
connect a dust extraction system to the dust port before use
Do not allow the dust bag to become more than two thirds full before
emptying, so that it can operate efficiently to provide a safer and
cleaner work environment
7.
WORKING WITH BELT SANDER
Switching on
To start the machine, squeeze the On/Off Trigger (8). To stop the
machine, release the trigger
For extended continuous use, you can lock the on/off trigger in the 'on' position:
1.
Squeeze the on/off trigger and depress the Lock On Button (2); the
machine will continue to run when the on/off trigger is released
2.
To stop the machine, squeeze and release the on/off trigger
Speed control
The speed of the machine can be varied
To adjust the speed, rotate the Speed Control Dial (9).
A higher number indicates a higher operating speed
It is highly recommended that you practice working with scrap
material until the optimum sanding speed is determined
Setting sanding depth
To set the maximum depth of material that will be
removed, adjust the position of the Depth Frame (12)
To adjust the depth frame, rotate the Depth Adjustment Knob
(13) on the rear of the machine
It is highly recommended that you practice working with scrap material
until the optimum sanding depth is determined
Summary of Contents for FDBP 200951-E
Page 1: ...FDBP 200951 E...
Page 2: ...3 A...


