background image

19

OPERATING INSTRUCTIONS

POLE-MOUNTED PRUNER

EN

Safety instructions

Avoid accidental starting. Ensure the switch is in the off-position before connecting the
battery, storing or carrying the power tool. Carrying power tools with your finger on the switch 
or plugging in power tools that have the switch on invites accidents.
Remove any adjusting tools or wrenches before turning the power tool on. An adjusting tool
or wrench left attached to a rotating part of the power tool may result in personal injury.
Do not overreach. Keep proper footing and balance at all times. This enables better control of
the power tool in unexpected situations.
Dress properly. Do not wear loose clothing or jewellery. Keep your hair, clothing and gloves
away from moving parts. Loose clothes, jewellery or long hair can be caught in moving parts,.
If devices are provided for the connection of dust extraction and collection facilities, ensure
these are connected and properly used. Use of these devices can reduce dust-related 
hazards.

Power tool use and maintenance

Do not force the power tool. Use only the correct power tool for your application. The correct
power tool will do the job better and safer at the rate for which it was designed.
Do not use the power tool if the switch does not turn it on and off. Any power tool that cannot
be controlled with the switch is dangerous and must be repaired.
Unplug the power cord from the mains outlet before making any adjustments, changing
accessories, or storing power tools. Such preventative safety measures reduce the risk of 
starting the power tool accidentally.
Store idle power tools out of the reach of children and do not allow persons unfamiliar with
the power tool or these instructions to operate the power tool. Power tools are dangerous in 
the hands of untrained users.
Maintain power tools. Check for misalignment or binding of moving parts, pay particular
attention to cracks, breakage of parts and any other condition that may affect the power tool’s 
operation. If damaged, have the power tool repaired before use. Many accidents are caused 
by poorly maintained power tools.
Keep cutting tools sharp and clean. Properly maintained cutting tools with sharp cutting
edges are less likely to bind and are easier to control.
Use the power tool, accessories and tool bits etc., in accordance with these instructions and
in the manner intended for the particular type of power tool, taking into account the given 
working conditions and the work to be performed. Use of the power tool for operations other 
than those for which the power tool is intended could result in hazardous situations.

Service

Have your power tool serviced by a qualified repair person using only original replacement
parts. This will ensure that the safety of the power tool is maintained.

Summary of Contents for FZP 6005-E

Page 1: ...FZP 6005 E...

Page 2: ...FZP 6005 E 2 English 13 e tina 31 Sloven ina 49 Magyarul 69 Polski 89...

Page 3: ...3 1 19 2 3 4 5 6 7 8 9 10 11 12 13 14 15 16 17 18 1 20 21 22 23 24 25 26 27...

Page 4: ...FZP 6005 E 4 3 2 8 A B...

Page 5: ...5 5 4 A 8 A B 2 1...

Page 6: ...FZP 6005 E 6 7 6 22...

Page 7: ...7 9 8 0 15 30 0 0 0 27...

Page 8: ...FZP 6005 E 8 11 10 9 A B A...

Page 9: ...9 13 12 17 28 19 29 30 31 32...

Page 10: ...FZP 6005 E 10 14 15 16 A B 34 38 37 36 35 32 0 6 mm...

Page 11: ...11 17 39 40...

Page 12: ...FZP 6005 E 12...

Page 13: ...ND PACKAGE CONTENT SAFETY INSTRUCTIONS SAFETY INSTRUCTIONS WHEN WORKING WITH POLE MOUN TED PRUNER POLE MOUNTED PRUNER ASSEMBLY SAWCHAIN TENSIONING ADJUSTING SAWCHAIN TENSION ADJUSTING CHAINSAW HEAD AN...

Page 14: ...ctions for use Familiarize with operating elements and the proper use of the device Keep the manual in a safe place for future reference We recommend keeping the original package including the inner p...

Page 15: ...efore using the tool read carefully this operating manual If the power cord is damaged immediately unplug the tool Always use hard hat goggles and hearing protection while working Danger of fatal inju...

Page 16: ...ols DANGER Do not start the tool if there are children bystanders or animals near you Use protective gloves while working Use solid insulated working footwear Use ear protection Wear work gloves Bewar...

Page 17: ...1 22 23 24 25 26 27 Clamp Handle Switch Plug Guide bar Saw chain Adjusting hole Guide bar bolt Sprocket cover Sprocket Adjusting block Adjusting plate Adjusting bolt Package Content Remove the machine...

Page 18: ...n or wet conditions Water entering a power tool will increase the risk of electric shock Do not abuse the cord Never use the cord for carrying pulling or unplugging the power tool Keep cord away from...

Page 19: ...ower tool that cannot be controlled with the switch is dangerous and must be repaired Unplug the power cord from the mains outlet before making any adjustments changing accessories or storing power to...

Page 20: ...under the branch you are cutting Always stand outside the area of falling chippings Never work from a ladder or other unstable equipment while working with a chain saw Always grasp the chain saw with...

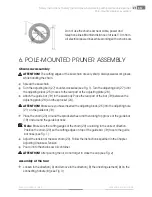
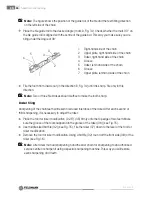
Page 21: ...e saw body Place the rear part of the bar 19 between the adjusting plate 26 and the sprocket 24 ATTENTION Make sure you have inserted the adjusting block 25 into the adjusting hole 21 on the guide bar...

Page 22: ...g plant New chain will always stretch Frequently check the tension of a new chain during the first 2 hours always unplug the power cord from power supply first Allow chain cool down When checking the...

Page 23: ...pole and extract it up to the desired length Note Always extend the pole only up to the minimum length required for cutting the particular shrubbery To lock the pole in the position tighten the arrest...

Page 24: ...h the guide bar occur as a result of uneven wear and tear Uneven wear and tear occurs mostly due to incorrect chain sharpening and incorrect adjustment of the raker If the bar is worn out unevenly the...

Page 25: ...be significantly faster and particularly safer Dull chain increases wear and tear of the sprocket guide bar chain and drive If you have to force the chainsaw while only wood dust and a few chippings...

Page 26: ...s sharp File only in this direction Note Two or three file strokes should suffice to make the tooth sharp Raker filing Sharpening of the chain teeth will result in reduced tolerance of the raker After...

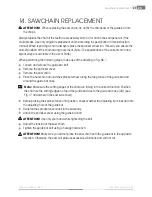
Page 27: ...Remove the sprocket cover Remove the saw chain Place the new chain around the sprocket wheel along the top groove of the guide bar and around the guide bar nose Note Make sure the cutting edges of th...

Page 28: ...guide bar Wipe the chainsaw body with a cloth When cleaning use a soft cloth soaked in a soap water Store the chainsaw in higher racks or in locked premises out of the reach of children in a dry place...

Page 29: ...rective for Electromagnetic Compatibility EMC No 2004 108 EC EC Directive for RoHS 2002 95 EC and norms EN 60745 1 2009 A11 2010 EN ISO 11680 1 2011 EN 55014 1 2006 A1 2009 A2 2011 EN 55014 2 1997 A1...

Page 30: ...natural resources and you help prevent any potential adverse effects on the environment and human health which could be the results of wrong waste disposal Ask your local authority or the nearest coll...

Page 31: ...DOD VKY BEZPE NOSTN POKYNY BEZPE NOSTN POKYNY PRO PR CI S TELESKOPICKOU ET ZOVOU PILOU SESTAVEN TELESKOPICK ET ZOV PILY NAPNUT PILOV HO ET ZU SE ZEN NAPNUT PILOV HO ET ZU NASTAVEN HLU HLAVY S POHONEM...

Page 32: ...rojem pracovat p e t te si n sleduj c bezpe nostn p edpisy a pokyny k pou v n Seznamte se s obslu n mi prvky a spr vn m pou v n m za zen N vod pe liv uschovejte pro p pad pozd j pot eby Minim ln po do...

Page 33: ...ed pou it m n ad si pe liv p e t te n vod k obsluze V p pad po kozen nap jec ho kabelu ihned n ad odpojte od nap jen P i pr ci v dy pou ijte ochrannou helmu br le a ochranu sluchu Nebezpe smrteln ho...

Page 34: ...ZPE Nespou t jte n ad pokud se ve va bl zkosti nach zej d ti jin osoby i zv ata P i pr ci pou vejte ochrann rukavice Pou vejte pevnou izola n pracovn obuv Pou vejte ochranu sluchu Pou vejte pracovn ru...

Page 35: ...ryt et zky et zka Regula n blok Regula n plech Regula n roub Obsah dod vky Stroj vyjm te opatrn z obalu a zkontrolujte zda jsou n sleduj c d ly kompletn Pro ez va Li ta Kryt li ty et z Ramen popruh N...

Page 36: ...zu elektrick m proudem Nepou vejte pohybliv p vod k jin m el m Nikdy nenoste a netahejte elektrick n ad za p vod ani nevytrh vejte vidlici ze z suvky tahem za p vod Chra te p vod p ed horkem mastnotou...

Page 37: ...e l pe a bezpe n ji vykon vat pr ci pro kterou bylo navr eno Nepou vejte elektrick n ad kter nelze zapnout a vypnout sp na em Jak koliv elektrick n ad kter nelze ovl dat sp na em je nebezpe n a mus b...

Page 38: ...ad pe liv o ist te a prove te p slu nou dr bu p ed p epravou n ad zajist te proti niku paliva po kozen i zp soben razu 5 BEZPE NOSTN POKYNY PRO PR CI S TELESKOPICKOU ET ZOVOU PILOU Nikdy nest jte p mo...

Page 39: ...TAVEN TELESKOPICK ET ZOV PILY Sestaven et zov pily POZOR ezn zuby et zu pily jsou velmi ostr P i manipulaci s et zem v dy pou vejte pracovn rukavice Rozlo te et z pily do d lky Ot ejte stav c m roubem...

Page 40: ...p n n pilov ho et zu vyt hn te z str ku nap jec ho kabelu ze z suvky P i kontaktu lidsk ho t la s b c m et zem m e doj t k v n mu a smrteln mu razu POZOR ezn zuby et zu pily jsou velmi ostr P i manipu...

Page 41: ...ou tla tko se zen s n pisem PUSH a oto te pohon do po adovan polohy Po uvoln n tla tka se hlava s pohonem automaticky zajist v nastaven poloze 10 NASTAVEN D LKY TELESKOPICK N SADY et zov pila je vybav...

Page 42: ...y nedo lo k jejich zran n 12 I T N A DR BA N AD i t n t lesa et zov pily Udr ujte t leso et zov pily ist P i i t n pou ijte m kk had k namo en v m dlov m roztoku T mto had kem pe liv o ist te t leso e...

Page 43: ...ez n bude v razn rychlej a p edev m bezpe n j Tup et z zvy uje opot eben et zky vodic li ty et zu a pohonu Pokud mus te na pilu tla it a p i ez n se tvo pouze piliny s p r od ezky znamen to e je et z...

Page 44: ...m ly posta it dva a t i tahy piln kem Pilov n omezovac ho zubu D sledkem ost en zub et zu je sn en tolerance omezovac ho zubu Po ka d m druh m a t et m ost en je nezbytn upravit nastaven omezovac ho...

Page 45: ...sejm te roub vodic li ty Sejm te kryt et zky Sejm te pilov et z Obto te nov et z kolem ozuben ho kola pot pod l horn dr ky vodic li ty a kolem hrotu vodic li ty Pozn mka Ujist te se e ezn zuby et zu s...

Page 46: ...ete olejem T leso et zov pily ot ete had kem P i i t n pou ijte m kk had k namo en v m dlov m roztoku et zovou pilu skladujte ve vy ch reg lech i v uzam en ch prostor ch mimo dosah d t na such m m st...

Page 47: ...o strojn ch za zen ch a o zm n sm rnice 95 16 ES Sm rnice Evropsk ho parlamentu a Rady 2004 108 ES ze dne 15 prosince 2004 o sbli ov n pr vn ch p edpis lensk ch st t t kaj c ch se elektromagnetick kom...

Page 48: ...enci ln ch negativn ch dopad na ivotn prost ed a lidsk zdrav co by mohly b t d sledky nespr vn likvidace odpad Dal podrobnosti si vy dejte od m stn ho adu nebo nejbli ho sb rn ho m sta P i nespr vn li...

Page 49: ...NOSTN POKYNY BEZPE NOSTN POKYNY NA PR CU S TELESKOPICKOU RE AZOVOU P LOU ZOSTAVENIE TELESKOPICKEJ RE AZOVEJ P LY NAPNUTIE P LOVEJ RE AZE NASTAVENIE NAPNUTIA P LOVEJ RE AZE NASTAVENIE UHLA HLAVY S POH...

Page 50: ...ova pre tajte si nasleduj ce bezpe nostn predpisy a pokyny na pou vanie Zozn mte sa s obslu n mi prvkami a spr vnym pou van m zariadenia N vod starostlivo uschovajte pre pr pad neskor ej potreby Minim...

Page 51: ...m n radia si pozorne pre tajte n vod na obsluhu V pr pade po kodenia nap jacieho k bla ihne n radie odpojte od nap jania Pri pr ci v dy pou vajte ochrann prilbu okuliare a ochranu sluchu Nebezpe enstv...

Page 52: ...ENSTVO Nesp ajte n radie ak sa vo va ej bl zkosti nach dzaj deti in osoby i zvierat Pri pr ci pou vajte ochrann rukavice Pou vajte pevn izola n pracovn obuv Pou vajte ochranu sluchu Pou vajte pracovn...

Page 53: ...li ta P lov re az Regula n otvor Skrutka vodiacej li ty Kryt re azov ho kolieska Re azov koliesko Regula n blok Regula n plech Regula n skrutka Obsah dod vky Stroj vyberte opatrne z obalu a skontroluj...

Page 54: ...ladni ky Nebezpe enstvo razu elektrick m pr dom je v ie ak je va e telo spojen so zemou Nevystavujte elektrick n radie da u vlhku alebo mokru Ak vnikne do elektrick ho n radia voda zvy uje sa nebezpe...

Page 55: ...denia boli pripojen a spr vne pou van Pou itie t chto zariaden m e zn i nebezpe enstvo sp soben vznikaj cim prachom Pou itie elektrick ho n radia a jeho dr ba Elektrick n radie nepre a ujte Pou vajte...

Page 56: ...rovnak rove bezpe nosti elektrick ho n radia ako pred opravou Skladovanie n radie prepravujte a skladuje len s nasaden m ochrann m krytom pred ulo en m n radie d kladne o istite a vykonajte pr slu n d...

Page 57: ...manipul cii s re azou v dy pou vajte pracovn rukavice Rozlo te re az p ly do d ky Ot ajte nastavovacou skrutkou 27 proti smeru hodinov ch ru i iek pozri Obr zok 1 Nastavovacou skrutkou 27 ot ajte dov...

Page 58: ...sk ho tela s be iacou re azou m e d js k v nemu a smrte n mu razu POZOR Rezn zuby re aze p ly s ve mi ostr Pri manipul cii s re azou v dy pou vajte pracovn rukavice POZOR Pri isten re azovej p ly nepo...

Page 59: ...zri Obr zok 7 9 NASTAVENIE UHLA HLAVY S POHONOM Obr zok 9 Hlavu s pohonom m ete nastavi do 3 r znych pracovn ch uhlov 0 stup ov 15 stup ov a 30 stup ov Stla te jednou rukou tla idlo nastavenia s n pis...

Page 60: ...pln ch ot kach Uvo nite sp na a zastavte p lu Pred sklopen m n sady k zemi sa uistite e sa pohyb p lovej re aze zastavil Rezanie nevykon vajte v dosahu al ch os b aby nedo lo k ich zraneniu 12 ISTENI...

Page 61: ...videlne odstra ujte piliny Pri isten pou ite pacht u 29 alebo dr t pozri Obr zok 13 Olejov dr ky 30 vy istite po skon en ka d ho pracovn ho d a Z bo n ch str n li ty odstr te ostriny 31 Ploch m piln k...

Page 62: ...nie zubov re aze Pou ite vodidlo 33 pozri Obr zok 14 na pilovanie pod uhlom 30 zna ka A Obr zok 14 Nastavte napnutie re aze na spr vnu rove Upevnite vodiacu li tu do zver ka aby ste mali re az v stabi...

Page 63: ...pozri Obr zok 15 Pou ite ploch piln k strednej ve kosti 32 pozri obr zok 15 Zapilujte obmedzovac zub 37 do rovne n stroja na pravu obmedzovacieho zuba Odoberte n stroj na pravu obmedzovacieho zuba Po...

Page 64: ...kryt re azov ho kolieska skrutkou vodiacej li ty POZOR Skrutku utiahnite len rukou Upravte napnutie re aze Dotiahnite skrutku vodiacej li ty pomocou es hrann ho k a POZOR Uistite sa e ste neumiestnili...

Page 65: ...e 3 8 D ka li ty 25 cm Rezn r chlos 10 m s Celkov d ka 2 05 m 2 65 m Bez vodiacej li ty Vibr cie ruka pa e v en efekt vna hodnota zr chlenia 2 5 m s2 Celkov d ka 2 3 m 2 9 m D ka rezu 250 mm Hmotnos 3...

Page 66: ...nice 95 16 ES Smernica Eur pskeho parlamentu a Rady 2004 108 ES z 15 decembra 2004 o aproxim cii pr vnych predpisov lensk ch t tov vz ahuj cich sa na elektromagnetick kompatibilitu a o zru en smernice...

Page 67: ...prostredie a udsk zdravie o by mohlo by d sledkom nespr vnej likvid cie odpadov al ie podrobnosti si vy iadajte od miestneho radu alebo najbli ieho zbern ho miesta Pri nespr vnej likvid cii tohto dru...

Page 68: ...FZP 6005 E 68...

Page 69: ...TONS GI UTAS T SOK TELESZK POS L NCF R SSZEL V GZETT MUNK RA VONATKOZ BIZTONS GI UTAS T SOK A TELESZK POS L NCF R SZ SSZE LL T SA A F R SZL NC MEGFESZ T SE A F R SZL NC FESZ L S NEK BE LL T SA A MOTOR...

Page 70: ...s haszn lati utas t sokat Ismerkedjen meg a g p kezel szerveivel s a helyes haszn lat szab lyaival A haszn lati tmutat rizze meg egy esetleges k s bbi jraolvas shoz A csomagol anyagot bele rtve a bel...

Page 71: ...zersz mot es nek zembe helyez s el tt figyelmesen olvassa el a haszn lati tmutat t Ha a g p t pk bele megs r l azonnal h zza ki a k sz l ket az elektromos h l zatb l Munkav gz s sor n minden esetben v...

Page 72: ...VESZ LYFORR S Soha ne engedje le a szersz mot ha a k zelben gyermekek m s szem lyek vagy llatok tart zkodnak Munkav gz shez haszn ljon munkakeszty t Stabil ramszigetel l bbelit viseljen Haszn ljon f...

Page 73: ...19 20 21 22 23 24 25 26 27 Kapocs Markolat Kapcsol Csatlakoz dug Vezet s n F r szl nc ll t ny l s Vezet s n csavar L ncker k burkolat L ncker k ll t blokk ll t lemez ll t csavar A csomagol s tartalma...

Page 74: ...z l k hez A csatlakoz dug s a csatlakoz aljzat talak t sa n veli az ram t s kock zat t Ker lje az rintkez st az olyan f ldelt fel letekkel mint a cs vezet kek radi torok h ztart si k sz l kek s h t g...

Page 75: ...rtson megfelel t vols got s egyens lyt Ez v ratlan helyzetekben is jobb ellen rz st biztos t a motoros eszk z felett lt zz n megfelel en Ne viseljen laza ruh zatot vagy kszert Tartsa t vol a haj t a r...

Page 76: ...z l k et a tartoz kokat s szersz mokat stb ezen utas t sok szerint haszn ljuk figyelembe v ve az zemi felt teleket s a v gzend munk t Az elektromos k sz l k nem rendeltet sszer haszn lata vesz lyt oko...

Page 77: ...lyek tart zkodhassanak a l ncf r sz k zel ben Biztos tsa hogy a k zelben tart zkod szem lyek mindig megfelel biztons gos t vols gban legyenek a v g si helysz nt l Soha ne haszn lja a l ncf r szt elek...

Page 78: ...ldja meg A ir nyba majd vegye le B ir nyba a csatlakoz markolaton 6 tal lhat r gz t elemet 8 l sd a 3 k pet Illessze a h ts markolatot A ir nyba az els r szbe l sd a 4 k pet Ellen rizze le hogy az 1 h...

Page 79: ...nc visszat r az eredeti helyzet ben a feszess ge megfelel A s n als l n a l nc enyhe bel g sa kb 4 mm vagy kevesebb m g megengedett 8 A F R SZL NC FESZESS G NEK BE LLT SA A f r szl nc be ll t sa el t...

Page 80: ...K t k zzel fogja meg a l ncf r sz markolat t Minden esetben az el rt poz ci knak A megfelel en fogja a szersz mot ld a 11 k pet A markolatot val ban fixen fogja A h velykujjnak s a t bbi ujjnak fixen...

Page 81: ...ka t bbnyire a l nc helytelen meg lez se valamint a k rm s tk z helytelen be ll t sa A s n egyenetlen kop sa eset n a vezet horony kisz lesedik l sd a k pet Ennek k vetkezm nye a l nc kopog sa valamin...

Page 82: ...biztos tsa a l ncf r sz less g t A f r szel s jelent sen gyorsabb s mindenekel tt biztons gosabb lesz A kopott l nc fokozza a l ncker k a vezet s n a l nc s a hajt s elhaszn l d s t Ha nyom st kell a...

Page 83: ...e az ir nyba reszeljen Megjegyz s A fog meg lez s hez el g k t h rom h z s a reszel vel A k rm s tk z reszel se A l ncfogak lez s nek k vetkezm nye a k rm s tk z cs kkent toleranci ja Minden m sodik h...

Page 84: ...j t Vegye le a l ncker k burkolat t Vegye le a f r szl ncot Forgassa meg az j l ncot a fogasker k majd a vezet s n fels hornya s a vezet s n v ge k r l Megjegyz s Ellen rizze le hogy a l nc fogai megf...

Page 85: ...ajozza meg a vezet s nt A l ncf r sz test t t r lje t ruhadarabbal Tiszt t shoz szappanos oldatba m rtott puha t rl ruh t haszn ljon A l ncf r szt magasban l v polcon vagy z rhat helyis gben gyermekek...

Page 86: ...nt s a Tan cs 2004 108 EK ir nyelve 2004 december 15 az elektrom gneses sszef rhet s gre vonatkoz tag llami jogszab lyok k zel t s r l s a 89 336 EGK ir nyelv hat lyon k v l helyez s r l Az Eur pai Pa...

Page 87: ...olt potenci lis negat v hat sok megel z s t ami a helytelen hullad k likvid l s k vetkezm nye lehet A tov bbi r szleteket a helyi hivatalban vagy a legk zelebbi gy jt helyen kaphat Az ilyen jelleg hul...

Page 88: ...FZP 6005 E 88...

Page 89: ...SADY BEZPIECZE STWA ZASADY BEZPIECZE STWA PODCZAS PRACY Z PILARK A CUCHOW Z WYSI GNIKIEM TELESKOPOWYM ZMONTOWANIE PILARKI A CUCHOWEJ NA WYSI GNIKU TELESKOPOWYM NAPI CIE A CUCHA PILARKI REGULACJA NAPI...

Page 90: ...y zapozna si z poni szymi przepisami bezpiecze stwa i instrukcj obs ugi Nale y zapozna si z elementami obs ugi i w a ciwym korzystaniem z urz dzenia Instrukcje nale y przechowywa w celu p niejszego z...

Page 91: ...deszczu Przed uruchomieniem nale y dok adnie zapozna si z tre ci instrukcji obs ugi W razie uszkodzenia przewodu zasilaj cego nale y natychmiast od czy narz dzie od zasilania Przy pracy nale y nosi k...

Page 92: ...chamia narz dzia je eli w pobli u znajduj si dzieci inne osoby lub zwierz ta Przy pracy u ywa r kawice ochronne U ywa odpowiednie izoluj ce obuwie robocze Zalecamy stosowanie ochronnik w s uchu Nale y...

Page 93: ...W cznik Wtyczka Prowadnica a cuch pilarki Otw r regulacyjny ruba prowadnicy Os ona ko a a cuchowego Ko o a cuchowe Blok regulacyjny Blacha regulacyjna ruba regulacyjna Zawarto opakowania Maszyn ostro...

Page 94: ...s uszkodzone przez przer bki oraz odpowiednie gniazda ograniczaj mo liwo pora enia pr dem elektrycznym Nale y wystrzega si kontaktu z przedmiotami uziemionymi takim jak np ruroci gi grzejniki central...

Page 95: ...pozostawiony w obracaj cej si cz ci narz dzia elektrycznego mo e spowodowa zranienie Pracowa nale y tylko tam gdzie jest zapewniony bezpieczny dost p Zawsze nale y utrzymywa stabiln pozycj i r wnowag...

Page 96: ...naostrzone przyrz dy tn ce z mniejszym prawdopodobie stwem ulegn zaklinowaniu a ich praca atwiej poddaje si kontroli Narz dzia elektryczne oprzyrz dowanie urz dzenia robocze itd nale y u ytkowa zgodni...

Page 97: ...nale y trzyma w obu r kach Podczas ci cia nale y na pilark a cuchow oddzia ywa ze sta ym r wnomiernym naciskiem ale nie nale y stosowa nadmiernej si y Nie u ywa pilarki do ci cia konar w grubszych ni...

Page 98: ...ko o z bate nast pnie poprowadzi wzd u g rnego wpustu prowadnicy 19 i woko o czubka prowadnicy Uwaga Upewni si e z by tn ce 20 s ustawione w prawid owym kierunku a cuch 20 nale y za o y tak aby z by...

Page 99: ...po uprzednim wy czeniu przewodu zasilaj cego ze r d a zasilania Pozostawi a cuch do wych odzenia Przy sprawdzaniu napi cia a cucha pilarki nale y post powa w spos b nast puj cy Od czy pilark od zasila...

Page 100: ...ementem blokuj cym zabezpieczy wystarczaj c wytrzyma o nasady w dowolnej d ugo ci W celu wysuni cia wysi gnika nale y zwolni element blokuj cy 9 w kierunku A patrz rys 10 Wysi gnik si atwo wysunie Poc...

Page 101: ...budowy pilarki a cuchowej Obudow pilarki a cuchowej nale y utrzymywa w czysto ci Do czyszczenia u ywa mi kkiej cierki zamoczonej w roztworze mydlanym cierk dok adnie oczy ci powierzchni obudowy pilark...

Page 102: ...z instrukcjami zamieszczonymi w rozdziale Cz ci zamienne i wyposa enie Prawid owy typ prowadnicy znajdziesz w Wykazie cz ci 13 OSTRZENIE A CUCHA PILARKI a cuch pilarki powinien by zawsze ostry Ci cie...

Page 103: ...k 30 na prowadniku pilnika pokrywa si ze rodkiem prowadnicy Upewnisz si e b dziesz pi owa pod k tem 30 1 2 3 4 5 6 7 1 2 3 4 5 6 7 Prawa strona a cucha Blacha g rna prawa strona a cucha Z b ograniczaj...

Page 104: ...cyfikacja w a ciwego typu a cucha i ko a z batego znajduje si w Wykazie cz ci Przy nast puj cej procedurze nale y kierowa si rysunkiem nr 1 Odkr ci i wyj rub prowadnicy Zdj os on ko a a cuchowego Zdj...

Page 105: ...esmarowa olejem Obudow pilarki przetrze cierk Do czyszczenia u ywa mi kkiej cierki zamoczonej w roztworze mydlanym Pilark a cuchow nale y przechowywa na wy ej po o onych rega ach lub w pomieszczeniach...

Page 106: ...entu Europejskiego i Rady 2004 108 ES z dnia 15 grudnia 2004 o zbli aniu przepis w prawnych kraj w cz onkowskich dotycz cych kompatybilno ci elektromagnetycznej i o uniewa nieniu dyrektywy 89 336 EHS...

Page 107: ...a rodowisko naturalne i zdrowie ludzi kt re mog aby spowodowa niew a ciwa likwidacja odpad w Szczeg owych informacji udziela Urz d gminy albo najbli sze wysypisko odpad w Przy niew a ciwej likwidacji...

Page 108: ...I Seller s stamp I Piecz sprzedawcy I Keresked b lyegz je Raz tko servisu I Pe iatka servisu I Stamp of the repair shop I Piecz serwisu I Szerviz pecs tje Vypln prodejce I Vypln predajca I To be fille...

Page 109: ...eklam ciu uplatni bez zbyto n ho odkladu aby nedoch dzalo ku zhor eniu chyby najnesk r v ak do konca z ru nej doby Kupuj ci je povinn pri reklam cii spolupracova pri overen existencie reklamovanej chy...

Page 110: ......

Reviews: