EN
ELECTRIC STRING TRIMMER
USER'S MANUAL
11
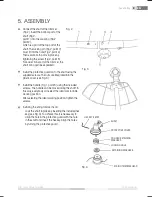
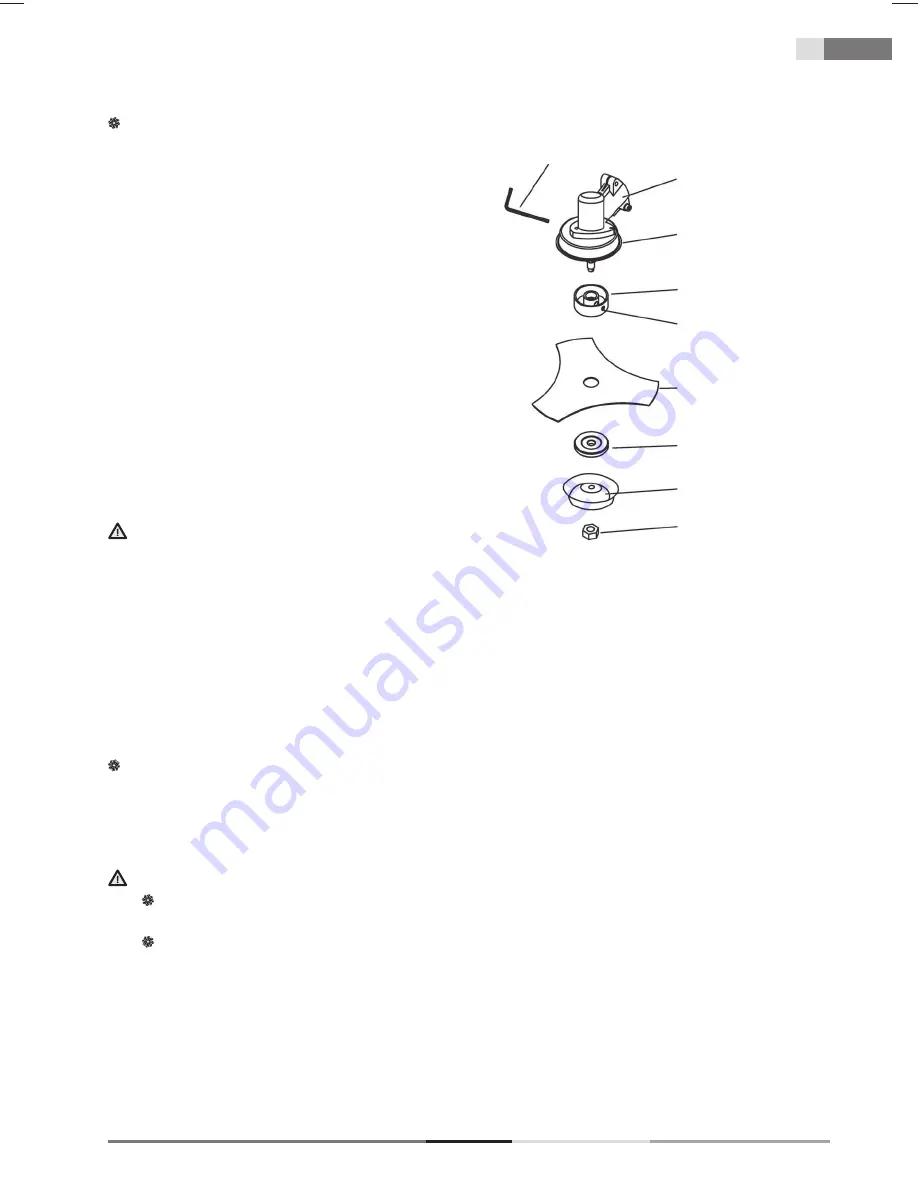
Installing the metal three tooth blade
- Lock the shaft in place by inserting the included
4mm hex key (see Fig. 6). To achieve this, it is
necessary to align the hole in the protective guard
with the hole in the shaft and insert the hex key.
Align the holes by turning the protective guard.
- Install the individual components in the following
order:
1. Cogged retaining washer A (also equipped with
a retaining hole)
2. Metal three tooth blade
3. Retaining washer B
4. Cup cover
5. Lock nut
- Make sure that the blade is correctly seated in the
distancing part of the cogged retaining washer A
- Using the supplied socket wrench, turn the blade
fastening nut clockwise (attention: reverse thread)
until it is securely tightened.
- Take the hex key out of the retaining hole.
WARNING
IN THE EVENT OF EXCESSIVE VIBRATIONS
– IMMEDIATELY STOP THE MOTOR
Excessive vibrations of the blade mean that this blade is not installed correctly. Immediately turn off the motor
and check the blade. An incorrectly installed blade may cause injuries. Only use original accessories when
performing maintenance or servicing this product.
6. STARTING THE TRIMMER
POINTS TO CHECK BEFORE STARTING WORK
1. Check whether any screws, nuts and installation elements are loose. Tighten any loose screws.
2. Make sure that the plastic head guard and the blade is securely fastened in place.
3. Check the blade or the string trimmer head for damage.
WARNING
Prior to starting the trimmer, make sure that the cutting blade/string trimmer head can move
freely and is not touching any foreign objects.
Hold the trimmer fi rmly with both hands.. Always stand so that your body is on the left of the shaft tube.
Never hold the handle with crossed arms. These instructions also apply to left-handers.
ATTENTION:
Exposure to vibrations may damage the health of persons that suffer from circulatory or nerve
system problems. If any physical problems become evident, such as desensitisation, loss of sensitivity, loss of
usual strength or changes in skin colour, please contact a doctor. These systems usually manifest themselves on
fi ngers, hands or wrists.
Fig. 6
HEX KEY 4 MM
SHAFT
PROTECTIVE COVER
COGGED RETAINING
WASHER A
RETAINING WASHER B
CUP COVER
LOCK NUT
LOCKING HOLE
METAL THREE TOOTH
BLADE
Assembly | Starting the trimmer
Summary of Contents for FZS 2050-E
Page 1: ...EN ...
Page 17: ...EN 18 FZS 2050 E Notes ...


