background image

8


Assembly


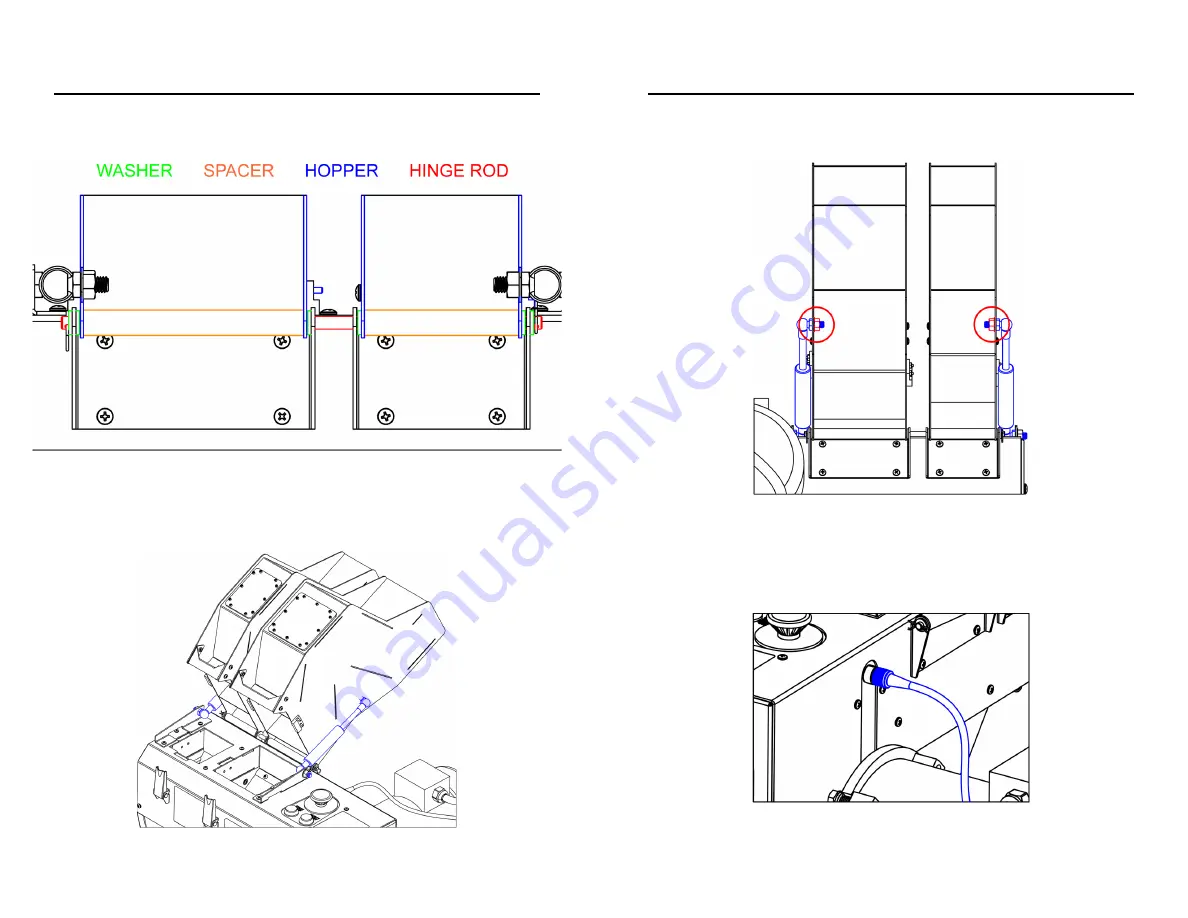
11.  Reinstall the hopper hinge rod, spacers, plastic washers and cotter 

pin in the order shown.  


12.  Remove the nuts from the end of the gas springs not attached to the 

bracket on the top panel. One at a time, tip each hopper back and 
insert the threaded stud on the end of the gas spring the nut was 
removed from into the hole midway up the back of the hopper. 


9


Assembly


13.  Reinstall the nuts on the gas spring studs on the inside of the hopper 

and tighten using a 1/2” wrench. 


14.  Plug the grey control cable from the back of the drive enclosure into 

the bulkhead located on the back of the Reclaimer above the motor 
and tighten the thumbnut to secure the connector. Make sure to 
allign the notch in the connector with the bump on the inside of the 
bulkhead.  


Summary of Contents for Reclaimer

Page 1: ...gh speed projectiles and sharp edges Always wear proper eyewear and gloves when working with the Reclaimer and processing plastic In Case of Emergency hit the EMERGENCY STOP button or pull the power cord out of the machine Only use the Reclaimer to process thermoplastic polymers No other use has been tested or approved by Filabot Always STOP the Reclaimer before opening the hoppers The Reclaimer i...

Page 2: ...ened Steel Fixed Blades Reversible 0 50 4140 Steel Plate Granulator Rotating Drum 0 20 x 0 20 Cutting Teeth 17 4 SS Hardened Fixed Blades Reversible 0 50 4140 Steel Plate 3 Parts Included 1 Reclaimer Main Body 2 Motor Base Assembly 3 Shredder Hopper 4 Granulator Hopper 5 Shredder Hopper Gas Spring Assembly 6 Granulator Hopper Gas Spring Assembly 7 2 5 16 18 x 7 8 Hex Head Bolts 8 2 5 16 Washers 9 ...

Page 3: ...ase Assembly 1 Loosen the 4 motor base bolts using a 1 2 wrench Do not remove the bolts 2 Line up the motor shaft with the gearbox input on the Reclaimer Use a pair of pliers to hold the shaft key from sliding back while inserting the shaft Caution Reclaimer can tip over easily Have someone support the Reclaimer while attaching the motor 5 Assembly 3 Push the motor face flat against the gearbox fa...

Page 4: ...Using a 1 2 wrench tighten the 4 base bolts which were loosened in step 1 8 Remove the inner cotter pin from the hopper hinge and slide out the rode while removing the aluminum spacers and plastic washers 7 Assembly 9 Remove the 4 top panel screws using a 2 Philips screw driver Line up the two gas spring assembly brackets with the holes in the top panel as shown and reinstall the screws Be sure th...

Page 5: ...he gas spring the nut was removed from into the hole midway up the back of the hopper 9 Assembly 13 Reinstall the nuts on the gas spring studs on the inside of the hopper and tighten using a 1 2 wrench 14 Plug the grey control cable from the back of the drive enclosure into the bulkhead located on the back of the Reclaimer above the motor and tighten the thumbnut to secure the connector Make sure ...

Page 6: ...e safety circuit 11 Controls Inputs cont 7 Drive status indicator LED Output code Solid green Drive power on ready to start Flashing green Drive operating normally motor is running Solid red Safety trip Safety switches or Emergency Stop Off No drive power If Main Power is illuminated and indicator is off then safety circuit must be reset Flashing red code 8 8 flashes followed by pause Over current...

Page 7: ...ues in the hopper During operation you may need to adjust the bags so they fill completely 8 At anytime during shredding or when the collection bag for the Shredder is full the Shredder output can be loaded into the Granulator hopper Press the Start Stop button to stop the machine and transfer the output of the Shredder into the Granulator hopper NOTE It is recommended to screen the output of the ...

Page 8: ...nual applies only to the Filabot EX6 While Triex LLC has applied all possible caution in producing this manual we urge the customer or user of this device to contact Triex LLC with any questions or concerns about operation before operating the device or making any adjustments Triex LLC provides no assurance of applicability of the product to customers requirements ...

Reviews: