10.
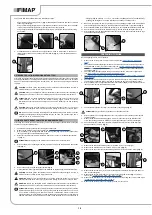
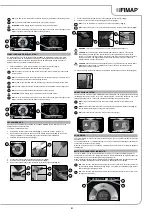
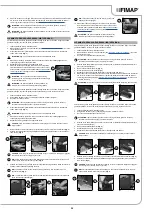
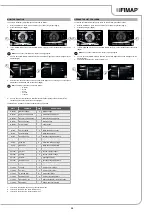
Activate the solution jet by pressing the lever in the tank cleaning accessory. Make sure the jet is
pointing into the tank before pressing the lever.
NB
: to adjust the solution jet from the
tank cleaning accessory, turn the knob (6) on the
accessory itself
(
Fig. 7
).
NB
: to adjust the intensity of the solution jet from the
tank cleaning accessory, turn the knob (7)
on the accessory itself
(
Fig. 8
).
NB
: to stop the solution jet,
use the lever (8) on the tank cleaning accessory (
Fig. 9
).
11. Clean the brush under running water to remove any impurities from its bristles. Check the bristles
are not worn; in the event of excessive wear, replace the brush (the bristles should be at least
10mm long). Read the paragraph “
REPLACING THE CYLINDRICAL BRUSHES
” for info on how
to replace the brush.
ATTENTION:
Every time it is remove, swap the front brush with the rear brush, and vice versa.
To clean the recovery tank (without the optional tank cleaning kit), proceed as follows:
1. Take the machine to the maintenance area.
2. Make sure the machine has been secured (see the section titled “
”).
CAUTION
: users are advised to always wear protective gloves, to avoid the risk of serious
injury to hands.
NB
: the place designated for this operation must comply with current environmental protection
regulations.
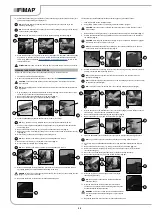
3. Grip the handle (1) on the left-hand side of the recovery tank (
Fig. 1
) and turn the tank cover as
far as it will go, until it reaches the maintenance position.
4.
Remove the dirty water basket/filter (2) from the support (
Fig. 2
).
5.
Remove the basket cover (3) from the basket/filter (2) (
Fig. 3
).
CLEANING THE RECOVERY TANK FILTERS
6.
Clean the basket/filter (2) and the basket cover (3) under a jet of water.
NB
: use a spatula or brush to eliminate any dirt that is particularly difficult to remove.
7.
Use a dry cloth to dry the basket/filter (2) and the basket cover (3) and place them back inside
the recovery tank.
8.
Remove the filter protection cup (4), turning it in the direction of the arrow (
Fig. 4
).
9.
Remove the vacuum motor filter (5), taking care not to lose the support tie (6) inside the recovery
tank (
Fig. 5
).
10.
Rinse the cup (4) and filter (5) thoroughly under running water.
NB
: use a spatula to eliminate any dirt that is particularly difficult to remove.
11.
Remove the recycle filter (6), only valid for FLR versions (
Fig. 6
).
12.
Rinse the filter (6) carefully under running water.
NB
: use a spatula to eliminate any dirt that is particularly difficult to remove.
13.
Rinse the inside of the recovery tank with a jet of water. If necessary, use a spatula to remove
any sludge that may have accumulated at the bottom of the tank.
WARNING
: Take care to clean the electro-mechanical float (7) that is present inside the tank
(
Fig. 7
), only for versions with FLR.
14. Repeat the operations in reverse order to reassemble all the parts.
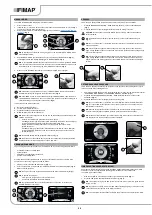
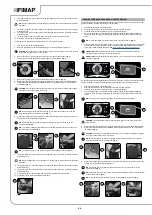
To clean the recovery tank filters (with the optional spray gun kit), proceed as follows:
1. Take the machine to the maintenance area.
2. Using the DS selector on the control display, select the “transfer” program”.
CAUTION
: users are advised to always wear protective gloves, to avoid the risk of serious
injury to hands.
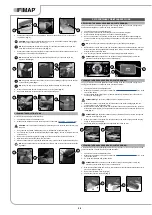
3. Release the tank cleaning accessory (1) (at the back of the machine) from the retainers (
Fig. 1
).
4.
Activate the optional tank cleaning kit ON/OFF pump by pressing the button (2) on the back of
the machine (
Fig. 2
).
CAUTION
: when using the optional tank cleaning kit, you are advised to always wear goggles
to avoid any risk of serious injury to your eyes.
NB
: before activating the optional tank cleaning kit, check the level indicator (3) to see how
much solution there is in the recovery tank (
Fig. 3
).
5.
Activate the solution jet by pressing the lever in the tank cleaning accessory. Make sure the jet is
pointing into the tank before pressing the lever.
NB
: to adjust the solution jet from the
tank cleaning accessory, turn the knob (4) on the
accessory itself
(
Fig. 4
).
NB
: to adjust the intensity of the solution jet from the
tank cleaning accessory, turn the knob (5)
on the accessory itself
(
Fig. 5
).
N.B.
: to stop the solution jet,
use the lever (6) on the tank cleaning accessory (
Fig. 6
).
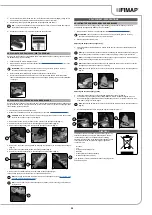
6. Grip the handle (7) on the left-hand side of the recovery tank (
Fig. 7
) and turn the tank cover as
far as it will go, until it reaches the maintenance position.
7.
Remove the dirty water basket/filter (8) from the support (
Fig. 8
).
8.
Remove the basket cover (9) from the basket/filter (10) (
Fig. 9
).
9.
Clean the basket/filter (10) and basket cover (9) under the jet of the tank cleaning accessory.
NB
: use a spatula or brush to eliminate any dirt that is particularly difficult to remove.
10.
Use a cloth to dry the basket/filter and basket cover, and place them back inside the recovery
tank.
11.
Remove the filter protection cup (11), turning it in the direction of the arrow (
Fig. 10
).
12.
Remove the vacuum motor filter (12), taking care not to lose the support tie (13) inside the
recovery tank (
Fig. 11
).
13.
Rinse the cup and filter thoroughly under the jet of the tank cleaning accessory.
14.
Remove the recycle filter (14), only valid for FLR versions (
Fig. 12
).
15.
Rinse the recycle filter (14) thoroughly under the jet of the
tank cleaning accessory.
NB
: use a spatula to eliminate any dirt that is particularly
difficult to remove.
16.
Rinse the inside of the recovery tank with a jet of water. If
necessary, use a spatula to remove any sludge that may have
accumulated at the bottom of the tank.
WARNING
: Take care to clean the electro-mechanical float
(15) that is present inside the tank (
Fig. 13
), only for versions
with FLR.
17. Repeat the operations in reverse order to reassemble all the parts.
26
7
6
8
7
9
8
2
3
1
1
2
2
3
5
4
4
5
6
2
3
2
3
4
4
5
6
5
6
7
7
8
9
8
10
9
10
11
11
12
13
6
7
7
8
1
1
12
14
13
15
Summary of Contents for MAXIMA 2017 PLUS
Page 2: ......
Page 36: ...36 NOTE ...
Page 37: ...37 NOTE ...
Page 38: ...38 NOTE ...
Page 39: ......

