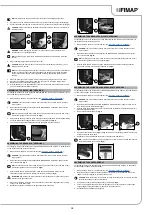
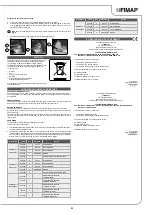


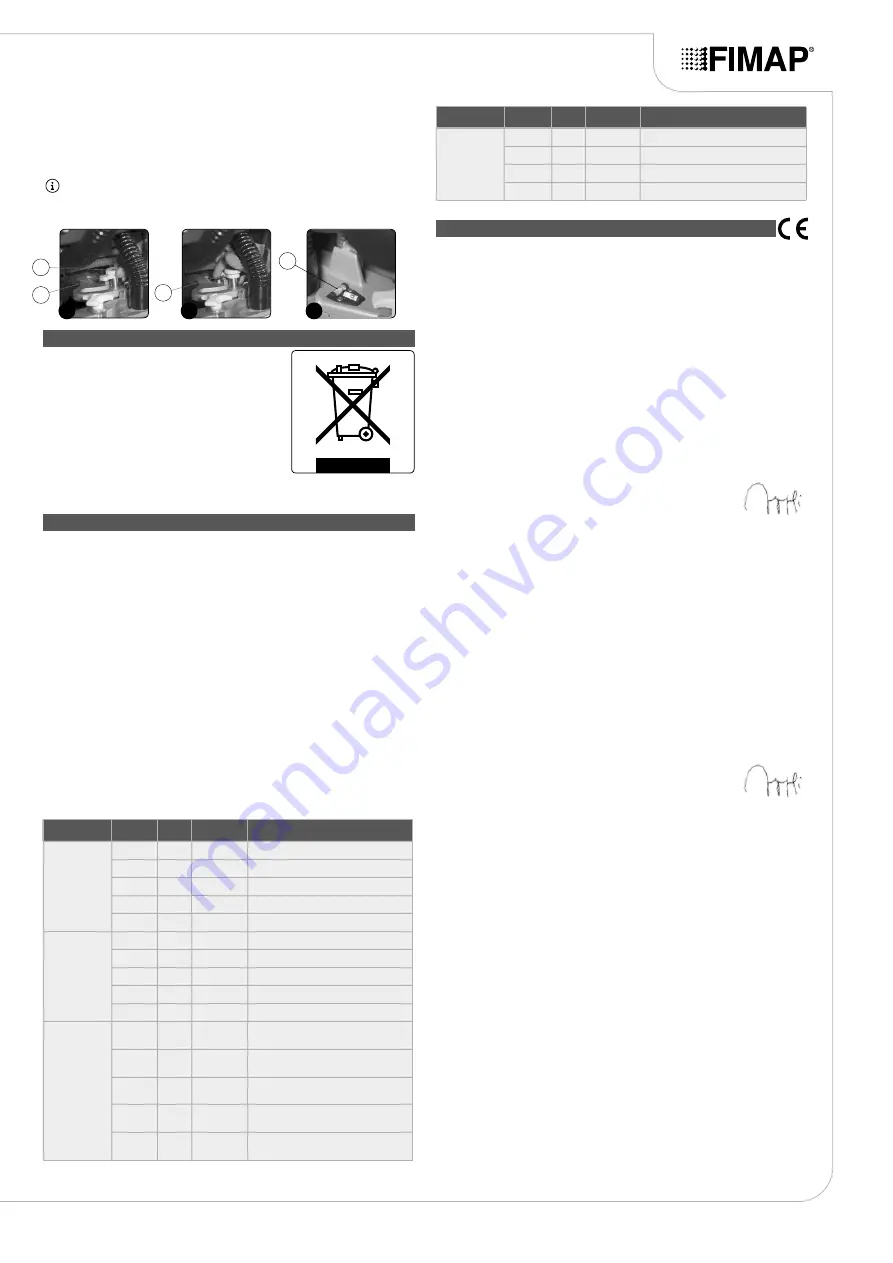
Adjusting the tilt of the squeegee body:
4.
Loosen the retainer knob (3) of the squeegee tilt adjustment knob (4) (
Fig.3
).
5.
To adjust the tilt of the squeegee body rubber blades in relation to the floor, tighten or loosen the
knob (5) (
Fig.4
) until the blades are bent outwards by about 30° in relation to the floor, in an even
manner along their entire length.
NB
: make sure the adjustment is correct by looking at the instrument (6) on the squeegee body
(
Fig.5
).
6.
Once the adjustment has been completed, tighten the retainer knob (3).
DISPOSAL
To dispose of the machine, take it to a demolition centre or an
authorised collection centre. Before scrapping the machine,
it is necessary to remove and separate out the following
materials, then send them to the appropriate collection centres
in accordance with the environmental hygiene regulations
currently in force:
• Brushes
• Felt
• Electric and electronic parts*
• Batteries
• Plastic parts (tanks and handlebars)
• Metal parts (levers and frame)
(*) In particular, contact your distributor when scrapping electric
and electronic parts.
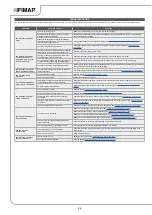
CHOOSING AND USING THE BRUSHES
POLYPROPYLENE BRUSH (PPL)
Used on all types of floors. Good resistance to wear and tear, and hot water (no greater than 50°C.).
The polypropylene is non-hygroscopic and therefore retains its characteristics even when working in
wet conditions.
ABRASIVE BRUSH
The bristles of this type of brush are charged with highly aggressive abrasives. It is used to clean very
dirty floors. To avoid floor damage, work only with the pressure strictly necessary.
BRISTLE THICKNESS
Thicker bristles are more rigid and are therefore used on smooth floors or floors with small joints.
On uneven floors or those with deep joints, it is advisable to use softer bristles which can enter the
gaps more easily.
Remember that when the bristles are worn and therefore too short, they will become rigid and are no
longer able to penetrate and clean deep down. In this case, like with over-large bristles, the brush
tends to jump.
PAD HOLDER
The pad holder is recommended for cleaning shiny surfaces.
There are two types of pad holder:
1.
The traditional pad holder is fitted with a series of anchor points that allow the abrasive floor pad to
be held and dragged while working.
2. The CENTRE LOCK type pad holder not only has anchor points, but also a snap-type central
locking system in plastic that allows the abrasive floor pad to be perfectly centred and held without
any risk of it becoming detached. This type of pad holder is recommended above all for machines
with more than one brush, where the centring of the abrasive discs is difficult.
The undersigned manufacturer:
FIMAP spa
Via Invalidi del Lavoro, 1
37059 Santa Maria di Zevio (VR)
declares under its sole responsibility that the products
FLOOR SCRUBBING MACHINES
mod. Maxima 2017 BASE 50BT CB - Maxima 2017 BASE 60BT CB
Maxima 2017 BASE 50BTO CB - Maxima 2017 BASE 50BTS CB
comply with the provisions of Directives:
•
2006/42/EC: Machinery Directive.
•
2014/35/EC: Low Voltage Directive.
•
2014/30/EC: Electromagnetic compatibility directive.
The person authorized to compile the technical file:
Mr. Giancarlo Ruffo
Via Invalidi del Lavoro, 1
37059 Santa Maria di Zevio (VR) - ITALY
Santa Maria di Zevio (VR), 01/01/2018
Fimap S.p.A.
Legal representative
Giancarlo Ruffo
EC DECLARATION OF CONFORMITY
The undersigned manufacturer:
FIMAP spa
Via Invalidi del Lavoro, 1
37059 Santa Maria di Zevio (VR)
declares under its sole responsibility that the products
FLOOR SCRUBBING MACHINES
mod. Maxima 2017 BASE 50BT - Maxima 2017 BASE 60BT - Maxima 2017 BASE 50BTO
Maxima 2017 BASE 50BTS
comply with the provisions of Directives:
•
2006/42/EC: Machinery Directive.
•
2014/30/EC: Electromagnetic compatibility directive.
The person authorized to compile the technical file:
Mr. Giancarlo Ruffo
Via Invalidi del Lavoro, 1
37059 Santa Maria di Zevio (VR) - ITALY
Santa Maria di Zevio (VR), 01/01/2018
Fimap S.p.A.
Legal representative
Giancarlo Ruffo
23
4
3
5
3
4
4
5
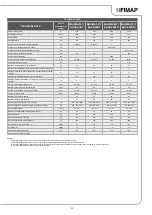
MACHINE
CODE
QTY
BRISTLE
NOTES
MAXIMA 2017
BASE 50BT
404654
1
PPL 0.3
BLUE BRUSH
405631
1
PPL 0.6
WHITE BRUSH
404653
1
PPL 0.9
BLACK BRUSH
405632
1
ABRASIVE
BRUSH
405527
1
PAD HOLDER WITH CENTRE LOCK
MAXIMA 2017
BASE 60BT
442823
2
PPL 0.3
BLUE BRUSH
442824
2
PPL 0.6
WHITE BRUSH
442825
2
PPL 0.9
BLACK BRUSH
442826
2
ABRASIVE
BRUSH
442828
2
PAD HOLDER WITH CENTRE LOCK
MAXIMA 2017
BASE 50BTO
442005
1
ABRASIVE PAD 508X355
(COLOUR: RED)
442661
1
ABRASIVE PAD 508X355
(COLOUR: GREEN)
442662
1
ABRASIVE PAD 508X355
(COLOUR: BLACK)
443711
1
ABRASIVE PAD 508X355
(COLOUR: WHITE)
443712
1
ABRASIVE PAD 508X355
(COLOUR: BROWN)
MACHINE
CODE
QTY
BRISTLE
NOTES
MAXIMA 2017
BASE 50BTS
445594
2
PPL 0.3
BLUE BRUSH
445595
2
PPL 0.6
WHITE BRUSH
445596
2
PPL 0.9
YELLOW BRUSH
445597
2
ABRASIVE
BRUSH


