ADJUSTMENT INTERVENTIONS
ADJUSTING THE SQUEEGEE BODY'S RUBBER BLADES
The careful adjustment of the squeegee body rubber blades guarantees better cleaning of the floor.
To adjust the squeegee body blades, proceed as follows:
1. Sit on the driver’s seat.
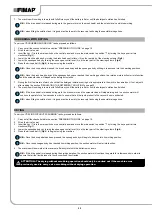
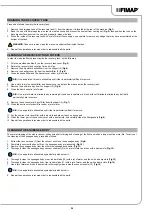
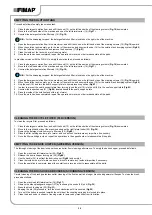
2. Insert the key (1) into the main switch on the control panel. Bring the main switch to its "I" position by turning the key (1) a quarter turn
clockwise (
Fig.1
).
3. Lower the squeegee body by turning the squeegee control lever (2) on the rear part of the steering column (
Fig.2
).
4. Press the drive pedal (3) (
Fig.3
) to begin moving the machine.
N.B.:
Once the drive pedal has been pressed, the squeegee body will begin to descend into its working position.
5. As soon as the brush head and the squeegee have reached their working positions, perform the procedure for securing the machine (see
the section entitled “MACHINE SAFETY” on page 14).
WARNING:
It is recommended to wear the appropriate PPE (Personal Protective Equipment), suitable for the work to be carried out.
6. Stand at the back of the machine.
Adjusting the height of the squeegee body:
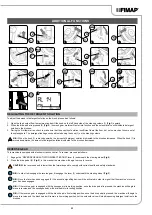
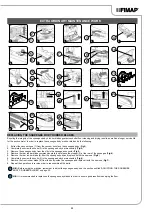
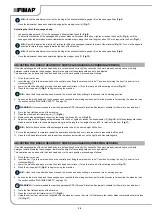
• Release the stopper lever (4) for the squeegee's height adjustment knob (5) (
Fig.4
).
•
Adjust the height of the rubber blade in relation to the floor by loosening or tightening the knobs (5) (
Fig.5
).
N.B.:
Figure 5 indicates the direction of rotation for decreasing the distance between the squeegee support and the floor. This distance
can be increased by turning it in the opposite direction.
N.B.:
By decreasing the distance between the squeegee support and the floor, the rubber blades present in the squeegee's body move
closer to the floor.
N.B.:
the right-hand and left-hand knobs must be rotated the same number of times, so that the squeegee is parallel to the floor when it is
working.
35
1
2
3
10
4÷5mm
30°
4
1
9
16
17
5
13
10
6
2
12
11
8
3
15
21
7
14
18
19
4
8
12
18
7
5
15
14
13
16
6
9
4
7
17
11


