background image


PURPOSE AND CONTENT OF THE MANUAL 


The aim of this manual is that of providing customers with all information 

needed to use the appliance in the most appropriate, autonomous and 

safe way. It includes information concerning technical aspects, safety, 

operations, equipment downtime, maintenance, spare parts and 

scrapping. Operators and qualified technicians must read the 

instructions in this manual carefully before carrying out any operation on 

the appliance. If in doubt about the correct interpretation of instructions, 

liaise with the closest Customer Service Centre to obtain the necessary 

clarifications. 

TARGET GROUP 

This manual is aimed at operators and qualified technicians responsible 

for equipment maintenance. Operators must not perform operations that 

should be carried out by qualified technicians. FIMAP SpA cannot be 

held liable for damages resulting from failure to comply with this 

prohibition. 

STORAGE OF USE AND MAINTENANCE MANUAL 

The Use and Maintenance Manual must be stored in close proximity to 

the appliance, within a dedicated pouch, protected from liquids and 

anything else that may compromise its legibility. 

ON CONSIGNMENT OF THE APPLIANCE  

When the machine is delivered to the customer, an immediate check 

must be performed to ensure all the material mentioned in the shipping 

documents has been received, in addition to verifying that the equipment 

has not been damaged during transportation. If this is the case, the 

carrier must ascertain the extent of the damage at once, informing our 

customer service office. It is only by prompt action of this type that the 

missing material can be obtained, and compensation for damage 

successfully claimed. 

INTRODUCTORY COMMENT 


Any type of equipment can operate properly and effectively only if used 

correctly and kept in full working order by performing the maintenance 

operations described in the attached documentation. Therefore, we 

suggest that you should read this instruction manual carefully, and 

should consult it again should issues arise while using the machine. If 

necessary, remember that our assistance service (organised in 

collaboration with our dealers) is always available for advice or direct 

intervention. 

IDENTIFICATION DATA   

For technical assistance or to request replacement parts, always give 

the model, the version and serial number written on the serial number 

plate. 

TECHNICAL DESCRIPTION 


MMx is a scrubbing machine that is able to clean a wide range of 

flooring and dirt types by means of the mechanical action of one or two 

cylindrical brushes and the chemical action of a water-detergent 

solution. As it advances, it also collects the dirt removed and the 

detergent solution not absorbed by the floor. The appliance must be 

used only for this purpose.  

INTENDED USE 

This scrubbing machine was designed and built for the 

cleaning (scrubbing and drying) of smooth, compact 

flooring in the commercial, residential and industrial 

sectors by a qualified operator in proven safety conditions. 

The scrubbing machine is not suitable for cleaning rugs or carpets.  The 

appliance is only suitable for use in indoor - or at least covered - spaces. 

The appliance is not suitable for use in the rain, or under jets of water. IT 

IS FORBIDDEN to use the appliance for picking up dangerous dusts or 

inflammable liquids in places with an explosive atmosphere. In addition, 

it is not suitable as a means of transport for people or objects. 
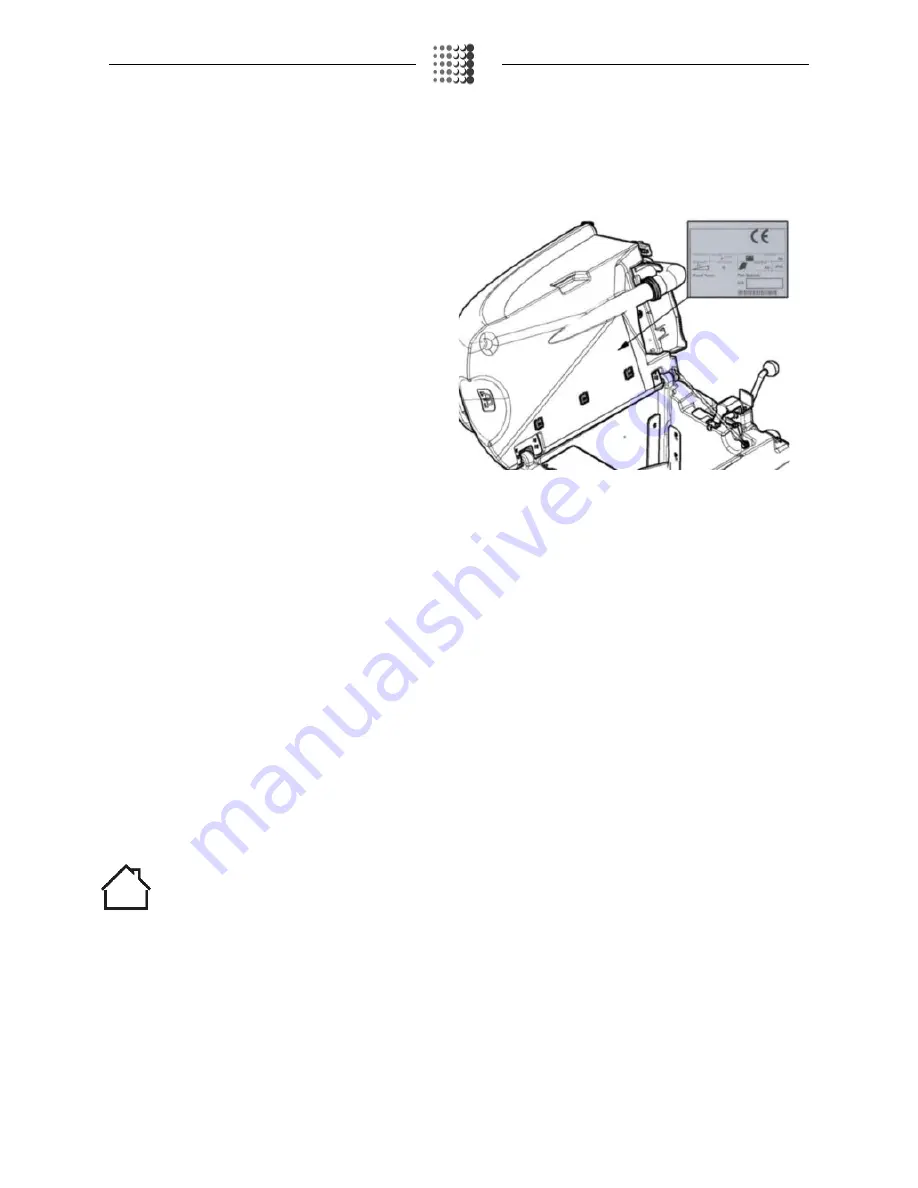
SERIAL NUMBER PLATE 

The serial number plate is located in the battery compartment and, more 

precisely, in the lower section of the tank. It indicates the machine's 

general characteristics and, specifically, its serial number. The serial 

number is a very important piece of information and should always be 

provided together with any request for assistance or when purchasing 

spare parts. 


Safety 

Operator co-operation is key to accident prevention. No accident 

prevention programme can be effective without the full co-operation of 

the operator who is directly responsible for machine operation. The 

majority of occupational accidents that happen both on the workplace or 

on the way to work are due to non-compliance with the most basic 

safety rules. An attentive, careful operator is most effective guarantee 

against accidents and is fundamental in order to implement any 

prevention programme. 


Page 4 


Summary of Contents for MMX 43B

Page 1: ...USE AND MAINTENANCE MANUAL MMX B BT 2014 ED 08 2014 EN TRANSLATION OF THE ORIGINAL INSTRUCTIONS Doc 10016247 Ver AE...

Page 2: ...S 15 16 FILLING THE DETERGENT CANISTER only for systems with FSS 15 17 ASSEMBLING THE SQUEEGEE 16 18 BRUSH ASSEMBLY only for single disc versions 17 19 BRUSH ASSEMBLY only for twin disc versions 17 20...

Page 3: ...E 34 6 INSUFFICIENT WATER ON THE BRUSHES 34 7 THE DEVICE DOES NOT CLEAN CORRECTLY 34 8 THE SQUEEGEE DOES NOT DRY PERFECTLY 34 9 EXCESSIVE FOAM PRODUCTION RECOVERY TANK 35 10 THE VACUUM MOTOR DOES NOT...

Page 4: ...ith this symbol for the disposal of the machine Warning symbol indicates that the packed product should be handled with suitable lifting means that comply with the legal requirements Indoor symbol The...

Page 5: ...ry remember that our assistance service organised in collaboration with our dealers is always available for advice or direct intervention IDENTIFICATION DATA For technical assistance or to request rep...

Page 6: ...oes not cause harmful vibrations Do not use the appliance in an explosive atmosphere Do not vacuum inflammable liquids Do not use the device to collect dangerous powders Do not mix different types of...

Page 7: ...s with FSS l 3 3 3 3 3 3 Batteries Nr V AhC20 2 12 120 2 12 120 2 12 120 2 12 120 2 12 120 2 12 120 Built in battery charger V A 24 11 24 11 24 11 24 11 24 9 24 9 Battery compartment dimensions Length...

Page 8: ...ntity of water supplied to the device s water system Indicates the risk of crushed hands Symbol used on the serial number plate to indicated the maximum gradient Label with instructions for the use of...

Page 9: ...rgy consumption and detergent solution Battery charge level symbol Used on the control display to indicate the state of charge of the batteries Critical battery charge level symbol Used on the control...

Page 10: ...ase turn the key by a quarter of a turn to the left 3 Remove the key from the instrument panel 4 The device is secured to the pallet with wedges 2 that lock the wheels Remove the wedges ATTENTION Duri...

Page 11: ...1 Check that the solution tank and recovery tank are empty and empty them if necessary see the paragraph EMPTYING THE RECOVERY TANK or read the paragraph EMPTYING THE SOLUTION TANK WARNING The tanks s...

Page 12: ...For battery maintenance and daily recharging you must carefully follow the instructions provided by the manufacturer or retailer All installation and maintenance operations must be carried out by spec...

Page 13: ...he device that could either damage it or be damaged through contact with it 2 Take all necessary steps to ensure that the device is in a safe condition see MACHINE SAFETY ATTENTION this process must b...

Page 14: ...floor if necessary turn the pedal 3 at the bottom of the device anticlockwise 5 Check that the squeegee unit is raised from the floor if necessary use the lever 4 at the rear of the device 6 For BT ve...

Page 15: ...es off automatically With the remaining charge however it is still possible to take the appliance to its dedicated recharging area BT versions 13 FORWARD MOVEMENT AT WORK SPEED only for BT system This...

Page 16: ...hose manufacturer s label indicates their suitability for scrubbing machines Do not use acid or alkaline products or solvents without this indication WARNING Acid or alkaline detergents can be used wi...

Page 17: ...clean water tank and excluding the dosing circuit 17 ASSEMBLING THE SQUEEGEE For packaging reasons the squeegee is supplied disassembled from the device and must be assembled as follows 1 Take all nec...

Page 18: ...ard read the paragraph BRUSH HEAD SPLASH GUARD ASSEMBLY WARNING you are advised to always wear protective gloves to avoid the risk of serious injury to your hands 19 BRUSH ASSEMBLY only for twin disc...

Page 19: ...om the fastening screw on the right hand side of the brush head direction of work 6 Remove the fixing strip 5 of the rubber splash guard 7 Wind the rubber splash guard 6 around the brush head position...

Page 20: ...USH REPLACEMENT 7 Free the recovery tank using the hinge 2 8 Grip the handle 3 on the rear left side of the recovery tank work direction and turn the recovery tank until it reaches the end position 9...

Page 21: ...d on the rear of the appliance 7 Lower the brush head unit using the lever 7 on the rear of the appliance 8 Action the dead man s levers 8 under the control handlebar to allow activation of the applia...

Page 22: ...brushes 3 During the first few meters check that the quantity of solution is enough to wet the floor but not so much as to come out of the splash guard the detergent disposal quantity can be adjusted...

Page 23: ...MODE program is activated the wording ECO is displayed on the control display The cancel the ECO MODE program just press the button again The ECO MODE function can only be activated during the washin...

Page 24: ...in an enclosed place on a flat surface near the appliance there must be no objects that could either damage it or be damaged through contact with it 3 Perform all the procedures listed in the paragrap...

Page 25: ...n the rear left side of the recovery tank work direction and turn the recovery tank until it reaches the work position 4 Secure the recovery tank with the hinge 2 5 Close the flow coming from the tap...

Page 26: ...ated maintenance area 2 Take all necessary steps to ensure that the device is in a safe condition see MACHINE SAFETY 3 Grip the handle 1 on the rear left side of the recovery tank work direction and t...

Page 27: ...e parts WARNING You are advised to always wear protective gloves to avoid the risk of serious injury to your hands WARNING The place this operation is carried out should comply with current environmen...

Page 28: ...e this operation is carried out should comply with current environmental protection regulations 2 CLEANING THE SOLUTION TANK The careful cleaning of the solution tank guarantees a longer appliance lif...

Page 29: ...ear protective gloves to avoid the risk of serious injury to your hands WARNING The place this operation is carried out should comply with current environmental protection regulations 4 CLEANING THE D...

Page 30: ...the vacuum nozzle 4 on the squeegee body 6 Fully loosen the knobs 5 in the squeegee body pre assembly 7 Remove the squeegee body from the slits in the squeegee connector WARNING you are advised to alw...

Page 31: ...e should be regulated and this is done by turning the knob 6 in the diagram only the right knob is depicted anti clockwise to raise the squeegee and in the opposite direction to lower it ATTENTION The...

Page 32: ...hands 5 RINSING THE DOSING SYSTEM only for FSS system If the appliance is not used for long periods of time more than 48 hours it is recommended that the dosing system should be rinsed To do this pro...

Page 33: ...active dosing system position the lever 10 must be in a vertical position 14 Turn the main machine switch to I turn the key 11 a quarter rotation to the right 15 When the control display shows the wor...

Page 34: ...NING If all these procedures do not solve the problem contact the technician at the dedicated Technical Service Centre 3 THE BATTERIES ARE NOT CHARGED CORRECTLY 1 Check that the battery 1 is connected...

Page 35: ...NOT SWITCH ON 2 Make sure that the detergent solution is supplied correctly to the brushes see the paragraph INSUFFICIENT WATER ON THE BRUSHES 3 Make sure that the amount of detergent solution versio...

Page 36: ...in a safe condition see MACHINE SAFETY 3 Grip the handle 1 on the rear left side of the recovery tank and turn the recovery tank until it reaches the work position 4 Secure the recovery tank with the...

Page 37: ...parate out the following materials then send them to the appropriate collection centres in accordance with applicable environmental hygiene regulations Brushes Felt Electric and electronic parts Batte...

Page 38: ...short they will become rigid and are no longer able to penetrate and clean deep down In this case like with overlarge bristles the brush tends to jump PAD HOLDER The pad holder is recommended for cle...

Page 39: ...principles of design Part 1 Basic terminology and methodology EN 12100 2 Machine safety Fundamental concepts fundamental principles of design Part 2 Technical principles EN 61000 6 2 Electromagnetic c...

Page 40: ...industrial environments EN 61000 6 3 Electromagnetic compatibility EMC Part 6 3 Generic standards Standard emission for residential commercial and light industrial environments EN 61000 3 2 Electroma...

Page 41: ...NOTE Page 40...

Page 42: ...NOTE Page 41...

Page 43: ...NOTE Page 42...

Page 44: ...FIMAP spa Via Invalidi del Lavoro 1 37050 S Maria di Zevio Verona Italy Tel 39 045 6060411 r a Fax 39 045 6060417 E mail fimap fimap com www fimap com...

Reviews: