background image

Page 3 


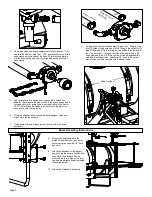
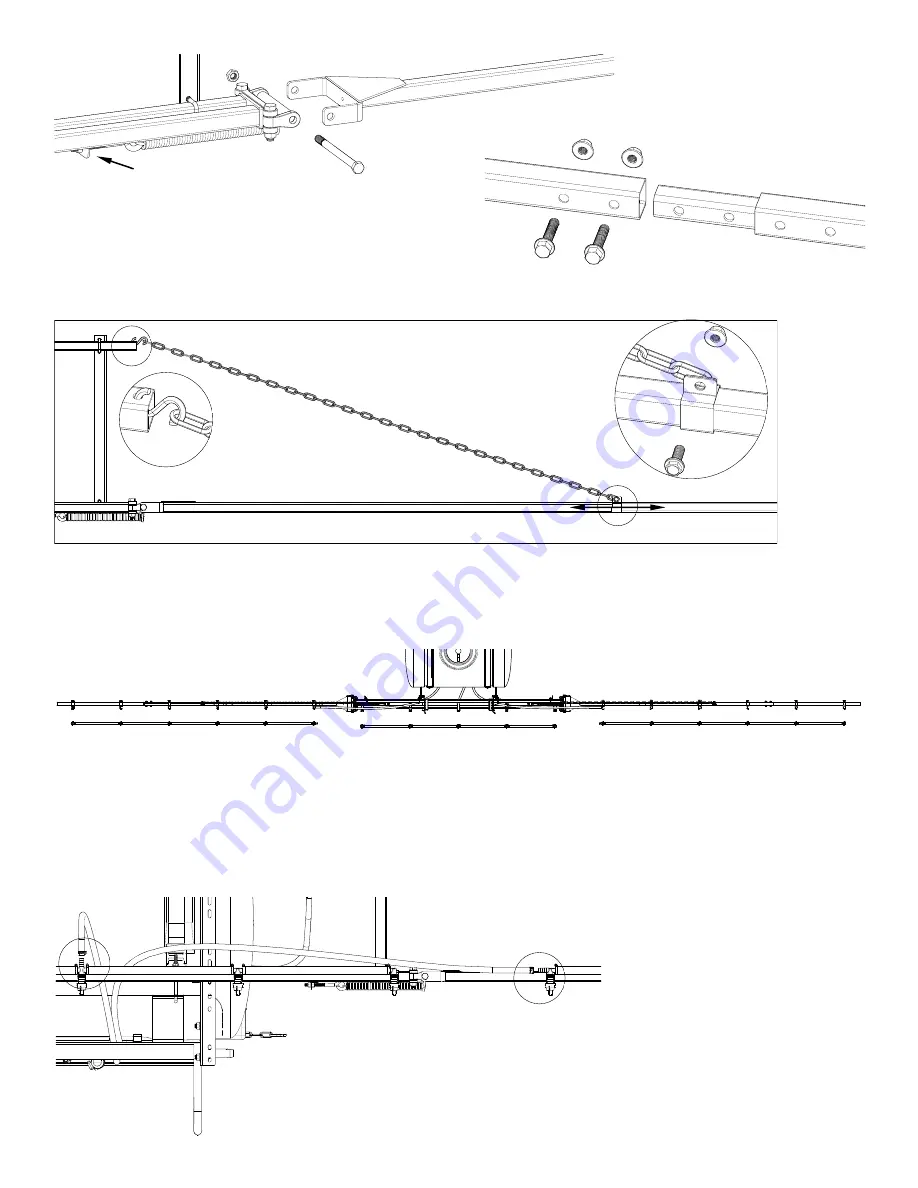
11.  Loosen the eye bolts and remove the 7” hinge bolts. Line up the 

outer booms and reassemble the hinge bolt through the outer 

boom yoke, the hinge casting and the spring connector. Tighten 

the eye bolt until the spring is at the desired tension. Lock the 

eye bolt in place with the inner whiz flange locknut.   


12.  Bolt on the boom extensions using the 3/8” x 1-3/4” bolts and 

hex lock nuts. 

Loosen nut on eye bolt 

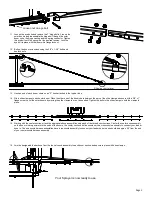
13.  Hook an end of each boom chain on an “S” hook attached to the top bar tube.    


14.  Slip a slide clamp onto each outer boom. Place the other end of the boom chain between the ears of the slide clamp and secure with a 3/8” x 1” 

flange screw. Level the outer booms by moving the slide clamps in or out as needed. Tighten the bolts in the slide clamps to hold the clamps in 

place. 

Slide in or out to level


15.  Starting with the center section, attach the appropriate hose assemblies onto each of the three boom sections. Center the center hose assembly 

on the boom, working outward to the ends of the booms. the center section has five nozzles with a cross nozzle assembly to connect your feeder 

hose to. The end nozzle harness assemblies have a tee nozzle assembly to connect your feeder hose to and should be approx. 20” from the end 

of your center nozzle harness assembly.           


16.  Join the designated feeder hose from the tee valve sub-assembly to each boom section and secure in place with hose clamps. 


Your Sprayer is now ready to use. 

Summary of Contents for 110-3PT-17N-XL

Page 1: ...stomer service rep can resolve the problem over the phone To obtain prompt efficient service always remember to give the following information Correct Part Description and or part number Model number and Serial Number Part descriptions and numbers can be obtained from the illustrated parts list section s of this manual General Information Thank you for purchasing this product The purpose of this m...

Page 2: ...with the hose clamp 5 The roller pump IS included with the assembly Attach the adapter the torque chain and S hook to the pump as needed It is intended for your pump to be mounted directly to the tractor PTO The torque chain needs to be secured to the tractor to keep your pump from spinning 6 Wrap the handgun hose around the hose hangers which are attached to the tank straps 7 Using sealant thread...

Page 3: ...cure with a 3 8 x 1 flange screw Level the outer booms by moving the slide clamps in or out as needed Tighten the bolts in the slide clamps to hold the clamps in place Slide in or out to level 15 Starting with the center section attach the appropriate hose assemblies onto each of the three boom sections Center the center hose assembly on the boom working outward to the ends of the booms the center...

Page 4: ...art the pump and open the valve to the boom nozzles Check the spray pattern Usually you can see the coverage better on a solid concrete surface such as a driveway Spraying Solutions Other Than Water Since all the tabulations are based on spraying water which weighs 8 34 lbs per USA gallon conversion factors must be used when spraying solutions which are heavier or lighter than water To deter mine ...

Page 5: ... the chemical into the tank You may use the handgun to spraying into the solution in order to mix the chemical and water The tips supplied as standard with the sprayer can be used for a wide variety of spraying applications Other tip sizes are available for different coverages The speed and pressure charts shown indicate the rates can be changed considerably by changing speed and pressure The pump...

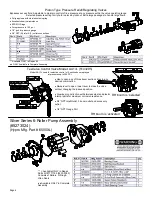
Page 6: ...ly RH boom is selected Available ONLY in Repair Parts Kit 7771795 3430 0380 Consists of Rollers O Ring Viton Seals Available ONLY in Complete Assembly TeeValve Control Valve Model AA17L 5143295 Model AA17L used for selective control of 3 section boom sprayers at pressures up to 300 PSI Use to open any of three boom sections lines in any desired combination Raise lever to open lower lever to close ...

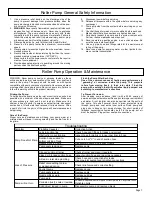
Page 7: ...bows and kinks Make sure all connections are tight and do not leak air Make sure line strainer is free of debris If pump does not self prime disconnect suction hose fill with water and reconnect to liquid source Often a squirt of oil into the ports of the pump will seal clearance and help priming Care of the Pump Proper care and maintenance will keep your pump wear at a minimum and will keep it ru...

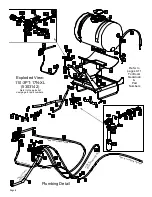
Page 8: ...list next page for part numbers Plumbing Detail Hose to RH Nozzle Harness Hose to LH Nozzle Harness H o s e t o C e n t e r N o z z l e H a r n e s s Bypass Hose H o s e t o V a l v e f r o m P u m p Handgun Hose Refer to pages 9 11 For Boom breakdown Part Numbers ...

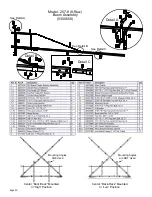
Page 9: ...opposite end is similar to this end Bolt Ref 1 9 goes through the yoke on the outer boom s then through Ref 1 7 and 1 8 followed with jam locknut Ref 1 10 For the eyebolt thread the first nut Ref 1 13 onto the eyebolt then feed it through the hole in the angle under the lower center section Use the next nut for adjusting and the first nut for locking the eyebolt into position ...

Page 10: ... Mounted In High Position Center Back Rack Mounted In Low Position Mounting Angles ARE Used Mounting Angles are NOT Used Detail B Detail C See Detail B Detail A Model 257 8 8 Row Boom Assembly 5300658 See Detail A See Detail C ...

Page 11: ...truction which provides excellent chemical resistance including acids as well as excep tional wear life Compact size to prevent tip damage Removable pre orifice Excellent for systemic products and drift management Ref 20 1 257 8 Center Nozzle Harness 5277761 Ref 20 2 257 8 LH Nozzle Harness 5277806 Ref 20 2 257 8 RH Nozzle Harness 5277806 Nozzle Assemblies consist of Elbow Tee Cross style nozzles ...

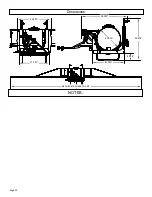
Page 12: ...Page 12 NOTES Dimensions 44 000 37 750 59 500 41 000 8 938 52 875 Boom Width Folded Out 28 30 000 ...

Page 13: ...Page 13 NOTES ...
Page 14: ...ited Warranty you must 1 provide written notice to Fimco Inc of the defect during the Warranty Period and within thirty 30 days after the defect becomes apparent or the repair becomes necessary at the following address Fimco Inc 1000 Fimco Lane North Sioux City SD 57049 and 2 make the Equipment available to Fimco Inc or an authorized dealer within a reasonable period of time For more information a...

Reviews: