background image

Page 8 


Try another 12-Volt battery

Quarter turn at a time clockwise until surging stops

Defective pressure switch

Troubleshooting

Bypass is not completely closed
System has leaks
Check for worn or dirty check valve
Excessive voltage
Improper adjustment of pressure switch
Damaged or defective wiring harness

Check for proper voltage

Check for worn or dirty check valve
Low flow may cause pump to surge
Spray wand is adjusted for a small or fine spray pattern
Slightly open bypass (if applicable) to overcome
If needed, pressure switch may need to be adjusted

Pump will not run:

Low Pressure/Low Flow:

Pump surges:

Pump continues to run:

Fuse blows:

Check for loose wiring
Make sure the ON/OFF switch is on
Check the fuse
Check for defective pressure switch
Check for a clogged strainer

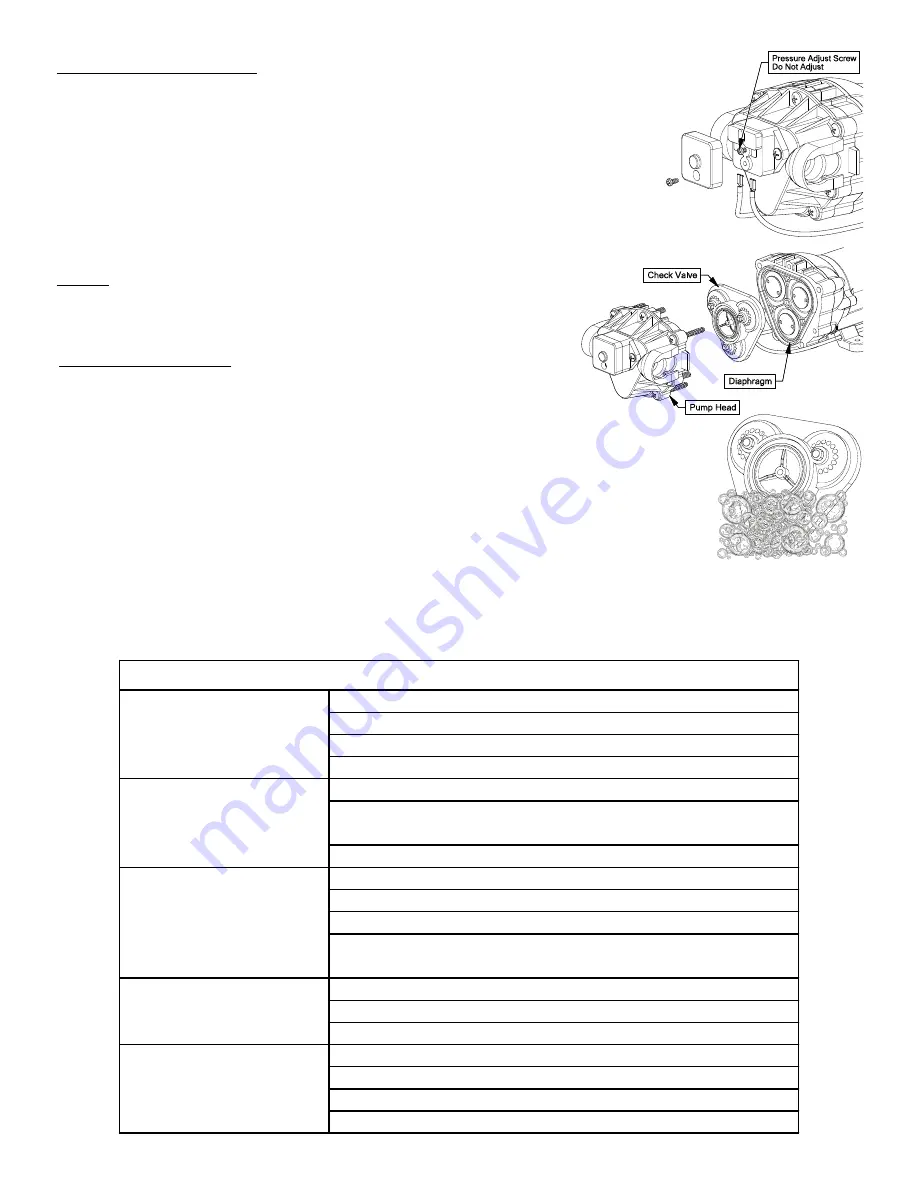
Cleaning the Check Valve

If you’re experiencing little to no pressure or the pump is not priming and you’ve checked your 

filter screen and it’s clean, and you’ve gone through the other trouble shooting tips, you may 

need to clean the check valve. 

 

Remove the head of the pump, which is held on by 7 screws. 

 

The first piece inside the head of the pump is called a check valve, it’s the part responsible for building up pressure 
and pumping water/solution through the lines.  

 

Clean the check valve under hot, soapy water (such as a good grade dish soap).  

 

Give it a very light scrubbing with something like an old toothbrush, something with soft bristles. 

 

Then let it soak for about an hour or so in the hot soapy solution and replace in the pump and reassemble the pump. 


Most times this will restore most, if not all of the prime of a pump. 

If you’re still having issues with pressure after this step, it would be recommended to replace this part. 

Checking the Pressure Switch

If your motor is not running and you’ve checked the following: for loose wiring connections, fuse, the switch on the 

lead wire was “ON” and made sure you were connected to a fully charged battery and everything is fine, but the  

motor won’t run, then it’s time to check to see if the pressure switch is bad. 

 

Remove the cover off the 1” square box (pressure switch) on the head of the pump, the cover is held on by   
one phillips-head screw. This will  expose the two red wires. 

 

With the pump connected to a good 12 volt power source and everything on. 

 

Slip the two red wires off the terminals and touch them together.  


If the motor runs, it means the pressure switch is bad and needs to be replaced.  

If it still doesn’t run, try bypassing the switch in the lead wire or using another lead wire. Even if a tester shows power 

to the pressure switch, it still could be the switch in the wire that is causing the problem. If still not responsive, use a 

voltmeter or electrical tester to make sure you are getting power to the head of the pump, as it could possibly be 

something in one of the wires or even the lead wire assembly may need to be replaced. 


Warning:

 It is NOT recommended to run the pump this way, as the pump will continue  

to run and not shut off.  


This could result in blown hoses when all discharges are closed. 

Also, this could result in premature failure of the pump completely. 

Summary of Contents for 5301439

Page 1: ...s with an On Off shut off valve located at the inlet location of the tank towards the underside See Detail A You must make sure the valve is in the open position before using your sprayer Detail A OWNER S MANUAL BEFORE RETURNING THIS PRODUCT FOR ANY REASON PLEASE CALL 1 800 831 0027 MONDAY FRIDAY 8 00 AM TO 5 00 PM CST If you should have a question or experience a problem with your Fimco Industrie...

Page 2: ...our sprayer s carton LG 1500 304 Contents of Parts Bag 5278316 Tank Lid Lanyard 5058188 Tank Frame Pre Assembly 2 Nozzle Boom Assembly 5277774 2 Tires Wheels 5021092 Owner s Manual 15 20 Gallon Trailer Bracket Kit 5277727 ...

Page 3: ...he axle and 2 wheels from the carton Remove the 2 wheel spacers and 2 cotter pins from the parts bag Slide the axle through the hole in one side of the frame and through the corresponding hole on the other side of the frame You may need to maneuver squeeze the frame slightly while doing this to get the axle through both holes Center the axle about the frame as best as possible Slide a wheel spacer...

Page 4: ...o the tank Do not over tighten These clips are where the spray gun is secured to the tank while not in use NOTE The spray gun should already be attached to the 15 foot hose prior to assembly The Sprayer should now be ready for use Assembly Procedure LG 1500 304 Remove the 2 nozzle boom assembly from the carton Using 2 bolts and 2 whiz nuts bolt the boom to the upright boom mounting brackets There ...

Page 5: ...en disconnect the negative black connection and finally the positive red connection The lead wire has an On Off switch to activate the pump is on and O is off Fill the tank part way with water and then add the desired amount of chemical to be sprayed Finish filling tank to proper level Turn the pump on and by depressing the side of the rock er switch The pump is equipped with a pressure switch tha...

Page 6: ...me chemicals will damage the pump valves if allowed to soak untreated for a length of time ALWAYS flush the pump as instructed after each use DO NOT allow chemicals to sit in the pump for extended times of idleness Follow the chemical manufacturer s instructions on disposal of all waste water from the sprayer Winter Storage Prepare the sprayer for end of season storage by running RV antifreeze thr...

Page 7: ...alve Check for clogged strainer filter Check for cracks in the pump housing Check for empty product supply Low Pressure Low Flow Check for leaks in the discharge line Check for restriction in the discharge line Check for debris in nozzle orifice Check for clogged strainer Check for proper voltage try another 12 volt battery Pulsating flow surging Low flow may cause pump to surge Spray wand is adju...

Page 8: ...an hour or so in the hot soapy solution and replace in the pump and reassemble the pump Most times this will restore most if not all of the prime of a pump If you re still having issues with pressure after this step it would be recommended to replace this part Checking the Pressure Switch If your motor is not running and you ve checked the following for loose wiring connections fuse the switch on ...

Page 9: ...Page 9 Manifold Detail Exploded View Parts List LG 1500 304 5301439 Intake Detail ...

Page 10: ...ggested Minimum Spray Height 18 20 above what is being sprayed to plant not ground Optimum Spray Height 39 Wide angle spray nozzle height is influenced by nozzle orientation The criti cal factor is to achieve a minimum 30 overlap Excellent spray distribution for uniform coverage along the boom Nozzle design incorporates a pre orifice to pro duce larger droplets for less drift ...

Page 11: ... filter screen Start your pump and before it shuts off reach down and shut the valve to the Closed position lever is perpendicular to the flow of fluid then shut off your pump Unscrew the knurled nut from the shut off valve leaving the valve connected to the tank Swing swivel the intake assembly towards you Look in the nut you JUST unscrewed There is a screen washer there Remove the screen and cle...

Page 12: ...obtain warranty service under this Limited Warranty you must 1 provide written notice to Fimco Ind of the defect during the Warranty Period and within thirty 30 days after the defect becomes apparent or the repair becomes necessary at the following address Fimco Ind 1000 Fimco Lane North Sioux City SD 57049 and 2 make the Equipment available to Fimco Ind or an authorized dealer within a reasonable...

Reviews: