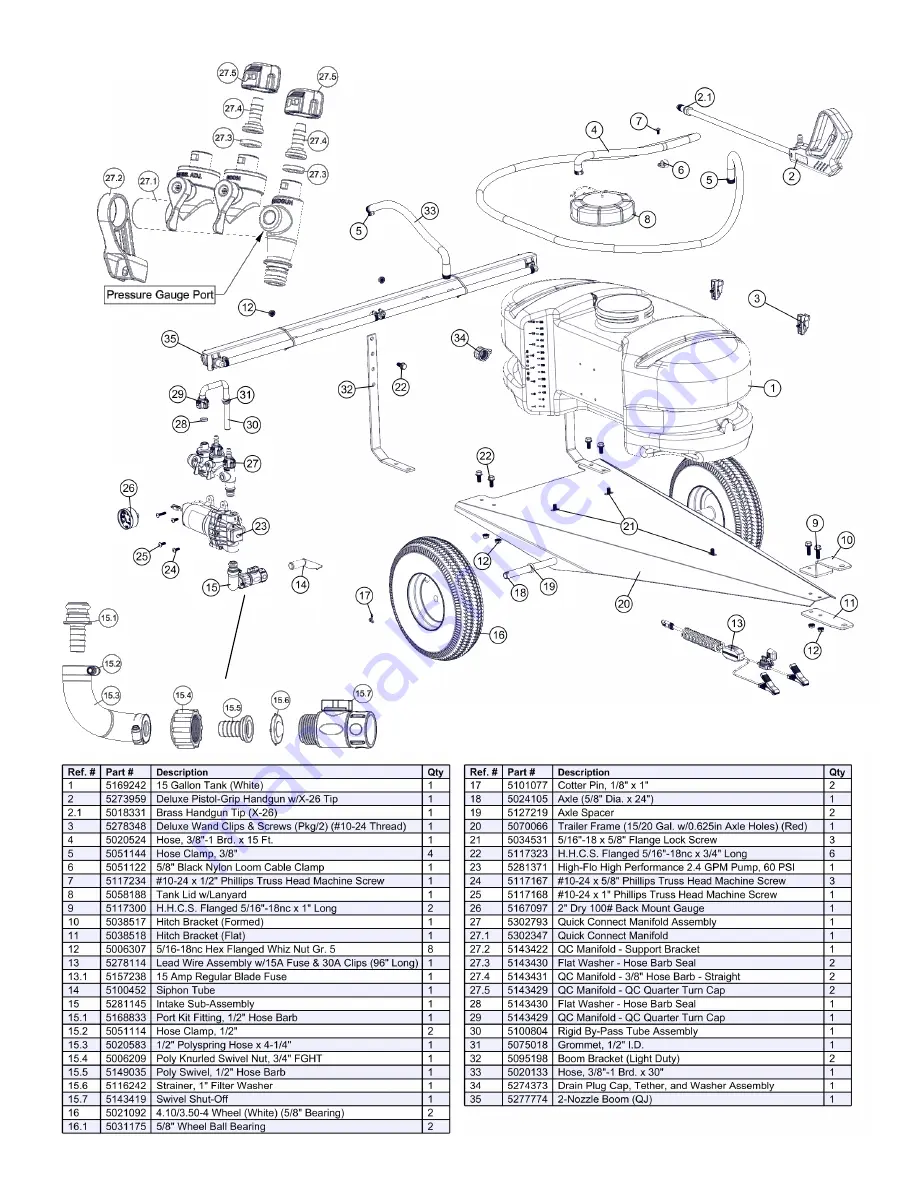
background image

Page 9 


Manifold 

Detail 

Exploded View/Parts List:  

LG-1500-304  (5301439) 

Intake 

Detail 

Summary of Contents for 5301439

Page 1: ...s with an On Off shut off valve located at the inlet location of the tank towards the underside See Detail A You must make sure the valve is in the open position before using your sprayer Detail A OWNER S MANUAL BEFORE RETURNING THIS PRODUCT FOR ANY REASON PLEASE CALL 1 800 831 0027 MONDAY FRIDAY 8 00 AM TO 5 00 PM CST If you should have a question or experience a problem with your Fimco Industrie...

Page 2: ...our sprayer s carton LG 1500 304 Contents of Parts Bag 5278316 Tank Lid Lanyard 5058188 Tank Frame Pre Assembly 2 Nozzle Boom Assembly 5277774 2 Tires Wheels 5021092 Owner s Manual 15 20 Gallon Trailer Bracket Kit 5277727 ...

Page 3: ...he axle and 2 wheels from the carton Remove the 2 wheel spacers and 2 cotter pins from the parts bag Slide the axle through the hole in one side of the frame and through the corresponding hole on the other side of the frame You may need to maneuver squeeze the frame slightly while doing this to get the axle through both holes Center the axle about the frame as best as possible Slide a wheel spacer...

Page 4: ...o the tank Do not over tighten These clips are where the spray gun is secured to the tank while not in use NOTE The spray gun should already be attached to the 15 foot hose prior to assembly The Sprayer should now be ready for use Assembly Procedure LG 1500 304 Remove the 2 nozzle boom assembly from the carton Using 2 bolts and 2 whiz nuts bolt the boom to the upright boom mounting brackets There ...

Page 5: ...en disconnect the negative black connection and finally the positive red connection The lead wire has an On Off switch to activate the pump is on and O is off Fill the tank part way with water and then add the desired amount of chemical to be sprayed Finish filling tank to proper level Turn the pump on and by depressing the side of the rock er switch The pump is equipped with a pressure switch tha...

Page 6: ...me chemicals will damage the pump valves if allowed to soak untreated for a length of time ALWAYS flush the pump as instructed after each use DO NOT allow chemicals to sit in the pump for extended times of idleness Follow the chemical manufacturer s instructions on disposal of all waste water from the sprayer Winter Storage Prepare the sprayer for end of season storage by running RV antifreeze thr...

Page 7: ...alve Check for clogged strainer filter Check for cracks in the pump housing Check for empty product supply Low Pressure Low Flow Check for leaks in the discharge line Check for restriction in the discharge line Check for debris in nozzle orifice Check for clogged strainer Check for proper voltage try another 12 volt battery Pulsating flow surging Low flow may cause pump to surge Spray wand is adju...

Page 8: ...an hour or so in the hot soapy solution and replace in the pump and reassemble the pump Most times this will restore most if not all of the prime of a pump If you re still having issues with pressure after this step it would be recommended to replace this part Checking the Pressure Switch If your motor is not running and you ve checked the following for loose wiring connections fuse the switch on ...

Page 9: ...Page 9 Manifold Detail Exploded View Parts List LG 1500 304 5301439 Intake Detail ...

Page 10: ...ggested Minimum Spray Height 18 20 above what is being sprayed to plant not ground Optimum Spray Height 39 Wide angle spray nozzle height is influenced by nozzle orientation The criti cal factor is to achieve a minimum 30 overlap Excellent spray distribution for uniform coverage along the boom Nozzle design incorporates a pre orifice to pro duce larger droplets for less drift ...

Page 11: ... filter screen Start your pump and before it shuts off reach down and shut the valve to the Closed position lever is perpendicular to the flow of fluid then shut off your pump Unscrew the knurled nut from the shut off valve leaving the valve connected to the tank Swing swivel the intake assembly towards you Look in the nut you JUST unscrewed There is a screen washer there Remove the screen and cle...

Page 12: ...obtain warranty service under this Limited Warranty you must 1 provide written notice to Fimco Ind of the defect during the Warranty Period and within thirty 30 days after the defect becomes apparent or the repair becomes necessary at the following address Fimco Ind 1000 Fimco Lane North Sioux City SD 57049 and 2 make the Equipment available to Fimco Ind or an authorized dealer within a reasonable...

Reviews: