background image

Page 10 


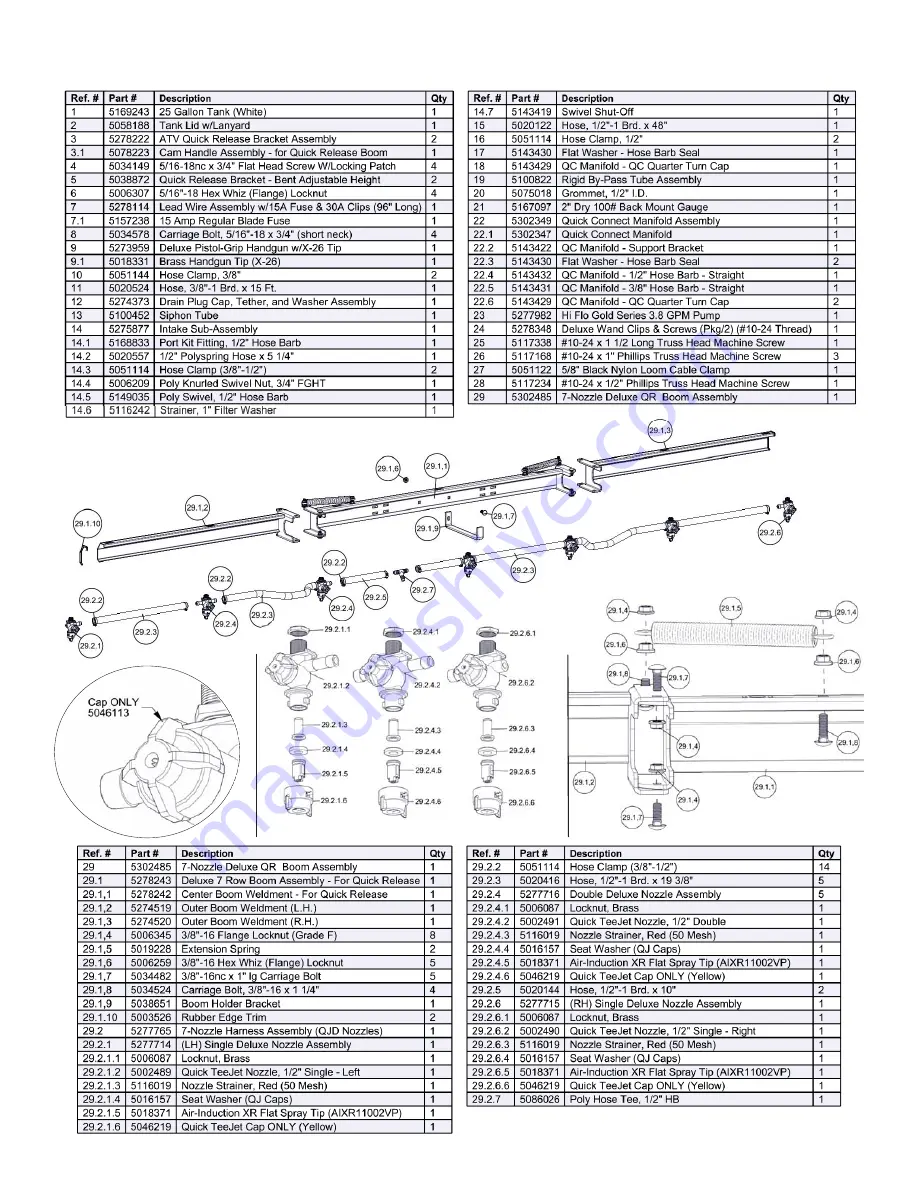
Parts List: ATV-25-71-QR (5302321) 

Opposite side has typical hardware setup 

7-Nozzle (Deluxe) Boom Assembly (5302485) 

Hinge 

Detail 

LH Elbow  

      Tee       RH Elbow 

See Hinge Detail 

Summary of Contents for 5302321

Page 1: ...94 0440 5008431 04 16 Model ATV 25 71 QR 5302321 25 Gallon Deluxe Lawn Garden ATV Sprayer Caution Always check the vehicle load rating before using this sprayer The loaded weight of the sprayer and boom assembly is about 280 lbs when the tank is full Care must be taken not to tip the vehicle over back wards especially when starting or accelerating Technical Specifications x 25 Gal Corrosion Resist...

Page 2: ... your sprayer s carton ATV 25 71 QR 5302321 7 Nozzle Boom 5274770 7 Nozzle Harness 5277765 Contents of Parts Bag 5278288 Tank Lid Lanyard 5058188 Tank Plumbing Pre Assembly Owner s Manual Contents of Bracket Kit 5278289 ...

Page 3: ...d screws 5034149 to secure it to the tank The tank will rest on the surface of the brackets Make sure the brackets are parallel with each other before tightening down the bolts Do not over tighten After your tank brackets are securely attached turn the tank assembly over and position it so that the cam handles which extend beyond the back of the tank are facing you and just hanging over the edge o...

Page 4: ...ernate positions Try to maintain approximately 18 22 inches above the items being sprayed for optimal coverage This is con sidered where the nozzles will mount at the end of these brackets Step 3 Step 4 Assembly Procedure ATV 25 71 QR With the boom secured to the boom mounting brack ets the nozzle harness can now be attached Attach the nozzle harness to the boom Each nozzle body has a brass nut se...

Page 5: ...tall the pressure gauge Hand tighten securely DO NOT OVER TIGHTEN Detail B Screw the lid onto the tank Place the end of the lanyard through the tab in the tank This is so the lid can hang off the tank when filling rinsing the tank out Detail C Locate the 2 clips and 2 phillips head machine screws from the parts bag A phillips head screwdriver is required for this step Place a screw through the hol...

Page 6: ...ank part way with water and then add the desired amount of chemical to be sprayed Finish filling tank to proper level Turn the pump on and by depressing the side of the rocker switch The pump is equipped with a pressure switch that is pre set at the factory to shut the pump off when all discharges are closed The pump will turn back on when one of the following actions occurs the handgun lever is s...

Page 7: ...ou may substitute dish soap for this step Turn pump on and circulate through system for 15 minutes and then spray out through boom and handgun nozzles Refill sprayer half way with clean water and repeat Follow the chemical manufacturer s disposal instructions of all wash or rinsing water If boom or handgun nozzles need cleaning remove them from the sprayer and soak in warm soapy water Clean with a...

Page 8: ...inals and touch the two ends together If your pump runs when you do this your pressure switch will need to be replaced x Check the fuse x Check for low voltage at the power supply Pump does not prime x Check for air leaks in supply line x Check for debris in the check valve assembly x Check for defective check valve x Check for clogged strainer filter x Check for cracks in the pump housing x Check...

Page 9: ...Page 9 Manifold Detail 5302349 Exploded View ATV 25 71 QR 5302321 Typical Spray PaƩern 7 Nozzle Boom Intake Detail 5275877 Manifold d Detail 5302349 9 ...

Page 10: ...Page 10 Parts List ATV 25 71 QR 5302321 Opposite side has typical hardware setup 7 Nozzle Deluxe Boom Assembly 5302485 Hinge Detail LH Elbow Tee RH Elbow See Hinge Detail ...

Reviews: