background image

Page 6 


Troubleshoo ng the Pump

 
Motor does not run: 

x

Check for loose wiring connec on(s). 

x

Make sure the 'ON/OFF' switch in the lead wire assembly is in the 
'ON' posi on.  “I" is the 'ON' posi on and 'O' is the 'OFF' posi on. 

x

Check for defec ve pressure switch. Make sure you are connected to 
a good   12 volt power source. Make sure any on/o

 switches are in 

the 'on' posi on. 

x

Remove the cap to the pressure switch. Pull both red wires o

 of 

their terminals, and touch the two ends together. If your pump runs 
when you do this,  your pressure switch will need to be replaced. 

x

Check the fuse. 

x

Check for low voltage at the power supply. 

 
Pump does not prime: 

x

Check for air leaks in supply line. 

x

Check for debris in the check valve assembly. 

x

Check for defec ve check valve. 

x

Check for clogged strainer/

fi

lter. 

x

Check for cracks in the pump housing. 

x

Check for empty product supply. 


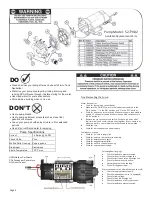
DO 

x

Clean and rinse your pump after each use with Fimco Tank 
Neutralizer 

x

Winterize your pump or sprayer by rinsing, draining and  
running RV Antifreeze through it before storing for the winter. 

x

Use clean water for your spray mixture 

x

Store inside a building when not in use. 

DON’T 

x

Use to pump bleach. 

x

Use to pump petroleum products such as diesel fuel,    
gasoline or kerosene 

x

Leave your pump sit with spray mixture in it for extended 
periods 

x

Use dirty or unfiltered water for spraying 

Pulsa ng 

fl

ow (surging): 

x

Check for defec ve pressure switch. 

x

Check for leaks in the discharge line. 

x

Check for restric on in the discharge line. 

x

Check for debris in nozzle ori

fi

ce. 

x

Discharge hose may be too long. 

x

Check for clogged strainer. 

 
Motor con nues to run a er discharge is shut o

x

Check for empty product supply. 

x

Check for open bypass valve. (if equipped) 

x

Check for low voltage. 

x

Check for leak in discharge line. 

x

Check for defec ve or dirty check valve. 

x

Check for defec ve pressure switch. 

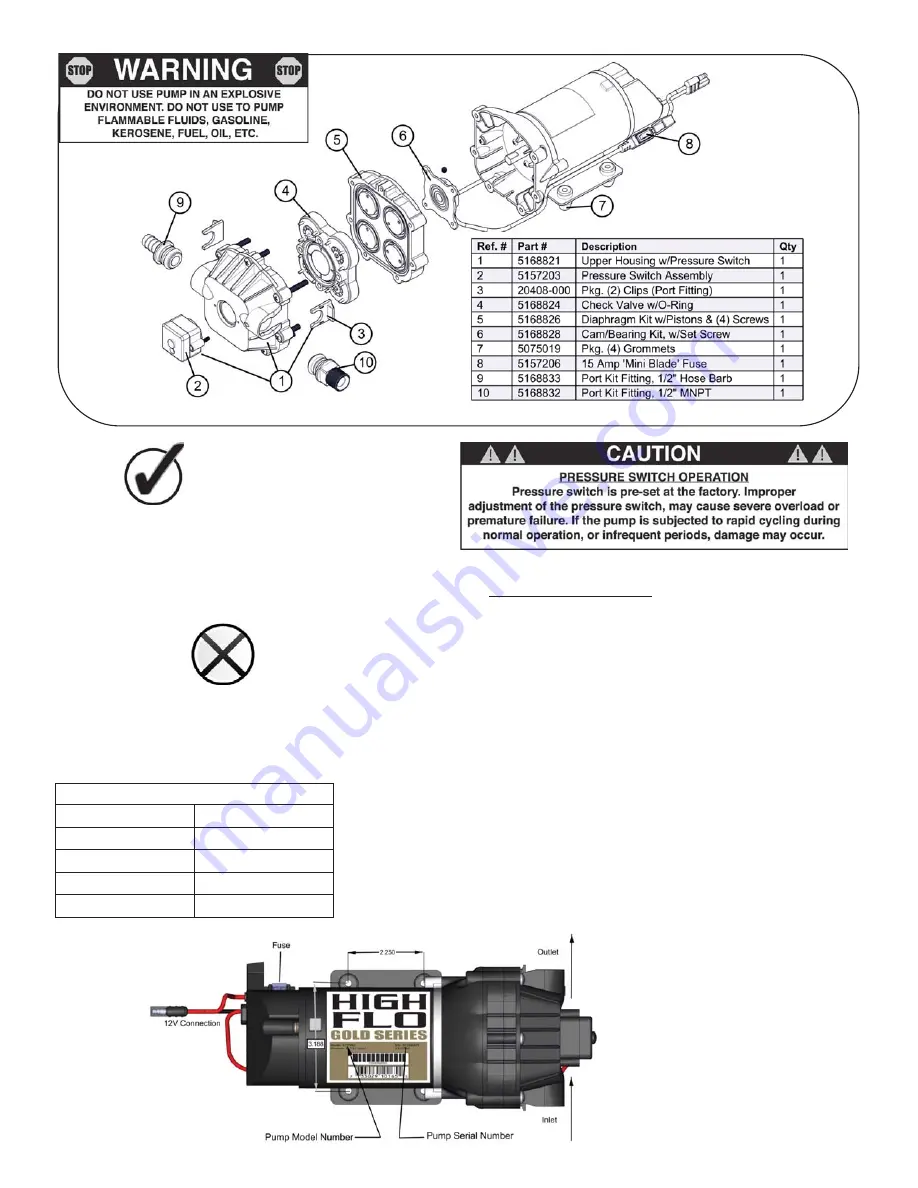
Pump Model:  5277982 

Available Replacement Parts 

Pump Specifications 

Current: 

7.4 Amps @ 40 PSI 

Check Valve: 

Viton 

Wetted Parts Housing:  Polypropylene 

Diaphragm: Santoprene 

Liquid Temperature: 

130° F max. 


GPM=Gallons Per Minute 
PSI=Pounds per Square Inch 
DC=Direct Current 

Summary of Contents for 5302322

Page 1: ...manual www fimcoindustries com 1000 FIMCO Lane P O Box 1700 North Sioux City SD 57049 Toll Free Phone 800 831 0027 Toll Free Fax 800 494 0440 5008430 04 16 Technical Specifications x 25 Gal Corrosion Resistant Polyethylene Tank x 12 Volt Diaphragm Pump 3 8 g p m 45 psi x Deluxe Pistol Grip Handgun x 15 Ft Handgun Hose 3 8 I D x 26 Ft Vertical throw 35 Ft Horizontal Throw x 30 Foot Spray Coverage w...

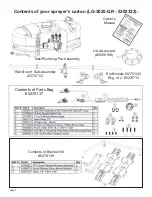
Page 2: ...prayer s carton LG 3025 QR 5302322 Contents of Parts Bag 5278137 Contents of Bracket Kit 5278138 Wet Boom Sub Assembly 5275712 Tank Plumbing Pre Assembly Owner s Manual End Nozzle 5275122 Pkg of 2 5275713 Lid w Lanyard 5058188 ...

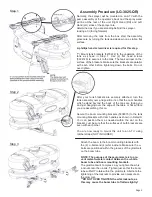
Page 3: ...cam handles which extend beyond the back of the tank are facing you and just hanging over the edge of the table or flat surface you are assembling this on Secure the boom mounting brackets 5038873 to the tank mounting brackets with Cam handles as shown in Detail A You can position them as needed within the slot on the bracket Just be sure that the surfaces of both brackets are even with each other...

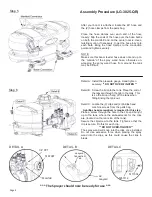
Page 4: ... Hand tighten securely DO NOT OVER TIGHTEN Detail B Screw the lid onto the tank Place the end of the lanyard through the tab in the tank This is so the lid can hang off the tank when filling rinsing the tank out Detail C Locate the 2 clips and 2 phillips head machine screws from the parts bag A phillips head screwdriver is required for this step Place a screw through the hole in the clip and bring...

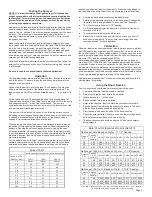
Page 5: ...68 4 0 17 34 51 5 0 14 27 41 6 0 11 23 34 7 0 9 7 19 29 8 0 8 5 17 26 9 0 7 6 15 23 10 0 6 8 14 20 consult your chemical label for the amount of chemical to be added to the tank Read the entire label Use only according to label directions x Activate the handgun by squeezing the handle lever x Rotating the adjustable nozzle tip on the handgun will change the tip pattern from a straight stream to a ...

Page 6: ...sprayer by rinsing draining and running RV Antifreeze through it before storing for the winter x Use clean water for your spray mixture x Store inside a building when not in use DON T x Use to pump bleach x Use to pump petroleum products such as diesel fuel gasoline or kerosene x Leave your pump sit with spray mixture in it for extended periods x Use dirty or unfiltered water for spraying Pulsa ng...

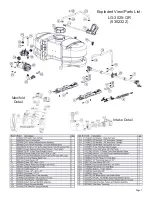
Page 7: ...Page 7 Exploded View Parts List LG 3025 QR 5302322 Intake Detail Manifold Detail ...

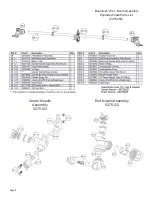
Page 8: ...Page 8 Boomless Wet Boom Assembly Exploded View Parts List 5275260 End Nozzle Assembly 5275122 Center Nozzle Assembly 5275123 ...

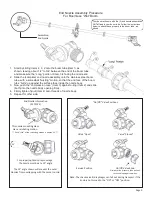
Page 9: ...other side End Nozzle Assembly Procedure For Boomless Wet Boom Your boom will come with the 2 end nozzle assemblies NOT affixed to your boom tube Follow the instructions below to attach these properly to the boom tube as shown Assembled End Nozzle End Nozzle Informa on 5275122 This nozzle moun ng stem Has a ratche ng mo on Each click of the ratche ng mo on is approx 15 For proper op mal spray cove...

Page 10: ...you may substitute dish soap for this step Turn pump on and circulate through system for 15 minutes and then spray out through boom and handgun nozzles Refill sprayer half way with clean water and repeat Follow the chemical manufacturer s disposal instructions of all wash or rinsing water If boom or handgun nozzles need cleaning remove them from the sprayer and soak in warm soapy water Clean with ...

Reviews: