background image

Page 3 


Assembly Procedure (LG-3025-PRO) 

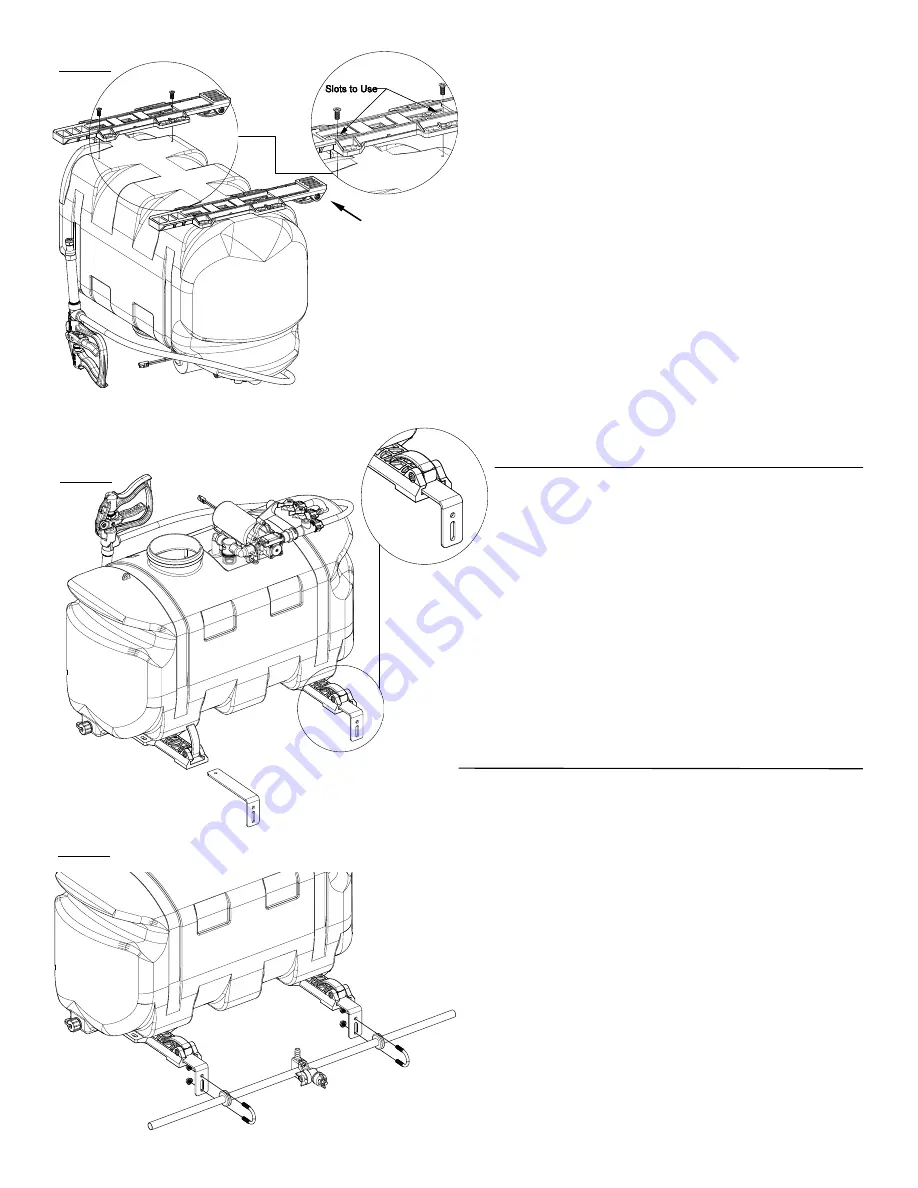
Step 1 

Step 2 

Normally, the sprayer will be mounted on an ATV with 

the  spray  gun  assembly  at  the  operator’s  back.  Right 

Hand (RH) and Left Hand (LH) sides of the sprayer are 

determined  as  if  you  are  standing  behind  the  sprayer, 

looking at it (facing forward) 


After removing the tank from the box, start the assem-

bly  procedure  by  turning  the  tank  upside  down  on  a 

stable,  flat  surface.  Be  careful  of  the  pump  and  mani-

fold assembly, as to not damage them or their connec-

tions. 


A  phillips  head  screwdriver  is  required  for  this 

step. 


(**) Mount tank brackets to the underside of the tank as 

shown in Step 1. Use (4) flat head screws to secure it 

to  the  tank.  The  tank  will  rest  on  the  surface  of  the 

brackets. Make sure the brackets are parallel with each 

other  before  tightening  down  the  bolts.  Do  not  over-

tighten. 

Detail A 

After  your  tank  brackets  are  securely  attached,  turn 

the tank assembly over and position it so that the cam 

handles which extend beyond the back of the tank are 

facing you and just hanging over the edge of the table 

or flat surface you are assembling this on. 


Secure  the  boom  mounting  brackets  to  the  tank 

mounting  brackets  with  Cam  handles  as  shown  in 

Detail A. You can position them as needed within the 

slot on the bracket. Just be sure that the surfaces of 

both brackets are even with each other. 


You are now ready to mount this unit to an ATV, 

using ratchet straps (NOT INCLUDED) 

Step 3 

Attach the boom to the boom mounting brackets with 

the (2)  u-bolts and (4) whiz locknuts. Make sure the u-

bolts are positioned within the grooves of the grommets 

on the boom tube 


NOTE: The purpose of these grommets is to pre-

vent metal-to-metal contact between the u-bolts, 

boom tube and boom mounting brackets. 

The grommets will ‘compress’ as you tighten the whiz 

locknuts onto the u-bolts. Tighten just so that the boom 

tube will NOT rotate within the grommets. Alternate the 

tightening of the locknuts to provide even pressure on 

the grommet. 

**DO NOT OVER TIGHTEN the whiz locknuts, as 

this may cause the boom tube to flatten slightly!


(**) ‘Long’ portion 

of the brackets 

should be facing 

towards the ‘back’ 

side of the tank 

(opposite of the 

spray gun) 

NOTE: 

The Spray Gun will already 

be attached to the spray line hose. 

Summary of Contents for 5302926

Page 1: ...ss Sprayer Professional Grade Pump 4 0 GPM Ideal for Harsh Chemicals Oil Based Chemicals with Surfactants Long Range 13 PRO SERIES Handgun 38 Horizontal Spray 27 Vertical Roundup Ready OWNER S MANUAL BEFORE RETURNING THIS PRODUCT FOR ANY REASON PLEASE CALL 1 800 831 0027 MONDAY FRIDAY 8 00 AM TO 5 00 PM CST If you should have a question or experience a problem with your Fimco Industries Product Vi...

Page 2: ... sprayer s carton LG 3025 PRO 5302926 Contents of Parts Bag 5281292 Contents of Bracket Kit 5278138 Wet Boom Sub Assembly 5275712 Owner s Manual Tank Plumbing Pre Assembly End Nozzle 5275122 Pkg of 2 5275713 Multi Lid 5058200 ...

Page 3: ...and just hanging over the edge of the table or flat surface you are assembling this on Secure the boom mounting brackets to the tank mounting brackets with Cam handles as shown in Detail A You can position them as needed within the slot on the bracket Just be sure that the surfaces of both brackets are even with each other You are now ready to mount this unit to an ATV using ratchet straps NOT INC...

Page 4: ...placement End Nozzle Assembly Procedure For Boomless Wet Boom Your boom will come with the 2 end nozzle assemblies NOT affixed to your boom tube Follow the instructions below to attach these properly to the boom tube as shown Assembled End Nozzle 15 End Nozzle Information 5275122 This nozzle mounting stem Has a ratcheting motion Each click of the ratcheting motion is approx 15 For proper optimal s...

Page 5: ... unwrapping the spray wand hose from around the tank may be difficult Detail A Install the pressure gauge Hand tighten securely DO NOT OVER TIGHTEN Detail B Screw the lid onto the tank Detail C Locate the handgun bracket grommet and screw from the parts bag and install onto the tank A phillips head screwdriver is required for this step Place the grommet in the bracket and then place a screw throug...

Page 6: ... the starting place for spraying When you are ready to spray turn the boom valve to the on position Detail A This will start solution spraying from the tips of the boom The pressure will decrease slightly when the boom is spraying Adjust the pressure by turning the ON OFF valve lever on the bypass line valve Detail B Make sure your pattern is sufficient You may down pressure the system by bypassin...

Page 7: ...ng of Cam Lock Mechanism Do not use QR bracket Cams to hold and store boom in vertical position Winter Storage Prepare the sprayer for end of season storage by running RV antifreeze through the system This will keep internal parts lubricated protect against corrosion and keep the unit from freezing Note RV antifreeze is non toxic and biodegradable and generally safer for the environment than autom...

Page 8: ...Clean and rinse your pump after each use with Fimco Tank Neutralizer Winterize your pump or sprayer by rinsing draining and running RV Antifreeze through it before storing for the winter Use clean water for your spray mixture Store inside a building when not in use DON T Pulsating flow surging Check for defective pressure switch Check for leaks in the discharge line Check for restriction in the di...

Page 9: ...Page 9 Exploded View Parts List LG 3025 PRO 5302926 See Pump Manifold Detail Next Page See Boom Detail Page 11 for Breakdown Part Numbers ...

Page 10: ...Page 10 Pump Manifold Detail See Page 9 for Part Numbers 13 High Pressure Spray Gun w 3 8 Hose Barb 5163149 See Page 9 for Part Numbers ...

Page 11: ...i Lid and use calibration container to measure the correct amount of chemical for the water being used 3 Pour chemical into tank and tighten Multi Lid back onto tank If desired amount of water was added in step 1 you are done Be sure to press firm ly on fill cap to seal with Multi Lid If desired amount of water was not met in step 1 proceed to step 4 4 Open fill cap and place garden hose into tank...

Page 12: ... Warranty you must 1 provide written notice to Fimco Ind of the defect during the Warranty Period and within thirty 30 days after the defect becomes apparent or the repair becomes necessary at the following address Fimco Ind 1000 Fimco Lane North Sioux City SD 57049 and 2 make the Equipment available to Fimco Ind or an authorized dealer within a reasonable period of time For more information about...

Reviews: