


Page 6
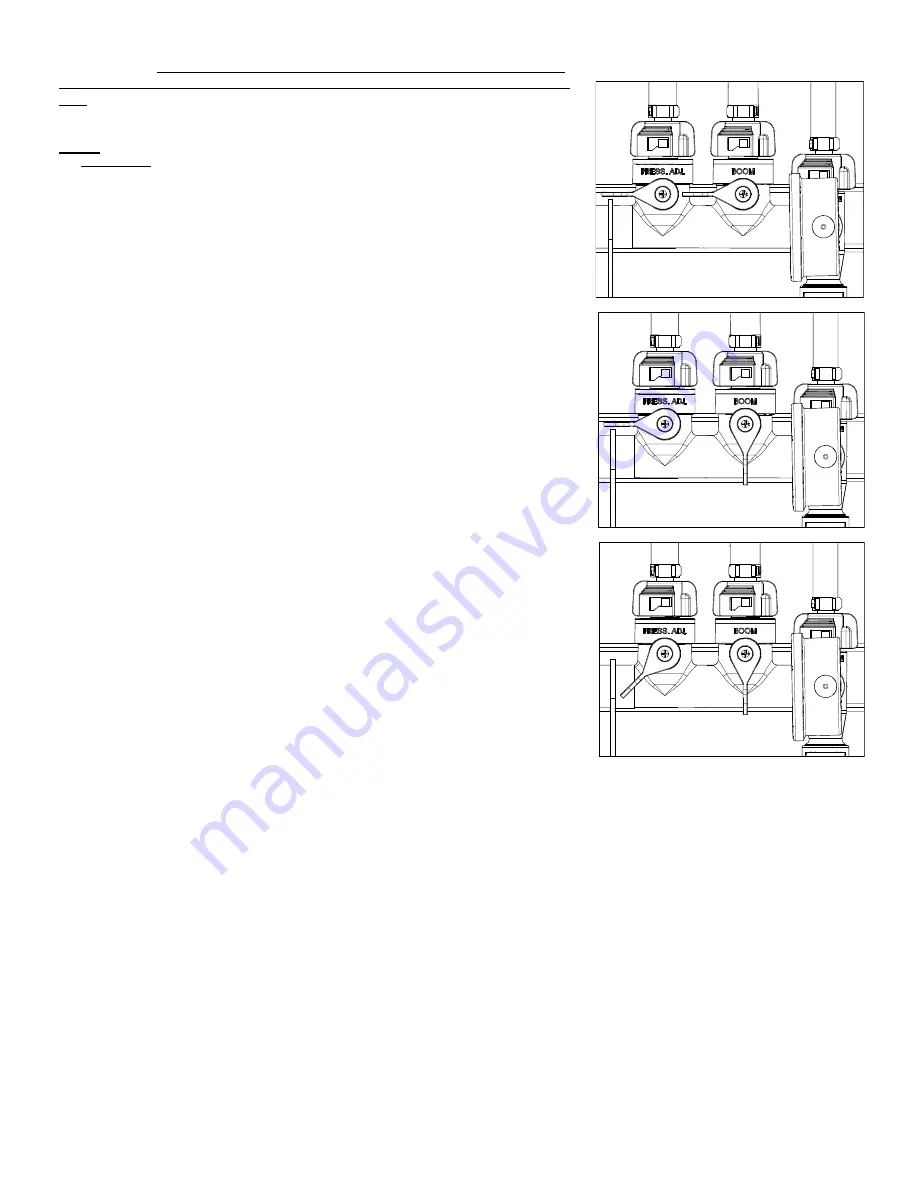
Manifold Valves CLOSED
When spraying with either the boom or the handgun, pressure may be reduced by slowly opening the bypass valve until desired pressure is achieved
(Detail B). Opening the valve decreases pressure, closing the valve increases pressure. When spraying with the boom, the proper method to set the
pressure is to open the boom valve completely and if a lower pressure is desired, then slowly open the bypass valve until that pressure is obtained.
For the safest and most efficient chemical application, you will need to calibrate your sprayer using the tip and speed charts. Once you have deter-
mined the proper speed and pressure settings, you will need to consult your chemical label for the amount of chemical to be added to the tank. Read
the entire label. Use only according to label directions.
Calibration
Chemical labels may show application rates in gallons per acre, gallons per 1000 square feet or gallons per 100 square feet. You will note that the tip
chart shows 2 of these rating systems. Once you know how much you are going to spray, then determine (from the tip chart) the spraying pressure
(PSI), and the spraying speed (MPH).
Determining the proper speed of the pulling vehicle can be done by marking off 100, 200 & 300 feet. The speed chart indicates the number of seconds
it takes to travel the distances. Set the throttle and with a running start, travel the distances. Adjust the throttle until you travel the distances in the num-
ber of seconds indicated by the speed chart. Once you have reached the throttle setting needed, mark the throttle location so you can stop and go
again, returning to the same speed.
Add water and proper amount of chemical to the tank and drive to the starting place for spraying.
IMPORTANT:
Remove tank lid and be sure the tank is clean and free of any
foreign material. Rinse tank out of any tank residue before filling with water to
test.
Testing the Sprayer
NOTE:
It is IMPORTANT that you test your sprayer for leakage and proper spray patterns with plain water
before chemical application is attempted. This will also give you the opportunity to familiarize your-
self with the operation of the sprayer, without the possibility of losing any expensive chemicals.
Fill the tank about 1/2 full with plain water and drive to the starting place for spraying.
When you are ready to spray, turn the boom valve to the “on” position (Detail A). This will start
solution spraying from the tips of the boom. The pressure will decrease slightly when the boom is
spraying.
Adjust the pressure by turning the “ON/OFF” valve lever on the bypass line valve (Detail B). Make
sure your pattern is sufficient. You may down-pressure the system by ‘bypassing’ solution back
into the tank. This is achieved by opening the bypass valve. Regulating pressure is done in this
manner.
Read the operating instructions and initially begin spraying by closing the ‘Pressure Adjust’ valve
and opening the boom line valve (Detail A). This will enable the air in the line to be eliminated
(purged) through all the tips, while building pressure. When everything tests all right (no leaks and
good pressure), add the desired chemicals to the mixture and water combination and start your
spraying operation. Adjust the pressure and spray as you did in the testing procedure.
Conditions of weather and terrain must be considered when setting the sprayer. Do not spray on
windy days. Protective clothing must be worn in some cases
Be sure to read the chemical label(s) before application!
Operation
The pumping system draws solution from the tank, through the strainer and to the pump. The
pump forces the solution under pressure to the handgun or boom nozzles.
Connect the lead wire to a fully charged 12 volt battery. You may use either a stand-alone battery
or the battery on your towing vehicle. Connect to the positive (red) terminal first, then connect to
the negative (black) terminal. Then connect the end of the lead wire to the end of the pump. When
disconnecting, disconnect the end of the pump wire from the lead wire, then disconnect the nega-
tive (black) connection and finally the positive (red) connection. The lead wire has an On/Off
switch to activate the pump. “-” is on and “O” is off.
Fill the tank part way with water and then add the desired amount of chemical to be sprayed. Fin-
ish filling tank to proper level. Turn the pump on and by depressing the “-” side of the rocker
switch. The pump is equipped with a pressure switch that is pre-set at the factory to shut the pump
off when all discharges are closed.
The pump will turn back on when one of the following actions occurs:
Handgun lever is squeezed to spray the handgun.
Boom valve is opened to broadcast spray with the boom.
Bypass valve is opened to re-circulate solution back into the tank.
Detail A
Detail B


