Page 3
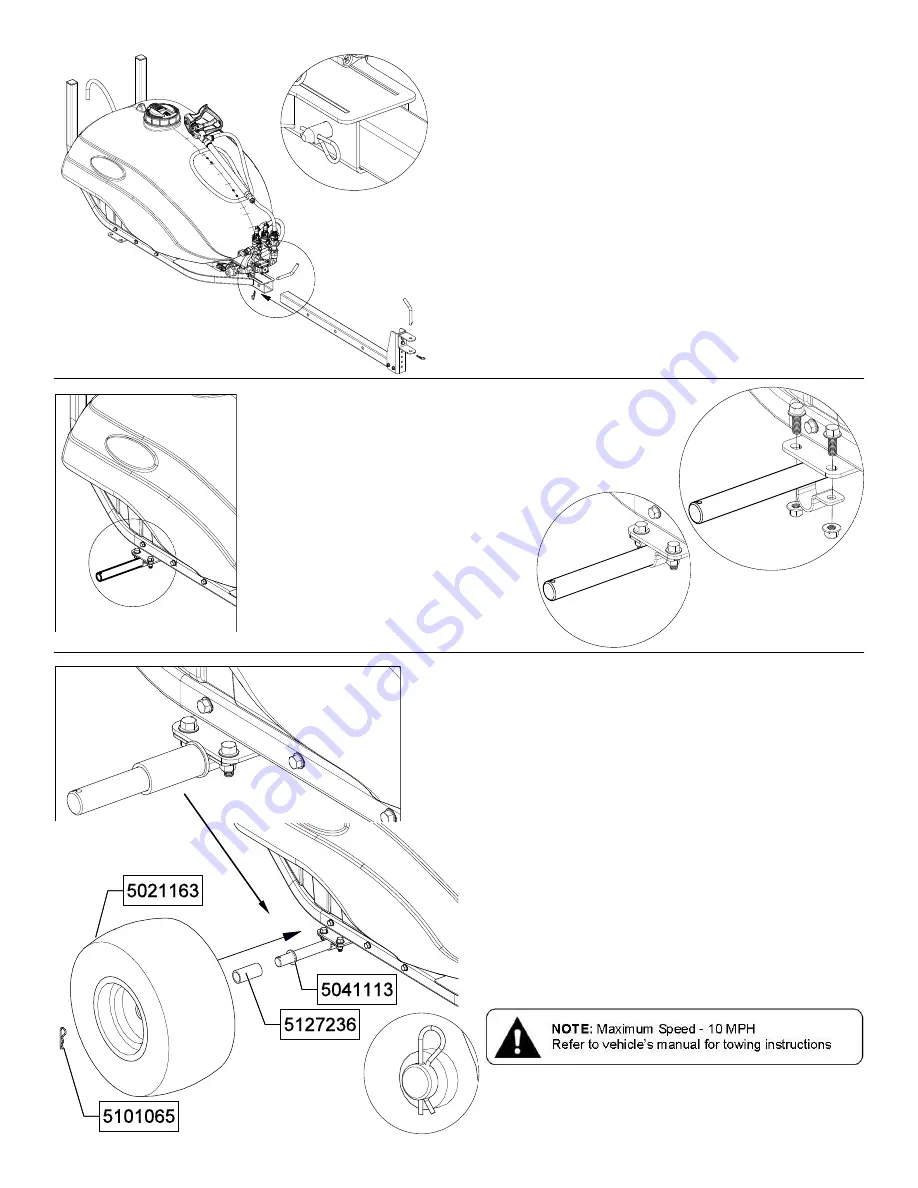
Your tank comes already mounted to the main frame and pre-
assembled with the pump, manifold, bypass, intake assembly,
lid, handgun, handgun hose amd handgun hose quick connect
already attached.
Assembling the tongue to the frame. Locate the (2) bent clevis
pins from the parts bag.
Slide the preassembled tongue into the receiver of the main
frame and lock in place with one bent clevis pin, securing with
the clip (See Detail A).
Insert the other bent clevis pin into the hole in the hitch and
secure with clip.
Detail A
Step 1
Locate the (2) axle spacers, (2) machine bushings,
(2) hitch pin clips and (2) turf tires.
Slide a machine bushing and axle spacer onto the
axle.
Slide the wheel onto the axle, making sure the
valve stem is facing outward.
Retain the wheel on the axle with the hitch pin
(See Detail C).
Repeat for other side.
NOTE:
The wheels have grease zerks for bear-
ings. After the wheels are installed, the bearings
should be filled with a NGLI No. 2 lithium grease.
Once a year new grease should be added to each
wheel.
Step 2
Detail B
Detail C
Step 3
Locate axle, (2) 1” Axle Clamps, (4) H.H.C.S. Flanged 3/8"-16nc
x 1" bolts and (4) 3/8-16nc Hex Flanged Toplock Nuts, Gr. 5.
Loosely attach the axle clamp to the main frame using 2 bolts
and 2 nuts, do not tighten (See Detail B). Repeat for other side.
Slide the axle through the 1” axle clamp in one side of the frame
and through the corresponding hole on the
other side,
being sure to center the axle. Tighten the
bolts and nuts.
NOTE: the axle will not turn or slide once
the bolts are tight.
Summary of Contents for 5302930
Page 13: ...Page 13 NOTES ...


