Page 3
Your tank comes pre-assembled with the pump,
manifold, bypass, intake assembly, lid w/lanyard, handgun,
handgun hose, handgun hose quick connect and loom clamp
already attached.
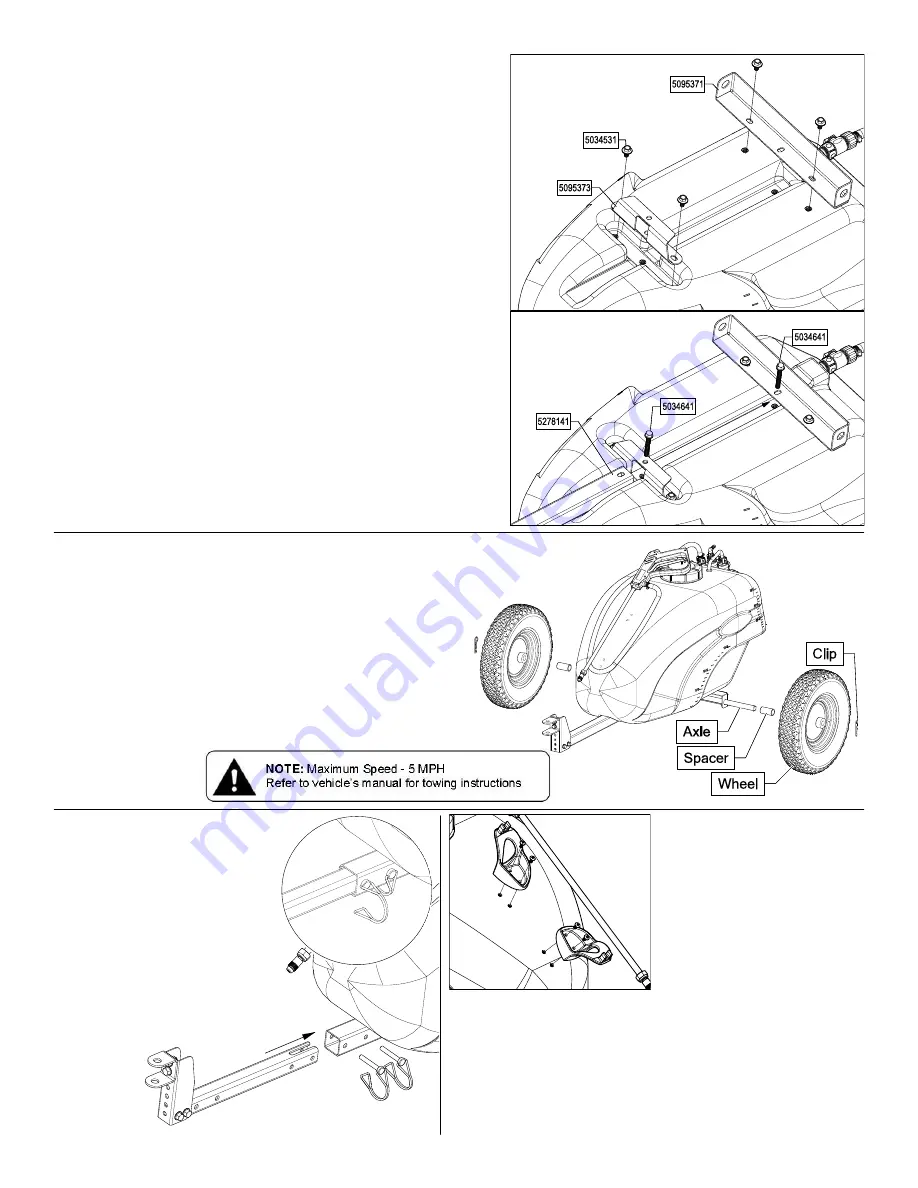
To assemble the tongue and frame to the tank. Locate the
(4) 5/16” x 5/8” Flange Lock Screws, (2) 5/16” x 2-1/4”
Flanged bolts, tank support , axle support and the tongue
assembly.
Turn the tank upside down.
Detail A: Loosely attach the tank support and axle support
with (4) lock screws.
Just start the bolts, do not tighten on either support.
Detail B: Slide the tongue assembly into place and using the
(2) flanged bolts, attach to the tank and tighten.
Do Not Overtighten.
Then tighten the (4) lock screws from Detail A.
Do Not Overtighten.
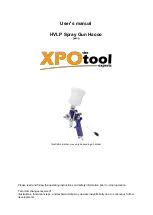
• A phillips head screwdriver is
required for this step
Turn the trailer right side up.
Locate the (4) #10 x 1/2”
Screws and the (2) Hose
Wraps from the parts bag.
Place a screw through the
holes in the hose wrap and
bring it up to the tank. Use the phillips head screwdriver to
secure the holders in place. Tighten so the holders are se-
cure.
**Do Not Over-Tighten**
Wrap the hose and clip in the handgun. Do not use exces-
sive force when placing the handgun into the clips, as this
could cause breakage.
The telescoping Tongue Assembly
comes fully assembled.
Remove D-Clip pins to slide
tongue in and out for usage or
storage. Replace D-Clip pins to
retain the tongue in the position
Detail A
Detail B
Locate the axle, spacers and (2) wheels from the carton.
Remove the (2) Hair Pin Clips from the parts bag.
Slide the axle through the hole in one side of the axle
mount and through the corresponding hole on the other
side. Then slide the spacers onto the axle.
Slide the wheels over the axle, making sure the valve
stems are facing outward.
Retain the wheels on the axle with the hair pin clips. Place
the pins through the holes at the end of the axle.


