background image

Page 4 


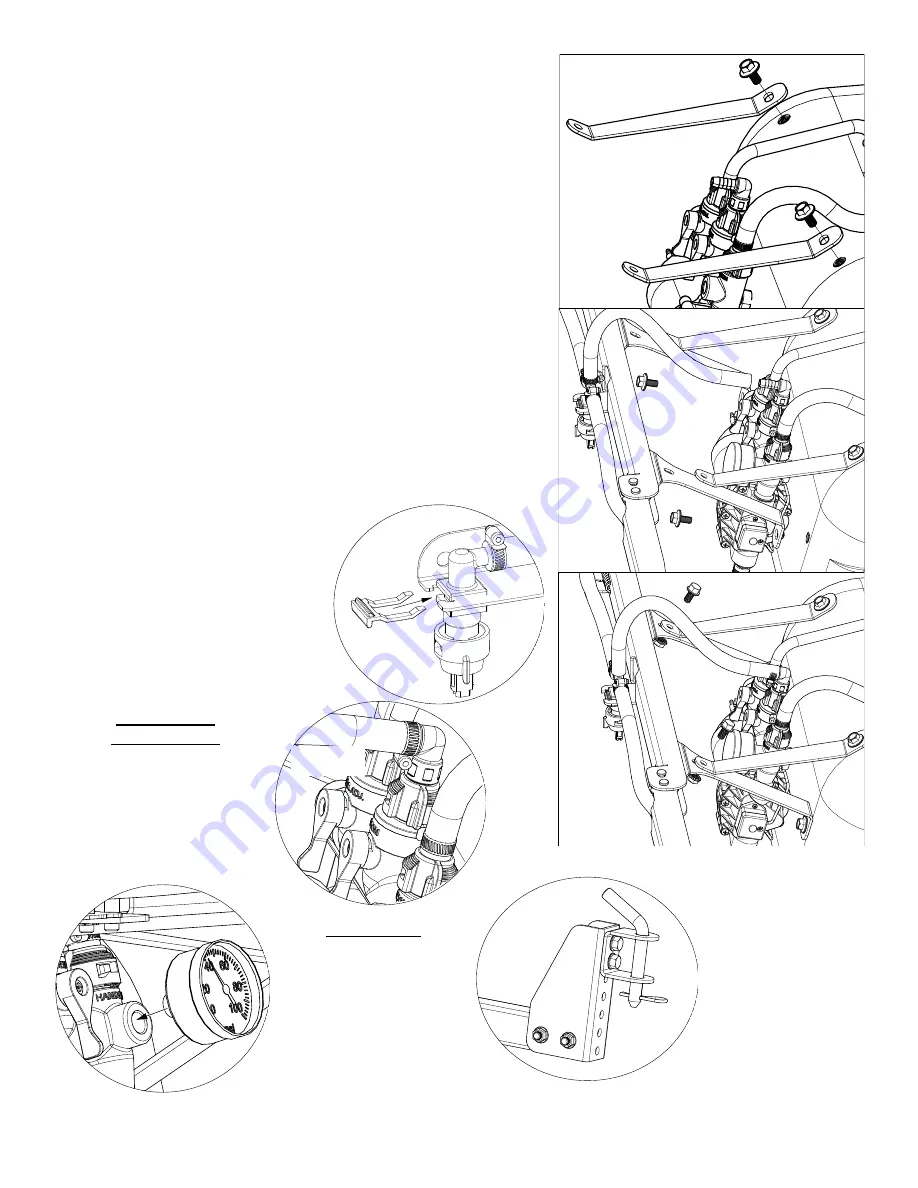
Break-Away Boom  Assembly is partially preassembled. Follow the 

directions below to mount to your tank. 


Detail A:  

Locate the (2) Boom Top Straps and then in the parts bag, locate  

(2) 5/16-18 x 5/8” Flanged Lock Screws. 


Attach the Boom Top Straps to the tank, using the two screws.  

DO NOT TIGHTEN 


Detail B:  

Locate the Boom Assembly and then in the parts bag,  

locate (2) 5/16-18 x 5/8” Flanged Lock Screws. 


Attach the Boom Assembly to the tank, using the two screws.  

DO NOT TIGHTEN 


Detail C:  

Locate in the parts bag (2) 5/16-18 x 5/8” Flanged Bolts and (2) Whiz 

Nuts.  


Attach the Boom Top Straps to the Boom Assembly using the two 

bolts and whiz nuts. 


**** Tighten all Bolts from Details A, B & C **** 

**** DO NOT OVERTIGHTEN **** 


Detail D: 

Attach the nozzle onto the end of the 

boom arm and secure with poly spring 

clip. Repeat for other side. 


Detail E:  

Slide hose clamp onto the end of the 8” 

Feeder Hose and with a twisting motion, 

attach to the 90° HB Elbow on the  

manifold. 


The boom is 

now installed. 

Final Steps: 

Locate the  

Pressure Gauge in the parts 

bag and thread into the open 

port on the manifold. 

Locate the  

Bent Clevis Pin in the 

parts bag and place in 

the hole on the hitch. 

*** The Sprayer should now be ready for use *** 

Detail A 

Detail B 

Detail C 

Detail D  

Detail E  

Summary of Contents for 5302950

Page 1: ...hut off valve located at the inlet location of the tank towards the underside You must make sure the valve is in the open position before using your sprayer OWNER S MANUAL BEFORE RETURNING THIS PRODUCT FOR ANY REASON PLEASE CALL 1 800 831 0027 MONDAY FRIDAY 8 00 AM TO 5 00 PM CST If you should have a question or experience a problem with your Fimco Industries Product Visit our website www fimcoind...

Page 2: ...Page 2 Tires Contents of your sprayer s carton LG 30 3N TRL Tank Plumbing Pre Assembly Owner s Manual Contents of Parts Bag 5281138 Breakaway Boom Bracket Kit Tongue Assembly ...

Page 3: ...and the 2 Hose Wraps from the parts bag Place a screw through the holes in the hose wrap and bring it up to the tank Use the phillips head screwdriver to secure the holders in place Tighten so the holders are se cure Do Not Over Tighten Wrap the hose and clip in the handgun Do not use exces sive force when placing the handgun into the clips as this could cause breakage The telescoping Tongue Assem...

Page 4: ...18 x 5 8 Flanged Bolts and 2 Whiz Nuts Attach the Boom Top Straps to the Boom Assembly using the two bolts and whiz nuts Tighten all Bolts from Details A B C DO NOT OVERTIGHTEN Detail D Attach the nozzle onto the end of the boom arm and secure with poly spring clip Repeat for other side Detail E Slide hose clamp onto the end of the 8 Feeder Hose and with a twisting motion attach to the 90 HB Elbow...

Page 5: ...n disconnect the negative black connection and finally the positive red connection The lead wire has an On Off switch to activate the pump is on and O is off Fill the tank part way with water and then add the desired amount of chemical to be sprayed Finish filling tank to proper level Turn the pump on and by depressing the side of the rock er switch The pump is equipped with a pressure switch that...

Page 6: ... can change the flow rate and spray distribution Water rinse and dry the tips before storing WARNING Some chemicals will damage the pump valves if allowed to soak untreated for a length of time ALWAYS flush the pump as instructed after each use DO NOT allow chemicals to sit in the pump for extended times of idleness Follow the chemical manufacturer s instructions on disposal of all waste water fro...

Page 7: ...alve Check for clogged strainer filter Check for cracks in the pump housing Check for empty product supply Low Pressure Low Flow Check for leaks in the discharge line Check for restriction in the discharge line Check for debris in nozzle orifice Check for clogged strainer Check for proper voltage try another 12 volt battery Pulsating flow surging Low flow may cause pump to surge Spray wand is adju...

Page 8: ...an hour or so in the hot soapy solution and replace in the pump and reassemble the pump Most times this will restore most if not all of the prime of a pump If you re still having issues with pressure after this step it would be recommended to replace this part Checking the Pressure Switch If your motor is not running and you ve checked the following for loose wiring connections fuse the switch on ...

Page 9: ...Page 9 See Boom Assembly Detail Page 11 Exploded View Parts List LG 30 3N TRL 5302950 See Intake Assembly Detail Page 11 See Manifold Assembly Detail Next Page ...

Page 10: ...pray Height 20 22 above what is being sprayed to plant not ground Optimum Spray Height 20 110 wide tapered flat spray angle with air induction tech nology for better drift management Made of 2 piece UHMWPE polymer construction which provides excellent chemical resistance including acids as well as exceptional wear life Compact size to prevent tip damage Excellent for systemic products and drift ma...

Page 11: ...s with an On Off shut off valve located at the inlet location of the tank towards the underside You must make sure the valve is in the open position before using your sprayer See Page 9 for Part Numbers Manifold Detail Intake Detail ...

Page 12: ...obtain warranty service under this Limited Warranty you must 1 provide written notice to Fimco Ind of the defect during the Warranty Period and within thirty 30 days after the defect becomes apparent or the repair becomes necessary at the following address Fimco Ind 1000 Fimco Lane North Sioux City SD 57049 and 2 make the Equipment available to Fimco Ind or an authorized dealer within a reasonable...

Reviews: