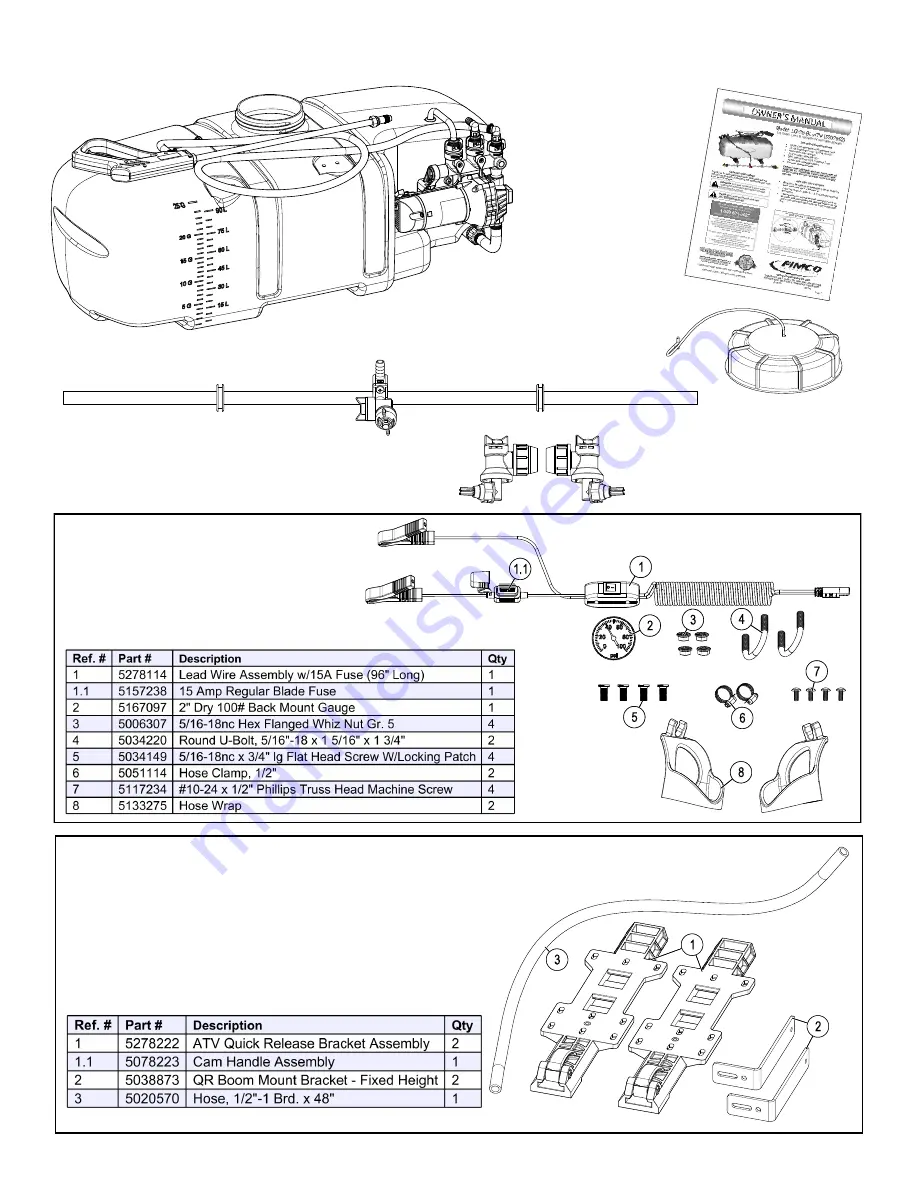
background image

Page 2 


Contents of your sprayer’s carton (LG-25-BL-ATV - 5302952): 

Contents of Parts Bag 

#5281094 

Contents of Bracket Kit 

#5278138 

“Wet Boom” Sub-Assembly 

(5275712) 

Lid w/Lanyard 

(#5058188) 

Tank/Plumbing Pre-Assembly 

Owner’s 

Manual 

End Nozzle (5275122) 

Pkg. of 2: #5275713 

Summary of Contents for LG-25-BL-ATV

Page 1: ...the inlet location of the tank towards the underside See Detail A You must make sure the valve is in the open position before using your sprayer Detail A OWNER S MANUAL BEFORE RETURNING THIS PRODUCT FOR ANY REASON PLEASE CALL 1 800 831 0027 MONDAY FRIDAY 8 00 AM TO 5 00 PM CST If you should have a question or experience a problem with your Fimco Industries Product Visit our website www fimcoindust...

Page 2: ...rayer s carton LG 25 BL ATV 5302952 Contents of Parts Bag 5281094 Contents of Bracket Kit 5278138 Wet Boom Sub Assembly 5275712 Lid w Lanyard 5058188 Tank Plumbing Pre Assembly Owner s Manual End Nozzle 5275122 Pkg of 2 5275713 ...

Page 3: ...nd beyond the back of the tank are facing you and just hanging over the edge of the table or flat surface you are assembling this on Secure the boom mounting brackets 5038873 to the tank mounting brackets with Cam handles as shown in Detail A You can position them as needed within the slot on the bracket Just be sure that the surfaces of both brackets are even with each other You are now ready to ...

Page 4: ...heck valve diaphragm can fall out during transport if the knob is not turned to the ON or OFF position Step 4 Assembly Procedure LG 25 BL ATV 1 Start by sliding Item 4 3 2 onto the boom tube Item 1 as shown leaving about 1 2 to 3 4 between the end of the boom tube and Item 2 Make sure the Long portion of Item 3 is facing the nozzle end 2 Slide the complete end nozzle assembly onto the stainless st...

Page 5: ...hose from around the tank may be difficult Detail A Install the pressure gauge Hand tighten securely DO NOT OVER TIGHTEN Detail B Screw the lid onto the tank Place the end of the lanyard through the tab in the tank This is so the lid can hang off the tank when filling rinsing the tank out Detail C Locate the 2 hose wraps and 4 phillips head machine screws from the parts bag A phillips head screwdr...

Page 6: ...Finish filling tank to proper level Turn the pump on and by depressing the side of the rock er switch The pump is equipped with a pressure switch that is pre set at the factory to shut the pump off when all discharges are closed The pump will turn back on when one of the following actions occurs Handgun lever is squeezed to spray the handgun Boom valve is opened to broadcast spray with the boom By...

Page 7: ...antifreeze into the tank so that when the pump is turned on you can pump the antifreeze throughout the entire plumbing system including the bypass Make sure to operate the boom and handgun until you see pink fluid spraying from the nozzles Leave any remaining antifreeze in the tank Before your next usage rinse the antifreeze from the sprayer with clean water It is nearly impossible to drain all of...

Page 8: ...r defective check valve Check for clogged strainer filter Check for cracks in the pump housing Check for empty product supply Low Pressure Low Flow Check for leaks in the discharge line Check for restriction in the discharge line Check for debris in nozzle orifice Check for clogged strainer Check for proper voltage try another 12 volt battery Pulsating flow surging Low flow may cause pump to surge...

Page 9: ...priming and you ve checked your filter screen and it s clean and you ve gone through the other trouble shooting tips you may need to clean the check valve Remove the head of the pump which is held on by 7 screws The first piece inside the head of the pump is called a check valve it s the part responsible for building up pressure and pumping water solution through the lines Clean the check valve un...

Page 10: ...Page 10 Exploded View Parts List LG 25 BL ATV 5302952 Intake Detail 5275877 Manifold Detail 5278781 ...

Page 11: ...Page 11 Boomless Wet Boom Assembly End Nozzle Assembly 5275122 Center Nozzle Assembly 5275123 ...

Page 12: ...obtain warranty service under this Limited Warranty you must 1 provide written notice to Fimco Ind of the defect during the Warranty Period and within thirty 30 days after the defect becomes apparent or the repair becomes necessary at the following address Fimco Ind 1000 Fimco Lane North Sioux City SD 57049 and 2 make the Equipment available to Fimco Ind or an authorized dealer within a reasonable...

Reviews: