background image

Page 3 


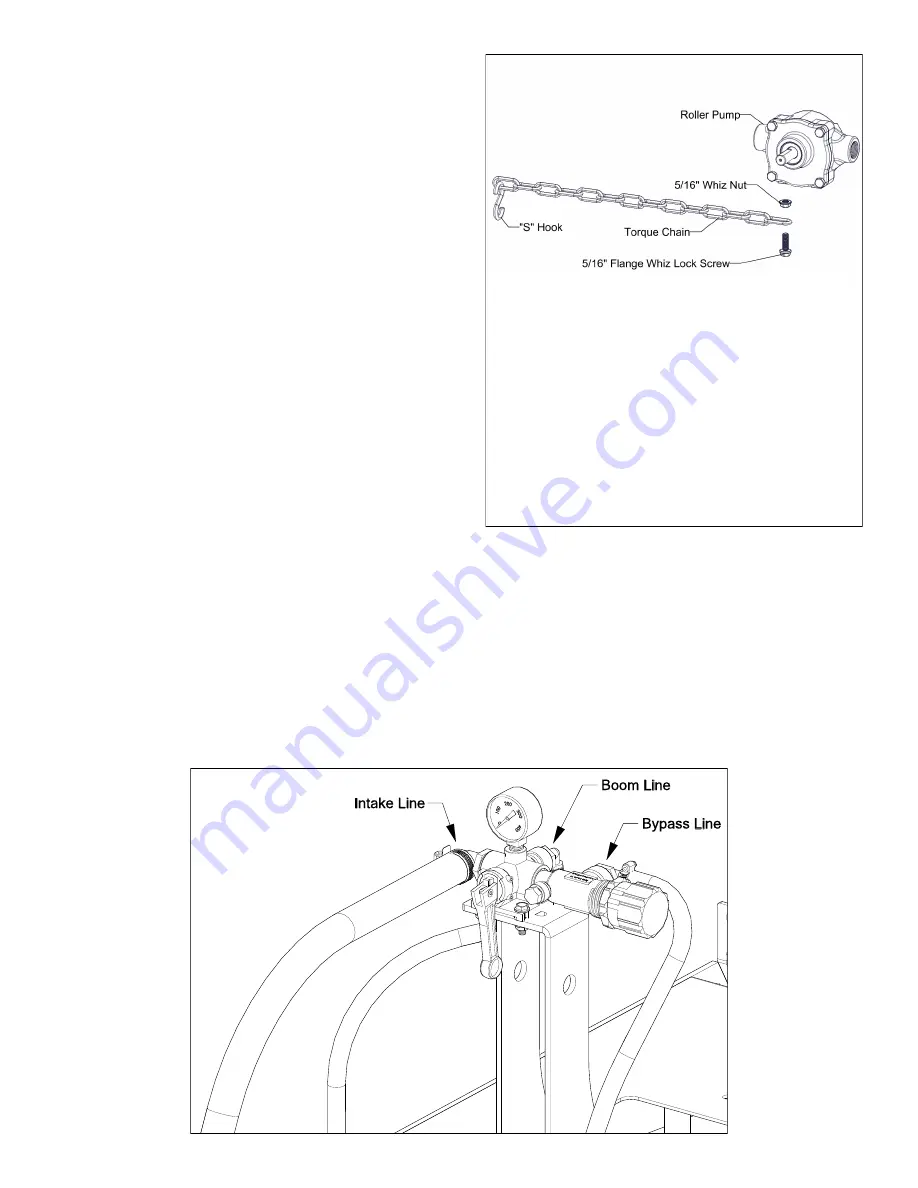
A torque chain, ‘S’ hook, nut and bolt are included in this assembly 

to secure your pump during operation. 


1. 

Attach one end of the torque chain over the threaded stem of 

the bolt 

2. 

Thread the whiz nut onto the bolt. Hand-tighten 

3. 

Thread the bolt, chain and nut ‘pre-assembly’ into the threaded 

hole on the underside of the pump. Tighten sufficiently 

4. 

Affix the ‘S’ Hook to your frame (or hitch). Wrap the chain 

around the frame or hitch and ‘S-Hook’ it in place. Make sure 

this connection is very secure! Not having a good, tight con-

nection may result in the pump spinning on your PTO shaft 

and damaging some components of your sprayer 


*** Insure that this connection point will not allow the roller pump to 

spin on the PTO shaft *** 

Torque Chain Attachment to a Roller Pump


Maintenance During/After Spraying 

Periodically check the strainer and clean the screen on your intake 

line. 


Proper care and maintenance will prolong the life of your sprayer. 


After use, fill the sprayer half way with clean water. Start the pump 

and allow the water to pump through the entire plumbing system and 

nozzles. Drain and then refill half full, add the recommended amount 

of a good quality tank cleaner, such as FIMCO Tank Neutralizer and 

Cleaner. (If no tank cleaner is available, you may substitute dish 

soap for this step).  Turn pump on and circulate through system for 

15 minutes and then spray out through boom and handgun nozzles. 

Refill sprayer half way with clean water and repeat. Follow the chemi-

cal manufacturer’s disposal instructions of all wash or rinsing water.  


If boom or handgun nozzles need cleaning, remove them from the 

sprayer and soak in warm soapy water. Clean with a soft bristled 

brush or toothpick if necessary. Never use a metal object. Even the 

slightest damage can change the flow rate and spray distribution. 

Water rinse and dry the tips before storing. 


WARNING: 

Some chemicals will damage the pump valves if al-

lowed to soak untreated for a length of time! ALWAYS  flush the 

pump as instructed after each  use. DO NOT allow chemicals to sit in 

the pump for extended times of idleness. Follow the chemical manu-

facturer’s instructions on disposal of all waste water from the sprayer.


Winter Storage 

Drain all water out of your sprayer, paying special attention to the 

pump, handgun and valve(s). These items are especially prone to 

damage from chemicals and freezing weather. 


The sprayer should be winterized before storage by pumping a solu-

tion of automotive antifreeze (containing a rust inhibitor) through the 

entire plumbing system. This antifreeze solution should remain in the 

plumbing system during the winter months. When spring time comes 

and you are preparing your sprayer for the spray season, rinse the 

entire plumbing system out, clearing the lines of the antifreeze  

solution.  


Proper care and maintenance will prolong the life of your  

sprayer. 

Summary of Contents for LG-60-3PT

Page 1: ... are included to be joined to the pump A torque chain S Hook and hardware are also in cluded for the pump The pump IS NOT included with this unit It is intended for a pump to be mounted directly to the tractor PTO Category I Caution When fully filled with water this sprayer will weigh approx 715 lbs Consult the owner s manual for your vehicle to verify that you are within it s load carrying capaci...

Page 2: ...structed after each use DO NOT allow chemicals to sit in the pump for extended times of idleness Follow the chemical manufacturer s instructions on disposal of all waste water from the sprayer When you are ready to spray mix chemicals as follows Add the proper amount of water to the tank Run the sprayer while adding chemical to the water Do NOT spray through the boom at this time This will allow t...

Page 3: ...e through system for 15 minutes and then spray out through boom and handgun nozzles Refill sprayer half way with clean water and repeat Follow the chemi cal manufacturer s disposal instructions of all wash or rinsing water If boom or handgun nozzles need cleaning remove them from the sprayer and soak in warm soapy water Clean with a soft bristled brush or toothpick if necessary Never use a metal o...

Page 4: ...ay control Fimco Mfg Part 5143316 AA6B 5168718 PK AB6B KIT Description Directo Valve AA6B Repair Kit Items Marked Ref Fimco Mfg Part Description Qty 1 5002476 CP36303 PP Poly Body AA6B 1 2 CP36307 PPB Washer 2 3 CP38726 VI Shut Off Washer Viton 1 4 CP36306 302SS Spring 1 5 CP36304 SS Stem 1 6 CP7717 2 108 VI O Ring Viton 1 7 CP7717 2 209 VI O Ring Viton 1 8 5086043 CP36302 PP Poly Body Insert Blac...

Page 5: ...Page 5 Pump NOT Included See Valve Detail Page 7 See Strainer Detail Page 7 Exploded View Parts List LG 60 3PT 5301160 Refer to Parts List Below for Part Numbers ...

Page 6: ...Minimum Spray Height 16 18 above what is being sprayed to plant not ground Optimum Spray Height 20 110 wide tapered flat spray angle with air induction tech nology for better drift management Made of 2 piece UHMWPE polymer construction which provides excellent chemical resistance including acids as well as exceptional wear life Compact size to prevent tip damage Excellent for systemic products and...

Page 7: ...Page 7 NOTES Valve Sub Assembly 5277756 Strainer Sub Assembly 5274745 Only Available in Complete Assembly Refer to Parts List Page 5 for Part Numbers ...

Page 8: ...Warranty you must 1 provide written notice to Fimco Ind of the defect during the Warranty Period and within thirty 30 days after the defect becomes apparent or the repair becomes necessary at the following address Fimco Ind 1000 Fimco Lane North Sioux City SD 57049 and 2 make the Equipment available to Fimco Ind or an authorized dealer within a reasonable period of time For more information about ...

Reviews: