background image

22

Nastavení cílového pulsu Target HR

Pomocí kolečka vyberte TAG v programu Cardio a potvrďte
jej stiskem MODE.
Požadovanou hodnotu pulsu nastavte kolečkem.
Stiskněte MODE pro potvrzení výběru a další nastavení.
Dále začne blikat „TIME“. Nastavte požadovaný čas
cvičení pomocí kolečka. Nastavení času
není povinné. Stiskněte Start pro zahájení cvičení.
Stiskněte Start pro zahájení cvičení.

5.3.2.1 WATT

Vyberte WATT pomocí kolečka.
Stiskněte MODE pro potvrzení výběru a další nastavení.
Začne blikat „WATT“. Pomocí kolečka nastavte
požadovanou hodnotu. Když je překročen limit pulsu,
ozve se alarm
Dále začne blikat „TIME“. Nastavte požadovaný čas
cvičení pomocí kolečka. Nastavení času
není povinné. Stiskněte Start pro zahájení cvičení.
Stiskněte Start pro zahájení cvičení.

5.3.7 Uživatelské programy

Můžete si vytvořit a uložit vlastní program.

Vyberte "U" pomocí kolečka.

Stiskněte MODE pro potvrzení.

Otáčením kolečka nastavte zátěž pro první sloupec.
Stiskněte MODE pro potvrzení. Začne blikat další sloupec.
Nastavte zátěž stejným způsobem.

Stiskněte MODE a nastavte délku tréninku. Celková doba
tréninku se rozdělí na 8 částí dle 8 sloupců.

Stiskněte Start pro zahájení cvičení.

How to deal TargetHR

You may select “TA” with the Push and Turn-button.

Confirm by pressing MODE. 

The exercise heartrate can be set by turning the Push and Turn-

button 

Press MODE

Next is Time. You may adjust the Time with the Push and Turn-

button . It is not a must to set the time. 

Press START and your excercise begins.

5.3.2.1 Watt 

Choose WATT with the Push and Turn-button.

Press MODE.

Next is WATT. You may adjust the Watt value with the Push and 

Turn-button. I

Next is Time. You may adjust the Time with the Push and Turn-

button. It is not a must to set the time. 

Press START and your excercise begins.

5.3.7 User program

The Computer has the possibility to save your own designed 

profile.

Select ““U by using the Push and Turn button 

Press MODE to confirm the selection.

By rotating the Push and Turn button, the resistance level for 

the first bar can be set. If it is done press MODE to confirm 
it. The next bar is blinking. do it in the same way as described 
before,

Press MODE for the seconds and adjust the exercise time. the 

exercise time for each bar will be calculated by: total exercise 
time/8.

Press START to activate your exercise.

5.3.8 Připojení k aplikaci

Stáhněte si a nainstalujte aplikaci „I “ z Apple
Store nebo Google Play.
Aktivujte „Bluetooth“ na svém smartphonu nebo tabletu.
Otevřete aplikaci „I “.
Spojte zařízení s počítačem stiskem tlačítka v levém
horním rohu.
Stiskněte znovu tlačítko Bluetooth.
Na displeji se zobrazí i-0044. Potvrďte počítač
stiskem tlačítka. Po správném propojení se displej počíta-
če
vypne. Funkce nyní ovládáte pomocí aplikace na svém
chytrém zařízení.

5.3.8 Connecting the APP 

Download and install „I Console“ from the apple store or google 

play store. 

Activate bluetooth in your smartphone or tablet.

Open „I Console“.

Connect your device with the computer by pressing the button 

on the left upper corner. 

Press again the bluetooth button.

I- and a number appear on the display. Confirm the 

computer by pressing the button. the display will be switched off 
after a stable connection. 

Summary of Contents for 3211V2

Page 1: ...U ivatelsk n vod...

Page 2: ...ctions 02 2 General 03 2 1 Packaging 03 2 2 Disposal 03 3 Assembly 04 3 1 Assembly Steps 04 4 Care and Maintenance 18 5 Computer 18 5 1 Computer keys 18 5 2 Computer functions 19 5 3 Computer function...

Page 3: ...NT The Cross Trainer Ergometer is produced according to ISO EN 20957 1 9 class HA Max user weight is 130 kg The elliptical should be used only for its intended purpose Any other use of the item is pro...

Page 4: ...n domovn odpad This training equipment is for use at home The equipment complies with the requirements of EN ISO 20957 1 9 Class HA The CE marking refers to the EU Directive 2014 30 EU and 2014 35 EU...

Page 5: ...h min 1 5m In order to make assembly of the item as easy as possible for you we have preassembled the most important parts Before you assemble the equipment please read these instructions carefully an...

Page 6: ...05 Krok Step 2...

Page 7: ...06 Krok Step 3...

Page 8: ...07 Krok Step 4...

Page 9: ...08 Krok Step 5...

Page 10: ...09 Krok Step 6 Vlo te pin 105 dovnit otvoru...

Page 11: ...10 Krok Step 7...

Page 12: ...11 Krok Step 8...

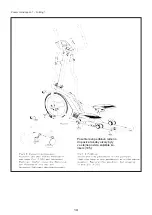
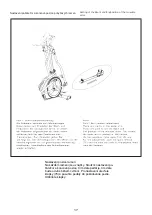
Page 13: ...12 Krok Step 9 Pro cvi en uvoln te kol k 76 a nasu te rameno Pot kol k ut h n te Uvoln te pin 95 vyta en m o 1 2 zoubky Posunujte podp rnou ty do l dokud neusly te cvaknut Pin znovu ut hn te Mazivo...

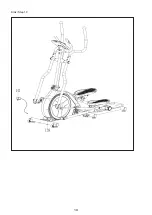
Page 14: ...13 Krok Step 10...

Page 15: ...14 Zusammenklappen 1 Folding 1 Posu te lev ped lov rameno do pozice tak aby otvory byly ve stejn pozici a zajist te ko l kem 105...

Page 16: ...15 Skl d n 2 Folding 2 Uvoln te pin 95 o 1 2 zoubky vyt hn te ven Posunujte ty vzh ru dokud neusly te cvaknut Pin ut hn te Uvoln te kol k 76 a posunuj te spojovac rameno Ut hn te kol k...

Page 17: ...ng 3 Skl d n 4 Folding 4 Zvedn te fixa n pin a oto te madla proti sm ru hodi nov ch ru i ek abyste je za jistili Nadzvedn te zadn st stroje tak aby z stal ne 3 kole k ch Nyn m ete trena r p esunout na...

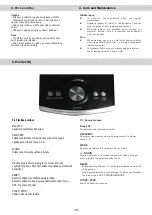
Page 18: ...Start and Endposition of the movable arms Nastaven pozice ramen Na ka d m rameni jsou zna ky Slou k nastaven po te n a koncov pozice m d le ped l je t m d le bude od v s b hem cvi en Pro nastaven ote...

Page 19: ...with a damp cloth 4 P e a dr ba 4 Care and Maintenance 18 5 Po ta D 5 1 Tla tka po ta e Body FAT Spust m en t lesn ho tuku RECOVERY Stiskem aktivujete funkci obnovy srde n ho tepu a zjist te svou fit...

Page 20: ...u will get the grade F1 very good A Waking up the computer from the snooze mode To reactivate the computer from the snooze mode press any button please A pedalling has no function in this mode 5 2 Fun...

Page 21: ...d Turn button to select the age and confirm by pressing MODE 5 Turn the Push and Turn button to select the bodyheight in cm and confirm by pressing MODE 6 Turn the Push and Turn button to adjust the w...

Page 22: ...ART and your excercise beginns A heartrate symbol followed by a questionmark shows you the searching for the heartrate If the heartrate cannot be detected a beep will indicate it 21 Za ne blikat CALOR...

Page 23: ...and Turn button Press MODE Next is WATT You may adjust the Watt value with the Push and Turn button I Next is Time You may adjust the Time with the Push and Turn button It is not a must to set the ti...

Page 24: ...belt strap incorrectly positioned Error Step resistance cannot be regulated Cause Mechanics control system Error Wobbly equipment Cause Uneven floor Stand feet are loose What to do Plug the power supp...

Page 25: ...the scope of delivery Connect the cable from the power supply to the respective socked on the lower rear end of the housing Power Supply Specification Input 230 V 50Hz Output 9V 2000mA Use only the p...

Page 26: ...t training for strengthening important muscle groups and the cardio circula tory system General notes for Training Never train immediately after a meal If possible orient training to pulse rate Do mus...

Page 27: ...te Because there are persons who have high and low pulses the individual optimum pulse zones aerobic zone anaerobic zone may differ from those of the general public target pulse diagram In these cases...

Page 28: ...rgie t la When condition has improved higher intensity of training is required in order for the pulse rate to reach the training zone that is the organism is capable of higher performance You will rec...

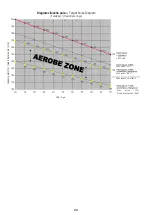
Page 29: ...Diagram c lov ho pulsu Target Pulse Diagram Puls V k Heart Rate Age Srde n puls Min Heart Rate beats min V k Age 220 v k Max pulsu 90 Max pulsu 70 Doporu en spodn limit Max pulsu 85 Doporu en horn lim...

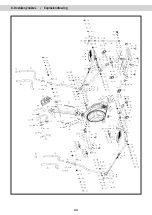
Page 30: ...8 Rozlo en n kres Explosiondrawing 29...

Page 31: ...30...

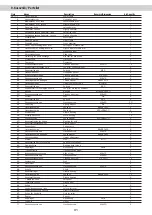
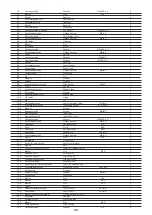
Page 32: ...ad screw M8x50 4 31 Mutter Nut M8 8 32 Kunststoffkappe Endcap 32 4 33 Sechskantschraube Hexhead screw M8x20 20 34 Federring Spring washer 8 17 35 Unterlegscheibe Washer 8x 33x2 0 4 36 Unterlegscheibe...

Page 33: ...ST 2 9x12 2 108 Stopper Stopper 2 109 Augenschraube Eyebolt M8x65 1 110 Riemenspanner Idler wheel 1 111 Riemenspannrolle Idler wheel roller 1 112 Unterlegscheibe Washer 6x 12x1 0 1 113 Sechskantschra...

Page 34: ...33 sti ozna en hv zdi kou se ast m u it m opot ebov vaj a je vhodn je kontrolovat p padn kontaktujte z kaznick servis The part numbers with an are wear and tear parts which are subject to natural wear...

Reviews: