background image

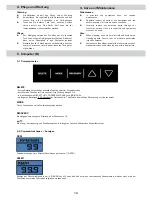
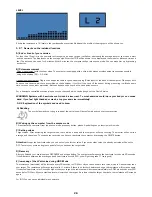
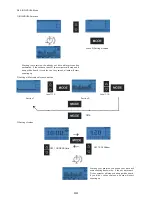
LEVEL

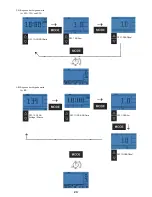
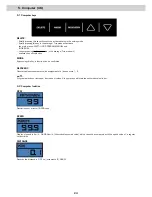
Shows the resistance in 16 levels in the rpm-dependant exercise. Additional the profile of the programs, will be shown, too.

5.2.1  Remarks on the individual functions

A) End or break of your exercise

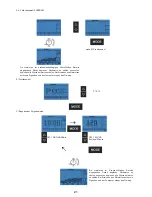
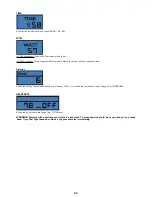
For less than 15rpm/min the computer will recognice an end or break. It will show alternativly the average data for rpm, speed, watt 

and the heartrate. The display shows the average sign. After that TRIP will be shown in the display and the values for distance, time and 
kcal. The datas can be seen for 4 minutes. After 4 minutes, the computer will go into snooze mode. You can wake him up by pressing 
any button.

B) Pulsemeasurement 

Pulse measurement with the chest strap: The computer is equipped with a chip, which makes wireless pulse transmission possible 
using a chest strap (5.0 – 5.5 kHz). 

Handpulse measurement: Plug in the hand pulse cable in the hand pulse plug (Pulse input) at the back of the computer. Please put both 
hands on the sensors, which are assembled on the handlebar. If you lift off one hand off the sensor during measuring, it will take some 
time to reach the correct watt value. Both hands have to be kept on the hand pulse sensors.

For a heartrate controlled exercise, please use the chestbelt, which can be bought at the Finnlo Service.

WARNING: Systems with heartrate control can be incorrect. To much exercise could injure your body or can cause 

dead. If you feel light theaded or weak, stop your exercise immediately!

5.2.2 Explanation of the symbols and need to know

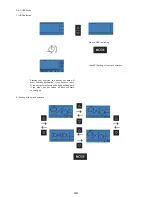
The symbol demand you to begin to pedal. the set values will be confirmed and you start your exercise.

A) Pedalling

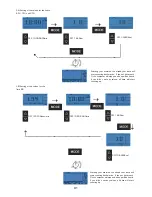
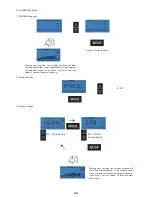
C) Setting values

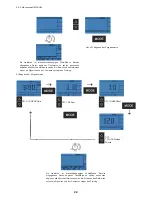
Target values: After achieving the target values, there will be a beep and the computer will stop counting. The monitor will show the 
average and trip values. To continue your exercise, you have to reactivate the computer by pressing the DELETE button.

Attention:

 Except the heartrate value, you can set only one further value. If you set another value, the already set value will be set to 

OFF. To start your exercise, beginn to pedal, after you have set the target value.

D) Recovery

After you finished your exercise press RECOVERY and stop pedalling. The computer will measure the heartrate for the next 60 seconds. 
If the difference between the starting and end heartrate is around 20%, you will get the grade F1 (very good).

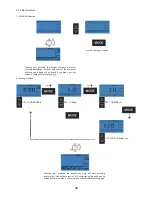
E) Increasing of the Watt value during HRC -Mode

The resistance (watt value) will be increase every 30 seconds for 10 Watt, till you reach a heart rate value, which is 5 beats lower than 
your target. The resistance will stay at this level for 1 minute. If there is no further heartrate change, the resistance will increase again. 
If the actual heartrate is for 5 seconds higher than your target, the resistance will decrease immediately for 20 Watt and than every 20 
seconds for 10 Watt, till your actual heartrate is lower than the target. If it is lower than the target heartrate, the resistance will increase 
again.

For IND: You can set an individual max heartrate. 

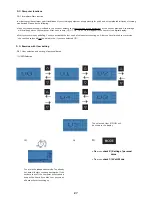
B) Waking up the computer from the snooze mode

To reactivate the computer from the snooze mode, press any button, please. A pedalling has no function in this mode.

26

Summary of Contents for Exum 3157

Page 1: ......

Page 2: ...ahl MANUAL 5 4 6 Menüauswahl INDIVIDUAL 1 Safety instructions 03 2 General 04 2 1 Packaging 04 2 2 Disposal 04 3 Assembly 05 3 1 Check list 05 3 2 Assembly Steps 06 3 3 Adjust for perfect saddle postion 11 3 4 Handlebar adjustment 11 3 5 Height adjustment 12 4 Care and Maintenance 13 13 13 12 15 15 16 16 16 16 18 19 21 22 23 5 Computer 24 5 1 Computer keys 24 5 2 Computer functions 24 5 2 1 Remark...

Page 3: ...nings duration 38 8 Explosion drawing 40 9 Parts list 42 10 Warranty Germany only 43 11 44 6 Technische Details 6 1 Netzgerät im Lieferumfang enthalten 7 Trainingsanleitung 7 1 Trainingshäufigkeit 7 2 Trainingsintensität 7 3 Pulsorientiertes Training 7 4 Trainings Kontrolle 7 5 Trainingsdauer 8 Explosionszeichnung 9 Teileliste 10 Garantie 11 Service Hotline Ersatzteilbestellformular ...

Page 4: ...dass sich nicht Dritte in der Nähe des Gerätes befinden da weitere Personen durch die beweglichen Teile verletzt werden könnten 16 Das Trainingsgerät darf nicht in feuchten Räumen Bad oder auf dem Balkon aufgestellt werden IMPORTANT The Ergometer is produced according to DIN EN 957 1 5 class HA Max user weight is 150 kg The Ergometer should be used only for its intended purpose Any other use of th...

Page 5: ...e sind gemäß ihrer Kennzeichnung wiederver wertbar Mit der Wiederverwendung der stofflichen Verwertung oder anderen Formen der Verwertung von Altgeräten lei sten Sie einen wichtigen Beitrag zum Schutze unserer Umwelt Bitte erfragen Sie bei der Gemeindeverwaltung die zuständige Entsorgungsstelle This training equipment is for use at home The equipment complies with the requirements of DIN EN 957 1 ...

Page 6: ... Stand hat Achten Sie darauf dass Sie während des Zusammenbaus in jede Richtung hin genügend Bewegungsfreiraum mind 1 5 m haben 3 1 Checkliste In order to make assembly of the Ergometer as easy as possible for you we have preassembled the most important parts Before you assemble the equipment please read these instructions care fully and then continue step by step as described Contents of packagin...

Page 7: ...3 2 Montageschritte Assembly steps Schritt Step 1 06 ...

Page 8: ...Schritt Step 2 07 ...

Page 9: ...08 Schritt Step 3 Schritt Step 4 ...

Page 10: ...09 Schritt Step 6 Schritt Step 5 ...

Page 11: ...10 Schritt Step 7 Schritt Step 8 ...

Page 12: ... ziehen an der Sattelspitze Ist eine komfortable Neigung erreicht drehen Sie die zuvor geöffneten Muttern der Sattelgestells mit dem passenden Werkzeug wieder zu 3 4 Lenkerverstellung Nach dem Lösen der Flügelschraube können Sie durch Neigen des Lenkers die für Sie bequemste Lenkerposition auswählen 3 3 How to adjust the saddle postion Height of the saddle Most important is the correct height of t...

Page 13: ... bewirkt ein Herausdrehen der Höhenverstellung Achten Sie darauf dass sich noch genügend Gewindegänge in der Fußkappe befinden 3 5 Height adjustment Turning the height adjustment screws can solve the wobble of the ergometer Turn the screw anti clockwise increases the height Please pay attention that there is enough thread left in the foot cap ...

Page 14: ...ment must not be used Care When cleaning use only a moist cloth and avoid harsh cleaning agents Ensure that no moisture penetrates into the computer Components handlebar saddle that come into contact with perspiration need cleaning only with a damp cloth 5 Computer D 5 1 Computertasten DELETE kurzes Betätigen löscht den aktuellen Funktionswert im Vorgabemodus durch kurzes Drücken im Durchschnitt T...

Page 15: ...nd Widerstandsstufe an KCAL Zeigt den Kilokalorienverbrauch mit einem Wirkungsgrad von 22 zum Aufbringen der mechanischen Leistung an Anzeige von 10 9990Kcal PULSE Pulswertanzeige Wertebereich von 40 199 Schlägen pro Minute Sie zeigt zusätzlich den errechneten oder vorgegeben Pulswert an WARNUNG Systeme der Herzfrequenzüberwachung können ungenau sein Übermäßiges trainieren kann zu ernsthaftem gesu...

Page 16: ...es Das Symbol fordert Sie zum Treten auf Sie bestätigen somit Ihre eingegeben Daten und beginnen mit Ihrem Training A Tretsymbol B Aktivierung des Computers aus dem Schlummermodus Um den Computer aus dem Schlummermodus zu aktivieren drücken Sie irgendeine Taste Ein Treten bewirkt keine Aktivierung C Vorgabewerte Vorgabewerte Nach Erreichen des Vorgabewertes ertönt ein Signalton und der Computer st...

Page 17: ...en Sie Ihr Training indem Sie zu Treten beginnen Alle Daten beginnen aufwärts zu zählen Befinden Sie sich im Benutzer U0 werden die Trainingsdaten nach Beendigung des Trainings nicht gespeichert 1 USER Auswahl 3s drücken siehe 2 Eingabe der persön lichen Daten 1s drücken siehe 3 Watt B Der angewählte User U0 U4 wird angezeigt oder Sie trainieren im drehzahlunabhängigen Watt Modus Bereits eingegebe...

Page 18: ...17 a Alter 20 90 Jahre A B Sie gelangen zur Menüauswahl siehe 5 4 2 2 Eingabe der persönlichen Daten ...

Page 19: ...F 10 9990Kcal OFF 120 199 Schläge Minute Sie trainieren im drehzahlunabhängigen Watt Modus Bereits eingegebene Daten beginnen Rückwärts zu zählen ansonsten beginnen alle Werte aufwärts zu zählen Bei Erreichen des Zielwertes ertönt ein Signalton und der Computer stoppt das Training B Eingeben der Vorgabewerte ...

Page 20: ...nze siehe 2 Auswahl der max Pulsgrenze Bereits eingegebene Daten beginnen Rückwärts zu zählen ansonsten beginnen alle Werte aufwärts zu zählen Bei Erreichen des Zielwertes ertönt ein Signalton und der Computer stoppt das Training Menüauswahl HRC blinkt ...

Page 21: ... 3A Eingeben der Vorgabewerte für 65 75 und 90 3B Eingeben der Vorgabewerte für IND OFF 10 00 99 00min OFF 1 999km OFF 1 9990Kcal OFF 10 00 99 00min OFF 1 999km OFF 10 9990Kcal OFF 120 199 Schläge Minute ...

Page 22: ... beginnen Rückwärts zu zählen ansonsten beginnen alle Werte aufwärts zu zählen Bei Erreichen des Zielwertes ertönt ein Signalton und der Computer stoppt das Training Sie trainieren im drehzahlunabhängigen Watt Modus Bereits eingegebene Daten beginnen Rückwärts zu zählen ansonsten beginnen alle Werte aufwärts zu zählen Bei Erreichen des Zielwertes ertönt ein Signalton und der Computer stoppt das Tr...

Page 23: ...nnen alle Werte aufwärts zu zählen Bei Erreichen des Zielwertes ertönt ein Signalton und der Computer stoppt das Training siehe 2 Eingeben der Vorgabewerte 2 Eingeben der Vorgabewerte Sie trainieren im drehzahlabhängigen Watt Modus Bereits eingegebene Daten beginnen Rückwärts zu zählen ansonsten beginnen alle Werte aufwärts zu zählen Bei Erreichen des Zielwertes ertönt ein Signalton und der Comput...

Page 24: ... 1 16 Länger als 2s gedrückt halten Bereits eingegebene Daten beginnen Rückwärts zu zählen ansonsten beginnen alle Werte aufwärts zu zählen Bei Erreichen des Zielwertes ertönt ein Signalton und der Computer stoppt das Training Bereits eingegebene Daten beginnen Rückwärts zu zählen ansonsten beginnen alle Werte aufwärts zu zählen Bei Erreichen des Zielwertes ertönt ein Signalton und der Computer st...

Page 25: ... user selection MODE By pressing this key a function can be confirmed RECOVERY Recovery pulse measurement with assignment of a fitness score 1 6 Program selection or increase decrease of values A longer press will start the automatic value finder 5 2 Computer funktion RPM Revolutions per minute 15 200rpm SPEED Display of speed in km h 0 99 99km h theoretical assumed value which cannot be compared ...

Page 26: ... the resistance level Calories Shows the energy consumption based on a efficiency of 22 to provide the mecahnical power Range from 10 9990Kcal HEARTRATE Shows the actual heartrate range from 70 199bpm WARNING Systems with heartrate control can be incorrect To much exercise could injure your body or can cause dead If you feel light theaded or weak stop your exercise immediately 25 ...

Page 27: ...to know The symbol demand you to begin to pedal the set values will be confirmed and you start your exercise A Pedalling C Setting values Target values After achieving the target values there will be a beep and the computer will stop counting The monitor will show the average and trip values To continue your exercise you have to reactivate the computer by pressing the DELETE button Attention Excep...

Page 28: ...he digital display Start your exercise by pedalling You have activated the last used all values start counting up After you have finished your exercise the reached values will not be safed in the if you have selected U0 3s press check 2 Setting of personal datas 1s press check 3 Watt Mode B 1 USER Selection The selected User U0 U4 will be shown in the display or 5 4 1 User selection and setting of...

Page 29: ...a Age 20 90 years A B You are in the main menue check 5 4 2 Watt Mode 2 Setting of personal datas 28 ...

Page 30: ...min OFF 1 999km 50 250Watt OFF 10 9990Kcal OFF 120 199bpm Starting your exercise the already set data will start counting backwards If the set data reach 0 the computer will stop and a beep will be heard If you didn t set any values all data will start counting up 2 Setting of values 29 ...

Page 31: ... the max heartrate 1 HRC Selection Starting your exercise the already set data will start counting backwards If the set data reach 0 the computer will stop and a beep will be heard If you didn t set any values all data will start counting up Menue HRC is blinking 30 ...

Page 32: ...se the already set data will start counting backwards If the set data reach 0 the computer will stop and a beep will be heard If you didn t set any values all data will start counting up Starting your exercise the already set data will start counting backwards If the set data reach 0 the computer will stop and a beep will be heard If you didn t set any values all data will start counting up OFF 12...

Page 33: ...If the set data reach 0 the computer will stop and a beep will be heard If you didn t set any values all data will start counting up Starting your exercise the already set data will start counting backwards If the set data reach 0 the computer will stop and a beep will be heard If you didn t set any values all data will start counting up OFF 10 00 99 00min OFF 120 199 Schläge Minute 32 ...

Page 34: ...If you didn t set any values all data will start counting up check 2 Setting of values 2 Setting of values Starting your exercise the already set data will start counting backwards If the set data reach 0 the computer will stop and a beep will be heard If you didn t set any values all data will start counting up 33 OFF 01 00 99 00min OFF 1 999km OFF 10 9990Kcal OFF 120 199 beats min ...

Page 35: ...tarting your exercise the already set data will start counting backwards If the set data reach 0 the computer will stop and a beep will be heard If you didn t set any values all data will start counting up Starting your exercise the already set data will start counting backwards If the set data reach 0 the computer will stop and a beep will be heard If you didn t set any values all data will start...

Page 36: ...en Netztrennung ist der Netzstecker aus der Steckdose zu ziehen Das Gerät deshalb nur an leicht zugängliche Steckdosen anschließen 6 1 Power Supply included in the scope of delivery Connect the cable from the power supply to the respective socked on the lower rear end of the housing Power Supply Specification Input 230 V 50 Hz Output 29 V 2500 mA Use only the power supply included in the scope of ...

Page 37: ...e später bei gleichem Puls eine höhere Leistung vollbringen was eine Verbesserung der Form bedeutet Wenn Sie mit pulsgesteuertem Training bereits Erfahrung haben können Sie Ihre gewünschte Pulszone Ihrem speziellen Trainingsplan bzw Fitnessstand anpas sen Training with the Ergometer is an ideal movement training for strengthening important muscle groups and the cardio circula tory system General n...

Page 38: ...ellen Leistungsfähigkeit sollte im darauffolgenden Training immer eine regene rative Trainingseinheit im unteren Pulsbereich folgen bis 75 des Maximalpulses Note Because there are persons who have high and low pulses the individual optimum pulse zones aerobic zone anaerobic zone may differ from those of the general public target pulse diagram In these cases training must be configured according to...

Page 39: ...ird daRüber hinaus auch Fett verbrannt Nach 30 40 Minuten wird der Fettstoffwechsel aktiviert danach ist das Körperfett der hauptsächliche Energielieferant When condition has improved higher intensity of training is required in order for the pulse rate to reach the training zone that is the organism is capable of higher performance You will recognize the result of improved condition in a higher fi...

Page 40: ...mm Target Pulse Diagram Herzfrequenz Alter Heart Rate Age Herzfrequenz Herzschlag Min Heart Rate beats min Alter Age 220 Age Max heartrate 90 Max heartrate 70 Suggested lower limit Max heartrate 85 Suggested upper limit ...

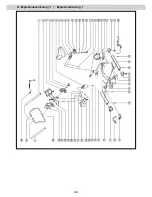
Page 41: ...8 Explosionszeichnung 1 Explosiondrawing 1 40 ...

Page 42: ...Explosionszeichnung 2 Explosiondrawing 2 41 ...

Page 43: ...zschlitzschraube Cross head screw ST2 9x16 4 29 Lenker Handlebar 1 30 Kunststoffkappe Plastic cap 2 31 Abdeckkappe für Tretkurbel Round plug for crank 2 32 Gerändelte Mutter Serrated nut M10x1 25 2 33L Tretkurbel links Crank left side 1 33R Tretkurbel rechts Crank right side 1 34L Gehäusehälfte links Housing left side 1 34R Gehäusehälfte rechts Housing right side 1 35 Kreuzschlitzschraube Cross he...

Page 44: ...htung der Betriebsanleitung oder Wartung aufgetreten sind oder falls das Gerät mechanische Beschädigungen irgendwelcher Art aufweist Der Kundendienst kann Sie nach telefonischer Rücksprache zur Reparatur bzw zum Tausch von Teilen welche Sie zugesandt bekommen ermächtigen In diesem Fall erlischt der Garantieanspruch selbstverständlich nicht 4 Garantieleistungen bewirken weder eine Verlängerung der ...

Page 45: ...Von Liebig Str 21 89231 Neu Ulm Ort Datum Ersatzteilbestellung Bitte in Druckbuchstaben ausfüllen Kaufdatum Gekauft bei Firma Garantieansprüche nur in Verbindung mit einer Kopie des Kaufbeleges Bitte liefern Sie mir folgende Ersatzteile Bitte leserlich schreiben Position Bezeichnung Stückzahl Bestellgrund S E R V I C E H O T L I N E 44 Käufer Name Vorname Strasse Hausnr PLZ Wohnort Telefon Fax E M...

Reviews: