background image

RPM/SPEED: Deze functie laat de snelheid zien in Km/Hr  (0-
99.9Km/Hr) en de trapfreqentie in RPM (rotaties per minuut van 
0-999).  De waarden worden afwisselend in kh/hr en RPM 
getoond.


RPM/SPEED: This function range  is showing Speed  [Km/H)


[0-99.9Km/H) and  RPM [0-999)  on a  rotating  basis.


SCAN: Automatische wisseling tussen functies na ca.  6sec.


SCAN:    Automatic  change  between  all function values every


6  seconds.


TIME:  Deze functie toont de  trainingstijd van 00:00 tot 99:00 
minuten. Het trainingsverloop wordt per seconde getoond. De 
trainingstijd kunt u met de SET toets instellen.


TIME:  Exercise time  [00:00-99:00 minutes).  The time  can  be


set  by using the  "SET"-  button.


DISTANCE:  Deze functie toont de afstand binnen een 
range van 0.0 tot 99.55  km in stappen van 50m.  De 
trainingsafstand kunt u met de SET toets instellen. 


DISTANCE:  0.0-99.5 km range.  Distance  will  be  shown  in


100m Steps.  The distance  can  be  set  by using the  "SET"- 
button.


CALORIES:  Deze functie toont het calorieverbruik (0.0 tot 
9990 Kcal.) in stappen van 1 Kcal. Het calorieverbruik 
verschilt per leeftijd, geslacht en conditie van de gebruiker. De 
calorie doelstelling voor een training kunt u instellen met de 
SET toets. 


CALORIES:  Shows  the  approx. calories  consumption  0.0-990


Kcal.  which differs  naturally according  to  age,  sex  and  basic 
conditions  of the  user.  The calories  consumption  can  be  set 
by using the  "SET"-  button.


PULSE:   Shows  the  actual  heart  rate  from  72-240 bpm.


The max heart  rate  can  be  set  by using the  "SET"-  button.


PULSE:   Deze functie laat de actuele hartslag zien binnen de 
range van 72  –  240 slagen per minuut,  in stappen van 1 
hartslag per minuut.  De maximale hartslag voor een training 
kunt u instellen met de SET toets.


5.3  Computerfuncties


5.3  Computer functions


5.3.1 Plaatsing van de batterijen 
 Plaats 2 AA batterijen in het batterijvakje aan de achterzijde van 
de computer. Let op dat u de batterijen correct plaatst (+ en -).


5.3.1  Insert the batteries


Use  2pcs  of AA  batteries and  put  them  into the  batteries case 
at  the  backside  of the  computer.  Pay attention  to  the  correct 
polarity.


5.3.2  Kamertemperatuur:


Na het plaatsen van de batterijen, zal de computer de gemeten 
kamertemperatuur tonen  in 

°

C.


5.3.2 Room  temperature


After inserting  the  batteries,   the  computer  is showing the 
current   room  temperature in 

°

C°.


5.3.3 Instellen van tijd en datum 
Onder de temperatuur zal de tijd knipperend zichtbaar zijn. Door 
op de SET toets te drukken kunt u nu de tijd instellen. Toets  
MODE om te bevestigen en naar de volgende waarde te gaan om 
in te stellen.  Ga door totdat u alle waarden heeft ingesteld. Als 
alle waarden zijn ingesteld, zal het display automatisch het 
trainingsmenu tonen.  
Als u de batterijen verwijdert, zullen alle waarden gereset 
worden.


5.3.3  Setting of  time and date


The display shows  a  blinking hour  value. Pressing  of the  SET- 
key will  change  the  hour  value. By  pressing  the  MODE-Key,  you 
can  activate  the  next value. Please  continue, until all values are 
set.  After all data  is set,  the  display will  automatically show  the 
exercise  menu.   Removing of the  batteries will  delete  all set 
values.


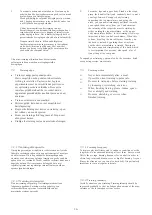
5.3.4 Auto   ON/OFF  Functie: De computer  schakelt 
automatisch aan wanneer de training begint en zal tot 4 
minuten na uw training ingeschakeld blijven. Na deze 4 
minuten zal de computer automatisch uitschakelen. 


5.3.4 Auto   ON/OFF function:


Computer  will  be  activated  automatically when exercise  is 
started and  4  minutes  after  you finish your exercise,  it will  be 
deactivated  automatically.


12


Summary of Contents for FINUM

Page 1: ......

Page 2: ...3 5 3 4 5 4 5 5 5 6 5 7 Computer keys Display Computer functions Insert the batteries Room temperature Setting of time and date Auto ON OFF function Training without set values Training with set value...

Page 3: ...hiervoor bedoeld zijn en niet op andere onderdelen van de apparatuur 13 Draag niet te wijd zittende kleding maar geschikte trainingskleding zoals bijvoorbeeld een trainingspak 14 Draag altijd schoenen...

Page 4: ...reparaties garantie aangelegenheden De apparatuur mag niet bij het gewone huisvuil geplaatst worden maar dient aangeboden te worden als grofvuil of bij groot afval instanties Please be sure to keep th...

Page 5: ...nde ruimte overblijft voor beweging tijdens het trainen ten minste 1 5m vrije ruimte overhouden rondom het apparaat Make certain that you have adequate room for movement at least 1 5 m on all sides du...

Page 6: ...Stap Step 2 05...

Page 7: ...Stap Step 3 06...

Page 8: ...Stap Step 4 07...

Page 9: ...Stap Step 5 08...

Page 10: ...Stap Step 6 09...

Page 11: ...Stap Step 7 10...

Page 12: ...en cleaning use only a moist cloth and avoid harsh cleaning agents Ensure that no moisture penetrates into the computer Components handlebar saddle that come into contact with perspiration need cleani...

Page 13: ...lag voor een training kunt u instellen met de SET toets 5 3 Computerfuncties 5 3 Computer functions 5 3 1 Plaatsing van de batterijen Plaats 2 AA batterijen in het batterijvakje aan de achterzijde van...

Page 14: ...r If you lift off one hand off the sensor during measuring it will take some time to reach the correct watt value Both hands have to be kept on the hand pulse sensors 5 7 Meting herstelhartslag Wannee...

Page 15: ...ing Note To activate the recovery function you must exercise for at least 30 seconds In order to receive a meaningful fitness score however you must exercise for at least 15 minutes That time period i...

Page 16: ...the arms in order to feel the complete course of the motion Do not lean on the arm rails and do not push with the feet The latter movement increases the horizontal force effect on the knees which res...

Page 17: ...rstellen Varieer in het begin en experimenteer met de verschillende posities om uw optimale positie te ontdekken Deze extra instel mogelijkheid heeft het voordeel dat de apparatuur gemakkelijker aan k...

Page 18: ...eft met hartslag trainingen kunt u uw gewenste hartslagzone of trainings fitnessprogramma aanpassen naar uw eigen waarden Note Because there are persons who have high and low pulses the individual opt...

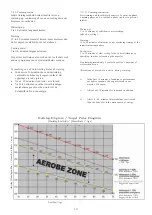
Page 19: ...minus leeftijd individuele maximale hartslag 100 Trainingshartslag Ondergrens 220 leeftijd x 0 70 Bovengrens 220 leeftijd x 0 85 Measure your pulse rate at the following points in time 1 Before traini...

Page 20: ...hould ideally consist of a warm up phase a training phase and a cool down phase in order to prevent injuries Warm up 5 to 10 minutes of calisthenics or stretching also slow cycling Training 15 to 40 m...

Page 21: ...8 Onderdelentekening 1 Explosiondrawing 1 20...

Page 22: ...Onderdelentekening 2 Explosiondrawing 2 21...

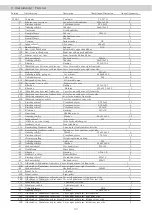
Page 23: ...T4 0x25 1 28 Kruiskopschroef Crosshead screw M5x10 4 29 Klembus Bushing 032x76 2 30 Stuurstang Handlebar post 1 31 Onderlegschijfje Washer 08x016x1 5 14 32 Greep schroef Grip screw M8 4 33 Afdekhoes s...

Page 24: ...crew ST4 2x16 4 87 Hartslagkabel Handpulse cable 1 88 Sensorkabel boven Upper sensor cable 1 89 Sensorkabel onder Lower sensor cable 1 90 Onderlegschijfje gebogen Arc washer 05 1 91 Afdekstuk weerstan...

Page 25: ...ochten optreden lees dan a u b eerst de gebruiksaanwijzing Vaak vindt u daar al een oplossing Als u verdergaande problemen wilt oplossen neem dan contact op met uw dealer vakhandel Om ons de kans te g...

Page 26: ...staties in geval van twijfel op de plaats van vestiging van uw dealer Het geven van garantie is beperkt tot het desbetreffende land waar u uw trainingstoestel heeft aangeschaft Aanspraak op garantie e...

Reviews: