background image

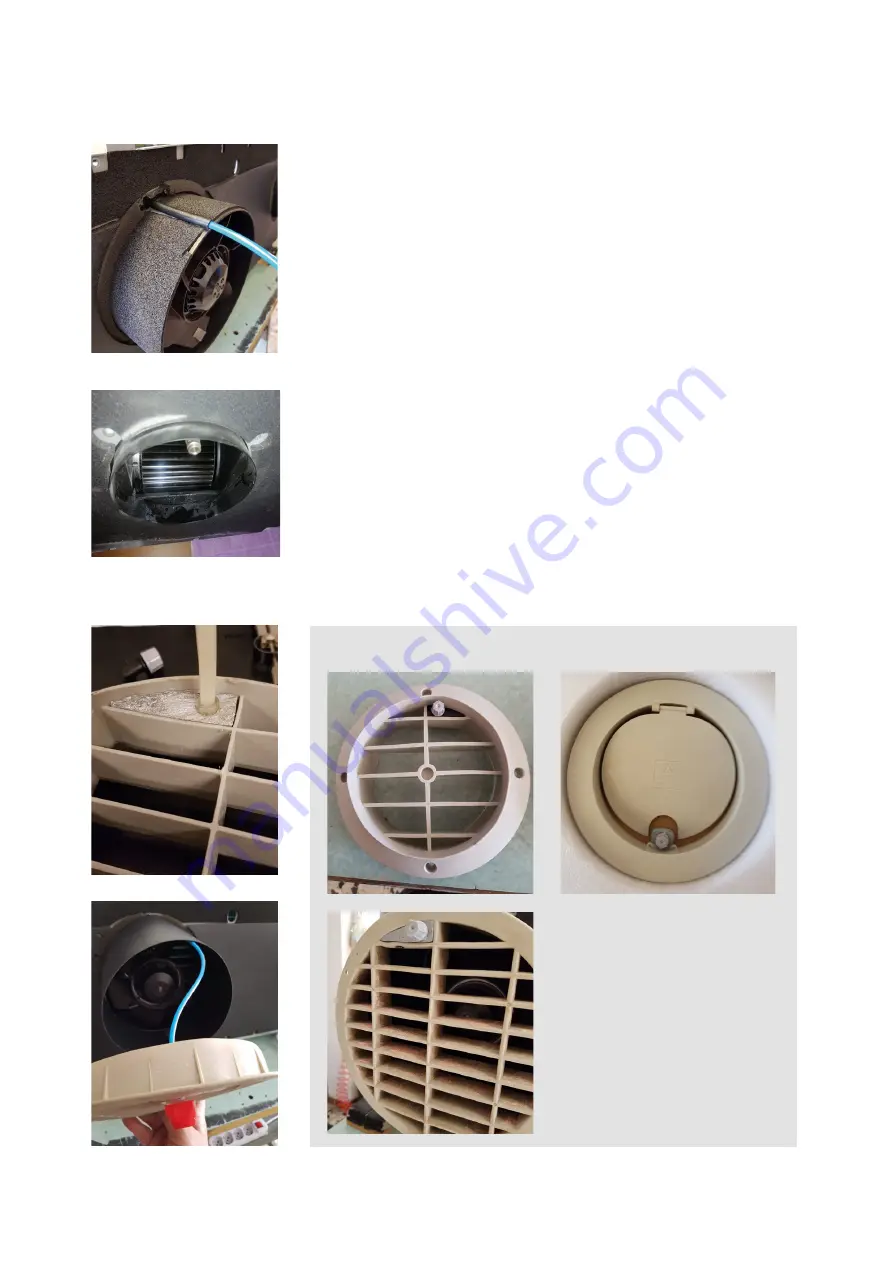
To connect the electronic condensate disposal system already mounted 
on the machine, i

t is not necessary to drill any other additional holes on 

the wall or on the installation surface of the air conditioner.

After drilling the holes on the wall for the inlet and expulsion of air
from the side of the supply fan, you will find the delivery nozzle as
shown in FIG.1

Then connect the Rilhsen tube supplied and check that it adheres per-
fectly without the possibility that it can be removed, alternatively, use 
special adhesives to ensure a perfect seal on the nozzle.

Connect the other end of the pipe to the expulsion grid as shown in the 
figure, after measuring it for the length of the hole drilled by adding 
+ 7cm for assembly flexibility. (FIG.2 / FIG.3) Secure the grid and posi-
tion the air conditioning unit in the following,leaving you some space 
to operate. NOTE: it can make a few drops ,of bigger water during the 
shutdown phase. Maintain at least every ,6 months

N.B.  THE  NO-CONDENSATE  DRAIN 
KIT SYSTEM COULD INCREASE THE 
ENVIRONEMENT  NOISE.  DURING 
THE  AIR  COND  SHUTDOWN,  SY-
STEM  WILL  DISCHARGE  ALL  RE-
MAING CONDENSATE IN THE TANK. 
THEREFORE  ENVIRONEMENT  NOI-
SE FOR A FEW SECONDS COULD BE 
USUAL FOR A WHILE

N:  B:  it  can  make  a  few  drops  of  larger  water  during  shutdown. 
Maintain at least every 6 months.

ELECTRONIC SYSTEM CONNECTION 
NO CONDENSATE DRAIN

SYDNEY / KYOTO 

OSLO 4.0/4.2
PANAMA
METROPOLIS 10/12 HP 

FIG.1

FIG.2

FIG.3

The final result will be the following according to the type of grid adopted:

46  KYOTO

Summary of Contents for KYOTO

Page 1: ...MADE IN ITALY MANUALE D USO E D INSTALLAZIONE KYOTO MANUALE D USO E D INSTALLAZIONE KYOTO INSTALLATION AND USER MANUAL KYOTO INSTALLATION AND USER MANUAL KYOTO ITA ENG ITA ENG KYOTO ...

Page 2: ...RE I CARTONI E LE PARTI IN POLISTIROLO PER UN EVENTUALE ASSISTENZA IN GARANZIA L EVENTUALE MANCANZA DELL IMBALLAGGIO ORIGINALE NON RENDERA TRASPORTABILE IL VS CLIMATIZZATORE CHE DOVRA ESSERE RECAPITATO A VS SPESE E A VS RESPONSABILTA PRESSO IL CENTRO ASSISTENZA AUTORIZZATO OPPURE ACQUISTARE UN IMBALLAGGIO INTEGRO PER IL TRASPORTO 2 KYOTO ...

Page 3: ...KYOTO 3 ...

Page 4: ...4 KYOTO ...

Page 5: ...enser outlet fan Condenser inlet fan Drainage pipe Front panel Air inlet area PTC speaker P2 2360 8000 2750 8 9377 1600 5500 904 42 1900 Net weight Kg 790 350 3 9 3 4 48 43 102 19 5 12 5 i KYOTO Fuse T6 3A Electrical heater KYOTO 5 ...

Page 6: ...8 6 KYOTO ...

Page 7: ...KYOTO 7 ...

Page 8: ...8 KYOTO ...

Page 9: ...Power cord KYOTO 9 ...

Page 10: ...P23 Outdoor Indoor Drainage pipe P24 Outdoor Indoor Drainage pipe 10 KYOTO ...

Page 11: ...KYOTO 11 ...

Page 12: ...12 KYOTO ...

Page 13: ...KYOTO 13 ...

Page 14: ...1 14 KYOTO ...

Page 15: ...1 KYOTO 15 ...

Page 16: ...1 16 KYOTO ...

Page 17: ...1 KYOTO 17 ...

Page 18: ...18 KYOTO ...

Page 19: ...visitate www finteksrl com N KYOTO 19 ...

Page 20: ...20 KYOTO ...

Page 21: ...KYOTO 21 ...

Page 22: ... alla griglia di espulsione come in figura dopo averne fatto misura per la lunghezza del foro praticato ag giungendo 7cm per flessibilità di assemblaggio FIG 2 FIG 3 Fissate la griglia e posizionate l unità condizionante nel seguito lascian dovi un po di spazio per poter operare N B IL SISTEMA DI NO SCARICO CONDENSA PUÒ AUMENTARE LA RUMOROSITA DI FONDO DELLA UNITA IN FASE DI SPEGNIMENTO MACCHI NA ...

Page 23: ...KYOTO 23 ...

Page 24: ...AIR SYSTEM OPTIONAL FRONT PANEL FUNCTION 2 4 FASTENING THE BRACKET 2 5 FITTING THE GRATINGS 2 6 FIXING PLASTIC SHEET AND INSULATION 2 7 CONNECTING DRAINAGE PIPE 2 8 FITTING THE AIR CONDITIONER ON BRACKET 7 8 9 10 11 19 3 14 3 15 3 13 FRESH AIR FUNCTION OPTIONAL 24 KYOTO ...

Page 25: ...power source of the same voltage frequency and rating as indicated on the product identification plate 1 1 INTRODUCTION Please note Don t dispose of any packaging until the installation of the air conditioner is completed After having removed the packing check that all the content is intact and complete See list of accessories In the event of missing parts contact your retailer This air conditione...

Page 26: ...hin reach of children since they are hiding of danger This product has been manufactured to comply with 2006 95 EC and with amendments 92 31 EEC and 93 68 EEC DISPOSAL Do not dispose this product as unsorted municipal waste Collection of such waste separately for special treatment is necessary Any batteries used in the remote control contain materials which are hazardous to the environment They mu...

Page 27: ... pipe Front panel Air inlet area PTC speaker P2 The display will show both setting temperature and ambient temperature After adjusting the setting temperature the setting temperature will flash 15 times on the display then the display will show the ambient temperature for 70 seconds After that the display will be off until next adjustment Fuse T6 3A Electrical heater KYOTO 27 ...

Page 28: ...ir leaves slats or panelling drain pipes overflows and gratings etc Any obstruction could interfere with the correct performances of the air conditioner The wall on which the air conditioner is installed must be sturdy and able to withstand the weight fo the air conditioner The air conditioner must be fitted leaving room all around as illustrated in the paper template Fasten the template to the wa...

Page 29: ...t back insulating material in this position to connect the machine without power plug or for MOD BUS connection Optional Tagliare l isolante posteriore della macchina in questa posizione per allacciare la macchina alla rete elettrica senza l utilizzo della spina shuko e per la connessione alla rete MOD BUS optional KYOTO 29 ...

Page 30: ...r hot country and normal cold temperature outside DRAINAGE HOLE P8 WALL BRACKET HOLES P9 P6 7 8 9 Please note If you are drilling the hole above ground floor level please ensure that an area has been secured and while the holes are drilled the outside area is supervised until drilling has been completed INTAKE AND OUTLET HOLES P6 This operation should be carried out using the proper tools diamond ...

Page 31: ... into the holes for the unit and tighten them inside the wall The anchor bolts provided require 10mm holes the wall should be inspected to determine if provided bolts are useful or if it is necessary to use a different anchorage The manufacture is not liable in case of underestimation of the structural consistency of the anchorage made at the time of installation 2 5 Put the silicon gel around of ...

Page 32: ...he sheets must be 107mm shorter than the thickness of the wall See P18 Use an ordinary cutter for the operation See P19 The black silicon gel is just for reference we could use white or transparent color gel to fix the outdoor grille See P17 P15 P16 P18 P19 P17 iCOOL unit Wall thickness T Fan thickness External grating thickness 77mm 30mm 5 0 0 m m 628mm T PLASTIC SHEET WITH INSULATION 2 6 FIXING ...

Page 33: ...chine is installed in normal climate or hot area we can connect the drainage pipe to outside with a proper place See P23 Outdoor Indoor Drainage pipe P24 2 When the machine is installed in very cold area the water in drainage pipe is frozen easily in winter we could connect the drainage pipe inside the wall and connect with a proper place See P24 Outdoor Indoor Drainage pipe Roll the sheet and ins...

Page 34: ...rs See P25 Lift it up by holding the sides at the bottom slightly insert the outside fan rings into the two big holes on the wall See P26 The air conditioner can now be pushed firmly against the wall then lift the unit and make sure the anchors and unit match well See P27 Inspect carefully the installation to make sure that the insulating back panel must fit firmly against the wall and there are n...

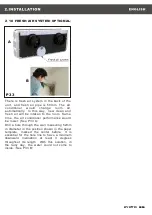
Page 35: ... intaken to the room Same time the air conditioner performance would be lower See P33 A Drill a hole through the wall measuring 52mm in diameter in the position shown in the paper template marked the center before It is essential for the hole line to have a minimum downward inelination at least 3 degrees throughout its length With this solution in the rainy day the water could not come to inside S...

Page 36: ...11 36 KYOTO ...

Page 37: ...3 3 HEATING MODE 3 4 COOLING MODE 12 KYOTO 37 ...

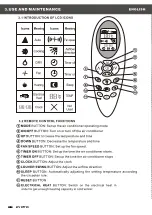
Page 38: ...s middle speed is high speed flashing is auto speed Fan auto fan the speed is choosen by the difference of room temperature and setting temperature Room temperature setting temperature 5 high speed Room temperature setting temperature 3 middle speed Room temperature setting temperature 1 low speed Press the ON OFF button switch off the air conditioner Next time when this button is pressed the air ...

Page 39: ...3 7 SLEEP MODE 3 8 AUTO MODE 14 KYOTO 39 ...

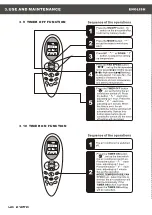
Page 40: ...3 9 TIMER OFF FUNCTION 3 10 TIMER ON FUNCTION 15 40 KYOTO ...

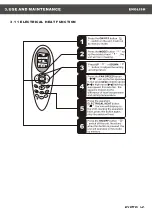
Page 41: ...16 3 11 ELECTRICAL HEAT FUNCTION KYOTO 41 ...

Page 42: ... AAA 2pcs the positive must be same with the mark on the plastic surface Reinstall the cover of battery Inspection If press ON OFF button no icons are displayed please install the battery again Open the cover of battery hold the hook and lightly pull up Open position Close position Clean position Fresh air system Fresh air filter should be cleaned regularly to keep the fresh air flow smooth Take o...

Page 43: ...from the electrical supply Wipe external surfaces clean with a damp cloth only Do not use an abrasive cloth or solvents as this may damage the surfaces Do not use excessively wet cloths or sponges as water stagnation could damage the air conditioner and compromise safety ACTIVE CARBON FILTER OPTIONAL P40 The unit maybe includes active carbon filter which not only has the function of eliminating su...

Page 44: ...g insertion of the batteries inside the remote control Protection of the conditioner Wait for 3 min and the air conditioner will start to work again If the supply cord damaged it must be replaced by manufacturer or its service agent or a similarly qualified person in order to avoid a hazard The remote control does not work The air conditioner does not work for 3 min when switched on The max operat...

Page 45: ...20 KYOTO 45 ...

Page 46: ...easuring it for the length of the hole drilled by adding 7cm for assembly flexibility FIG 2 FIG 3 Secure the grid and posi tion the air conditioning unit in the following leaving you some space to operate NOTE it can make a few drops of bigger water during the shutdown phase Maintain at least every 6 months N B THE NO CONDENSATE DRAIN KIT SYSTEM COULD INCREASE THE ENVIRONEMENT NOISE DURING THE AIR...

Page 47: ...KYOTO 47 ...

Page 48: ... A2 2011 EN55014 2 1997 A1 2001 A2 2008 EN 61000 3 2 2006 A1 2009 A2 2009 EN 61000 3 3 2013 Ultime due cifre dell anno in cui e stata affissa la marcatura CE Last two digits of the year in which the CE marking was affixed letzten zwei Zahlen vom Jahr der Markierung CE derniers deux chiffres de l annee ou a ete place le marquage CE Ultimas dos cifras de ano en el que ha sido registrada la marcacion...

Page 49: ... Metropolis 10 12 Hp Panama Oslo 3 0 4 0 4 2 Santiago Windy 3 4 5 Hp SS ottemperano alle seguenti caratteristiche energetiche Sydney COP 3 11 EER 2 61 classe A A Kyoto COP 3 10 EER 2 67 classe A A Metropolis 10 12 Hp COP 3 11 EER 2 67 classe A A OSLO 3 0 Oslo 4 0 COP 3 11 EER 2 67 classe A A OSLO 4 2 COP 3 63 EER 3 10 classe A A PANAMA COP 3 12 EER 2 67 classe A A SANTIAGO COP 3 80 EER 3 78 classe...

Page 50: ......

Page 51: ...otto acquistato e la data di acquisto e o di consegna Per il difetto di conformità manifestatosi nei primi 6 mesi di data del prodotto Fintek srl si impegna alla riparazione del difetto senza alcuna spesa per il consumatore Dal settimo al ventiquattresimo mese il consumatore dovrà sostenere il costo del diritto fisso di chiamata a domicilio Si prega di conservare l intero imballaggio per inviare i...

Page 52: ...IPARAZIONE LA STESSA POTRÀ AVVENIRE IN LOCO O PRESSO CENTRI ASSISTENZA AUTORIZZATI PER QUESTA EVENIENZA È NECESSARIO L IMBALLO ORIGINALE CONDIZIONE OBBLIGATORIA 2 3 LA GARANZIA È VALIDA SOLO SE L INSTALLAZIONE È AVVENUTA A REGOLA D ARTE AI SENSI DELLA LEGGE 46 DEL 5 3 90 E SEGUENDO SCRUPOLOSAMENTE LE INSDICAZIONI DEL MANUALE DI INSTALLAZIONE A CORREDO DEL PRODOTTO 2 4 GLI INTERVENTI DOVUTI A CATTI...

Page 53: ... DI TARGA ESSI PREVEDONO COMUNQUE LA RIPARAZIONE CON SPESE INTERAMENTE A CARICO DEL CLIENTE 4 1 3 SONO ESCLUSI DALLA GARANZIA I PRODOTTI CHE INVIATI A FINTEK SRL O C A T AUTORIZZATI RISULTASSERO FUNZIONANTI O MANCANTI DEL SIGILLO ANTIMANOMISSIONE IN TAL CASO LE SPESE VERRANNO IMPUTATE AL CLIENTE 4 1 4 LA GARANZIA INOLTRE NON COPRE I DANNI DERIVATI DA MANCATO RISPETTO DELLE ISTRUZIONI RIPORTATE SUL...

Page 54: ...LA COMUNITÀ ECONOMICA EUROPEA 89 392 EEC EN 60204 PR EN 378 HANNO I REQUISITI LISTATI NELL ANNESSO 1 DELLE DIRETTIVE 89 392 EEC INCLUDENTI MODIFICA 91 368 EEC E 93 44 EEC LE MACCHINE SONO MARCHIATE CON IL MARCHIO DI CONFORMITÀ DATA FATTURA ___________________________________________________________ DATA COLLAUDO________________________________________________________________ NUMERO MATRICOLA _____...

Page 55: ......

Page 56: ...WWW FINTEKSRL COM WWW FINTEKSRL COM via Tonso di Gualtiero 46 47896 Faetano RSM Tel 378 0549 901 950 commercialeitalia finteksrl com www finteksrl com ...

Reviews: