background image

2.INSTALLATION

ENGLISH

5

SANTIAGO  31

Summary of Contents for SANTIAGO

Page 1: ...MADE IN ITALY INSTALLAZIONE E MANUALE D USO INSTALLATION AND USER MANUAL Double Duct Air Conditioner ITA ENG ...

Page 2: ...2 SANTIAGO ...

Page 3: ...R32 SANTIAGO 3 ...

Page 4: ... FISSAGGIO 2 TELECOMANDO 3 PORTATELECOMANDO 4 TUBO SCARICO ACQUA 5 GRIGLIE ESTERNE 6 TUBO ESPULSIONE INGRESSO ARIA 7 KIT VITI 8 CORDA FISSAGGIO GRIGLIE ESTERNE 9 MANUALE 10 FOGLIO DIMA DI INSTALLAZIONE See page 11 ANELLO DI CENTRAGGIO TUBO DIAMETRO 160mm 12 ANELLO DI CENTRAGGIO TUBO DIAMETRO 150mm 4 SANTIAGO ...

Page 5: ...zioni temperatura telecomando 18 30 C Fusibile T3 15L 2 250V Refrigerante R410A Potenziale di riscaldamento globale GWP 2088 Dimensioni W HID cm 58 110 24 5 Peso kg 52 I dati riportati in tabella sono soggetti a cambiamenti dovuti a migliorie apportate al prodotto per aumentarne le prestazioni Riscaldatore elettrico PTC CONDIZIONI DI PROVA STANDARD EN 14511 CONDIZIONI DI FUNZIONAMENTO IN RAFFREDDA...

Page 6: ...2 INSTALLAZIONE 5 ITALIANO 2m P3 2m Outdoor Indoor P4 livella 6 SANTIAGO ...

Page 7: ...2 INSTALLAZIONE 6 ITALIANO SANTIAGO 7 ...

Page 8: ...2 INSTALLAZIONE 7 ITALIANO P5 3 INCLINATION P13 A A B B Terminale di gomma Terminale di plastica 8 SANTIAGO ...

Page 9: ...e la linea di giunzione del film con nastro adesivo Inserirlo poi nel foro mantenendo la linea di giunzione sul lato superiore Una volta posizionati i due tubi ultimate il loro fissaggio fissando gli anelli di fissaggio o tramite delle colla siliconica o mediante della viti in corrispondenza degli apositi fori 150mm ring 160mm ring SANTIAGO 9 ...

Page 10: ...2 INSTALLAZIONE 9 ITALIANO P10 P9 P7 P8 10 SANTIAGO ...

Page 11: ...2 INSTALLAZIONE 10 ITALIANO P14 P11 P12 ALZARE QUI ALZARE QUI SANTIAGO 11 ...

Page 12: ...reddamento Deumidificazione Ventilazione Significato Velocita ventilatore Direzione aria Timer off Timer on Notturno Non in uso 3 USO E MANUTENZIONE 11 Significato 3 2 FUNZIONI DEL TELECOMANDO ITALIANO 12 Resistenza Elettrica di post riscaldamento 12 SANTIAGO ...

Page 13: ...3 3 MODO RISCALDAMENTO 3 4 MODO RAFFREDDAMENTO 12 3 USO E MANUTENZIONE ITALIANO SANTIAGO 13 ...

Page 14: ...3 5 MODO DEUMIDIFICAZIONE 3 6 MODO VENTILAZIONE 13 3 USO E MANUTENZIONE ITALIANO 14 SANTIAGO ...

Page 15: ...3 7 MODO NOTTURNO 3 8 MODO AUTOMATICO 14 3 USO E MANUTENZIONE ITALIANO SANTIAGO 15 ...

Page 16: ... IL TIMER 3 10 ACCENSIONE CON IL TIMER 15 3 USO E MANUTENZIONE Sequenza delle operazioni Fare riferimento al punto 3 1 e 3 2 Sequenza delle operazioni Fare riferimento al punto 3 1 e 3 2 1 2 3 4 5 2 1 ITALIANO 16 SANTIAGO ...

Page 17: ...16 3 USO E MANUTENZIONE ITALIANO Riscaldamento SANTIAGO 17 ...

Page 18: ...17 3 USO E MANUTENZIONE ITALIANO 18 SANTIAGO ...

Page 19: ...all interno della stanza si cambierà automaticamente allo stesso tempo anche le performance dell unità saranno minori pertanto valutate correttamente se praticarlo o meno Il filtri deve essere regolarmente pulito per mantenerlo efficace Sfilatelo come dalla fiugra secondo la freccia lavatelo con acqua tiepida senza saponi o detergenti Solo quando è perfettamente asciutto riponetelo nel suo alloggi...

Page 20: ...visitate www finteksrl com N FILTRO ELETTROSTATICO PASSIVO ANTIBATTERICO P16 P17 P18 P19 P15 LIFT IT UP HERE LIFT IT UP HERE 17 3 USO E MANUTENZIONE ITALIANO 20 SANTIAGO ...

Page 21: ...lati dal telecomando Come indicato della freccia la griglia di ingresso puo essere stati rimossia e i filtri rimossi per la manutenzione Per la pulizia dei filtri consultare il punto 3 14 MANUTENZIONE PULIZIA DEI FILTRI ATTENZIONE Non coprire il riscaldatore elettrico durante il lavoro La distanza tra il riscaldatore elettrico e mobili di legno o altri mobili infiammabili deve essere superiore a 1...

Page 22: ... ITALIANO 3 16 SOLUZIONE PROBLEMI La temperatura massima di esercizio per l aria condizionatore max raffreddamento esterno DB43 C WB26 C interno DB32 C WB23 C riscaldamento min esterno DB 5 C WB 6 C interno DB20 C 22 SANTIAGO ...

Page 23: ...che aderisca perfettamente senza possibilità che esso si possa sfilare in alternativa provvedere con appositi collanti alla perfetta tenuta sull u gello Collegare l altra estremità del tubo alla griglia di espulsione come in figura dopo averne fatto misura per la lunghezza del foro praticato aggiungendo 7cm per flessibilità di assemblaggio FIG 2 FIG 3 Fissate la griglia e posizionate l unità condi...

Page 24: ... I CARTONI E LE PARTI IN POLISTIROLO PER UN EVENTUALE ASSISTENZA IN GARANZIA L EVENTUALE MANCANZA DELL IMBALLAGGIO ORIGINALE NON RENDERA TRASPORTABILE IL VS CLIMATIZZATORE CHE DOVRA ESSERE RECAPITATO A VS SPESE E A VS RESPONSABILTA PRESSO IL CENTRO ASSISTENZA AUTORIZZATO OPPURE ACQUISTARE UN IMBALLAGGIO INTEGRO PER IL TRASPORTO 24 SANTIAGO ...
Page 25: ...otare i dati qui sotto in caso di guasto prima di contattare il servizio assistenza Per inviare Air Med Pro presso l assistenza si prega di conservare integro l imballaggio Senza lo stesso il prodotto viaggia a rischio e pericolo del cliente Contatto telefonico del Servizio Assistenza 0549901950 r a Contatto via mail assistenza finteksrl com 18 La società Fintek S r l con sede in Via Tonso di Gual...

Page 26: ...BRACKET 7 2 5 INSTALLATION OF THE PIPES 7 2 6 FITTING THE GRATINGS 8 2 7 FITTING THE AIR CONDITIONER ON BRACKET 3 1 INTRODUCTION OF LCD ICONS 10 3 2 REMOTE CONTROL FUNCTIONS 10 3 3 HEATING MODE 11 3 4 COOLING MODE 11 3 5 DRY MODE 12 3 6 FAN MODE 12 3 7 SLEEP MODE 13 3 8 AUTO MODE 13 3 9 TIMER OFF FUNCTION 14 3 11 ELECTRICAL HEAT FUNCTION 15 3 12 ON BOARD CONTROL FUNCTION 16 3 13 FRESH AIR SYSTEM 1...

Page 27: ...eturn the air conditioner to an authorised service center for examination and repair to avoid a hazard Do not attempt to repair or adjust any electri cal or mechanical functions on this air condi tioner as this may void warranty contact your service engineer Always operate the product from a power source of the same voltage frequency and rating as indicated on the product identifica tion plate Thi...

Page 28: ...onditioner has been located in the point of installation Carefully remove the adhesive strips posi tioned on the air conditioner Packaging components must be disposed cor rectly and not left within reach of children since they are a potential source of danger 1 5 LIST OF ACCESSORIES P0 1 FASTENING BRACKET 2 REMOTE CONTROL 3 REMOTE CONTROL HOLDER 4 DRAINAGE PIPE 5 EXTERNAL GRATING 6 PLASTIC SHEET A...

Page 29: ...ATING CONDITIONS IN HEATING MODE 0 Inside 27 C DB 19 0 C WB 0 Outside 35 C DB 240 C WB 0 Outside 7 C DB 60 C WB 0 Inside 20 C DB GREEN LED YELLOW LED BLUE LED RED LED 3 Remote control box Filter grating On board control PTC electric heater Power cord Air directional flap DISPLAY RED LED power supply is connnected GREEN LED compressor is on YELLOW LED timer is on BLUE LED night mode is on The displ...

Page 30: ...rilled in the chosen area without interfering with other structures or installations beams piers pipes wires etc Please also ensure that there are no obstacles on the outside of the wall which may obstruct air circulation through the drilled holes for example plants and their leaves slats or paneling drain pipes overflows and gratings etc Any obstruction could interfere with the correct performanc...

Page 31: ...2 INSTALLATION ENGLISH 5 SANTIAGO 31 ...

Page 32: ...er would be 52mm It is optional for the customer P5 P13 DRAINAGE HOLE P13 This air conditioner has a double system to drain the condensate moisture automatically Before install the Air Conditioner choose which is the suitable system for your installation Please read carefully the follow instructions System A drill a hole through the wall measur ing 30mm in diameter in the position shown in the pap...

Page 33: ...f the wall is not sturdy enough it is advisable to use extra anchor bolts using the holes showed in grey on the paper template The anchor bolts provided require a 8mm holes the wall should be inspected to determine if provided bolts are useful or if it is necessary to use a different anchorage The manufacturer is not liable in case of underestimation of the structural consistency of the anchorage ...

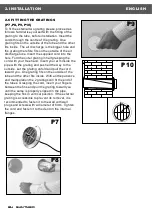
Page 34: ...de the pipe with the grating and push all the way to the outside Let the grating unfold and pull the cord toward you One grating fits on the outside of the tube and the other fits inside With a little patience and mainpulation the 2 gratings will fit the end of the tubes Grasping the cord insert your fingers between the fins and pull the grating toward you until the same is properly slipped in the...

Page 35: ...an now be pushed firmly against the wall Inspect carefully the installation to make sure that the insulating back panel must fit firmly against the wall and there are no fissures at the back of the air conditioner and that the two plastic semicircle on the back side of the air conditioner are placed inside of the two plastic hoses fixed inside the wall LIFT IT UP HERE LIFT IT UP HERE P14 Water Wat...

Page 36: ...TTON Set up the time the air conditioner starts TIME OFF BUTTON Set up the time the air conditioner stops CLOCK BUTTON Adjust the clock LOUVER SWING BUTTON Adjust the airflow direction SLEEP BUTTON Automatically adjusting the setting temperature according the circadian rule RESET BUTTON 12 12 ELECTRICAL HEAT BUTTON Switch on the electrical heat in order to get enough heating capacity in cold winte...

Page 37: ...tch on the air conditioner Next time when this button is pressed the air conditioner will operates in this mode by memory Press the ON OFF button switch on the air conditioner it will run by memory mode Press the MODE button set up the mode to cool the air conditioner will run in cooling Press UP or DOWN button to adjust the setting up temperature Press the FAN SPEED button set up the fan speed is...

Page 38: ...on switch on the air conditioner it will run by memory mode Press the MODE button setup the mode to fan the air conditioner will run in fan Press UP or DOWN adjust the setting up temperature button to Press the ON OFF button switch off the air conditioner Next time when this button is pressed the air conditioner will operates in this mode by memory Press the FAN SPEED button set up the fan speed i...

Page 39: ...set up the mode to auto the air conditioner will run in auto mode Reference to emergency operation According to the difference of room temperature and setting temperature automatically choose the running mode cool heat fan The temperature setting button UP and DOWN are disable 0 When room temperature 20 C run with heat mode 0 0 When 20 C room temperature 25 C run with fan mode 0 When room temperat...

Page 40: ...OFF button set up the time air conditioner switch off Press the button each time adjusting up 1 hour Press the button each time adjusting up 1 minute When the time is over the air conditioner will be switched off automatically If press this button again before the air conditioner switch off the timer off setting will cancelled The air conditioner is switched off Press the TIME ON button set up the...

Page 41: ...st the setting up temperature Sequence of the operations Press the ON OFF button switch on the air conditioner it will run by memory mode Press the MODE button set up the mode to heat the unit will run in heating Press the assistant ELECTRICAL HEAT button the icon will display on the LCD starting the assistant heat press this button again stop the assistant heat Press the ON OFF button switch off ...

Page 42: ...eed working state MIDDLE SPEED LED Signal the middle speed working state LOW SPEED LED Signal the low speed working state AUTO FAN LED Signal the automatic fan state If you select the AUTO speed the fan speed is according with the room temperature and setting temperature 0 Room temperature setting temperature 5 C high speed 0 Room temperature setting temperature 3 C middle speed 0 Room temperature...

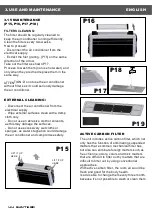
Page 43: ...Fresh air system Fresh air pipe 50 There is fresh air system in the back of the unit On the wall the fresh air pipe would be 50mm accordingly The air conditioner will change the room air automatically in this way new clean and fresh air will intake to the room Same time the air conditioner performance would be lower The filer should be cleaned regularly to keep the fresh air flow smoothly Take out...

Page 44: ...sconnect the air conditioner from the electrical supply Wipe external surfaces clean with a damp cloth only Do not use an abrasive cloth or solvents as this may damage the surfaces Do not use excessively wet cloths or sponges as water stagnation could damage the air conditioner and compromise safety ACTIVE CARBON FILTER The unit includes active carbon filter which not only has the function of elim...

Page 45: ...oo high Wait until the temperature goes down 5 The temperature is not properly set Check it 6 The grids could be obstructed Check and remove the eventual obstacles Dampness in the room coming from walls carpets furnishing or similar Wrong installation of the air conditioner Wrong connection of the drainage pipe Exhausted batteries Wrong insertion of the batteries inside the remote control Protecti...

Page 46: ...er dafür staatlich vorgese hene Stellen entsorgt werden 3 Eine ordnungsgemäße Entsor gung des Altgeräts trägt dazu bei Schäden an der Umwelt und der menschlichen Gesundheit zu ver meiden 4 Weitere informationen zur Ent sorgung des Altgeräts erhalten Sie bei der Stadtverwaltung beim Entsorgungsamt oder in dem Ge schäft in dem Sie das Produkt er worben haben 1 When this crossed out bin sym bol appea...

Page 47: ...SANTIAGO 1 years are guaranteed from the date of purchase if aimed at professional use 24 months if in the private sphere It is recommended to write down the data below in case of failure before contacting the after sales service To send Clean Air Plus to service please keep the packaging intact Without the same the product travels at the customer s risk Telephone contact of the Assistance Service...

Page 48: ...M via Tonso di Gualtiero 46 47896 Faetano RSM Tel 378 0549 901 950 commercialeitalia finteksrl com www finteksrl com Don t miss the video presentations of our air conditioning units and much more on our YouTube channel ...

Reviews: