Warning!
This appliance is designed to be operated by adults.
Children should not be allowed to tamper with the controls
or play with the appliance .
The hood cannot be connected to flues of other appliances
that run on energy sources other than electricity.
When the hood is used at the same time of other appliances
that run on energy sources other than electricity, provision
must be made for an adequate supply of air.
No food must be cooked flambe underneath the hood.
The use of an unprotected flame is dangerous for the filters
and could cause fires. Therefore, never use an open flame
under the hood. When frying foods, never leave the pan
alone because the cooking oil could flare up.
Please, keep to the provisions of official directives
regarding the question of fume discharge.
The manufacturers refuse to accept any responsibility for
damage to the hood or its catching on fire because of failure
to observe the above instructions.
Maintenance
Before performing any maintenance operation, isolate the
hood from the electrical supply by switching off at the
connector and removing the connector fuse.
Or if the appliance has been connected through a plug and
socket, then the plug must be removed from the socket.
Metal grease filter
The grease filter serves to trap particles of grease through
suspension.
The metal grease filter lasts forever and must be washed
either by hand or in the dishwasher (65°C) with suitable
detergents.
When washed in a dish washer, the grease filter may
discolor slightly, but this does not affect its filtering
capacity.
The metal grease filters must be washed at least once a
month and anyhow whenever the LED 4 indicates the
saturation of the filter (see previous page).
This LED flashes to warn you that the metal grease filters
must be cleaned.
Generally, these must be cleaned after 40 hours of use.
Once the grease filters have been cleaned, press button
1 for about3 seconds until you hear the acoustic signal
(beep): the LED 4 will now stop flashing.
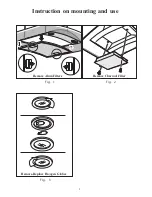
To remove the metal grease filter - Fig. 1:
1. Disconnect the hood from the electricity.
2. a - push toward the centre
b - pull the filters downwards.
Let the filter dry without damaging it before putting it back
into place.
Carry out the above steps in reverse order to put the filters
back after having washed them.
Carbon filter
This filter dissolves cooking odors.
The carbon filter must never be washed.
The carbon filter should be replaced every 4 months under
normal use and anyhow whenever LED 5 indicates the
saturation of the filter (see previous page).
This LED flashes to warn you that the carbon filter must
be replaced.
This must be done after approximately 160 hours of use.
Once you have replaced the carbon filter, press button 1
for about 3 seconds until you hear the acoustic signal
(beep). The LED 5 will now stop flashing.
To fit the carbon filter - Fig. 2:
1. Disconnect the hood from the electricity.
2. Remove the metal filters.
3. Fit the carbon filter and fix it to the body of the hood with
two supplied screws
4. Put the metal filter back into place.
To replace the carbon filter - Fig. 2:
1. Disconnect the hood from the electricity.
2. Remove the metal filters.
3. Remove the old carbon filter and replace it.
4. Put the metal filter back into place.
Cleaning
To clean the outside and inside of the hood use a cloth
moistened with denatured alcohol or neutral liquid
detergents.
Never use products containing abrasive.
Wipe brushed stainless steel in the same direction as the
brushing to avoid scratching.
Clean the external and internal surface of the cooker hood
almost once every 10 days.
Attention
Failure to observe the rules for cleaning the appliance and
changing and cleaning the filters may cause fires.
Therefore, we recommend observing these instructions.
Replacing the lamp
a) Disconnect the hood from the electricity.
b) Unscrew the light shield (Fig. 3).
c) Replace the damaged lamp with a new halogen lamp
of 20Watt max.
d) Refit the the light shield.
e) Before calling for repair service because the hood fails
to light up, make sure the bulbs are screwed in tightly.
5


